Chatbot: the steps in a flow
The catalogue of canvas steps, one by one
This article is the catalogue of the steps you can put in the flow of a chatbot. If you do not know the module, the canvas or how an agent is published yet, start with the Chatbot article and come back here when you need to know what a particular step does.
The steps are grouped the same way they are in the canvas menu, so you can read the article straight through or jump to the group you need.
How a step is added
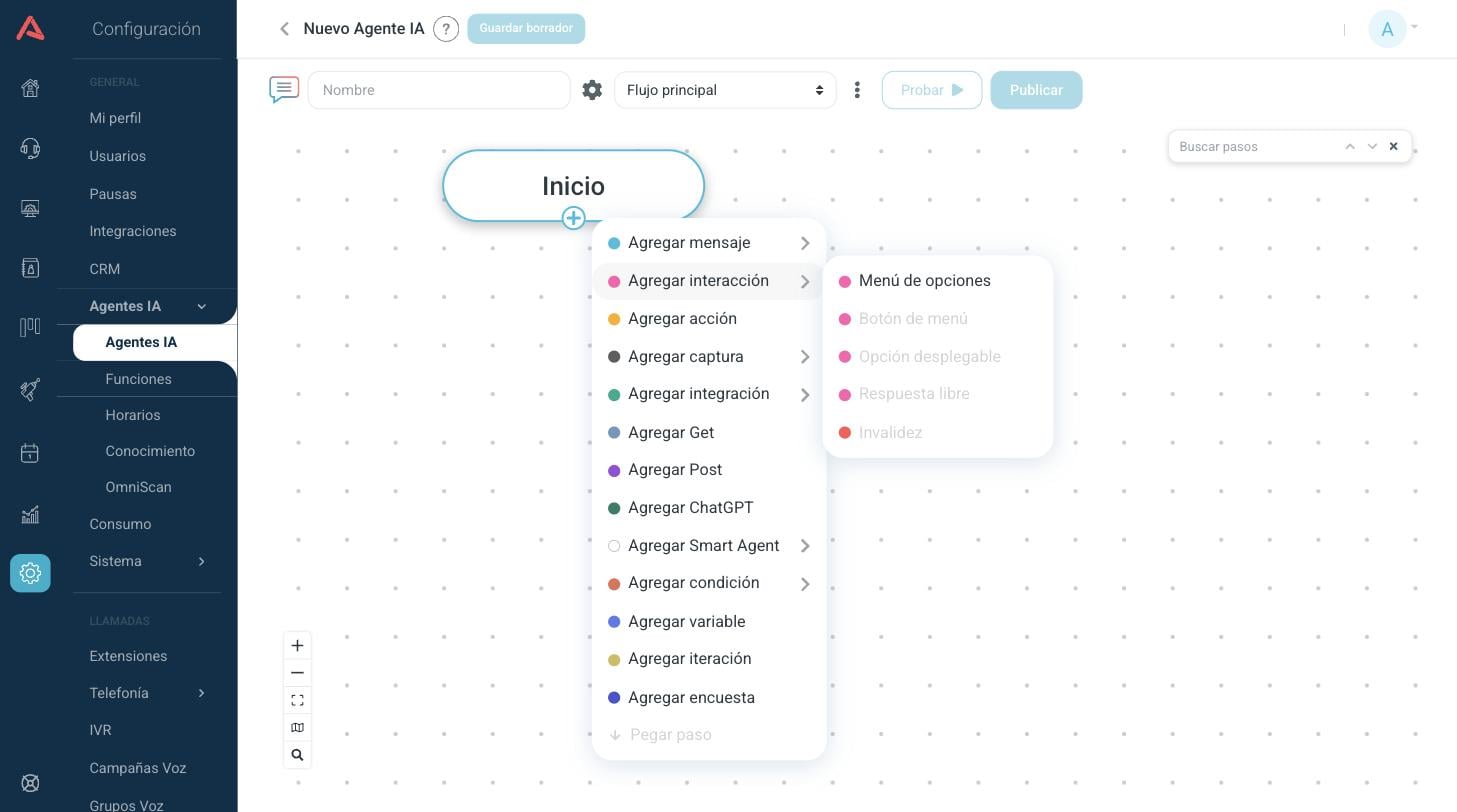
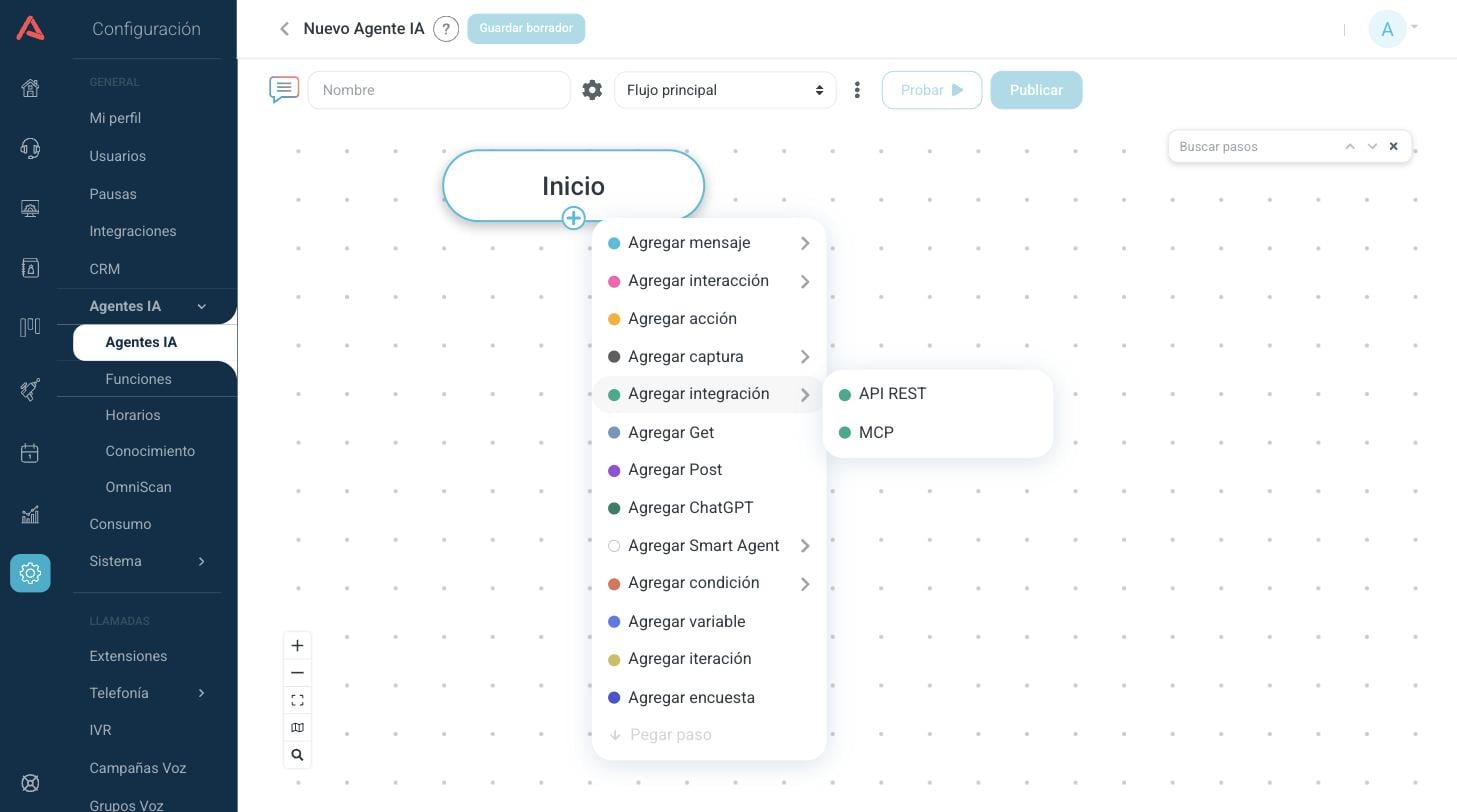
Every step on the canvas has a round connector on its bottom edge. Hover over it and a (+) button appears; click it and the step menu opens.
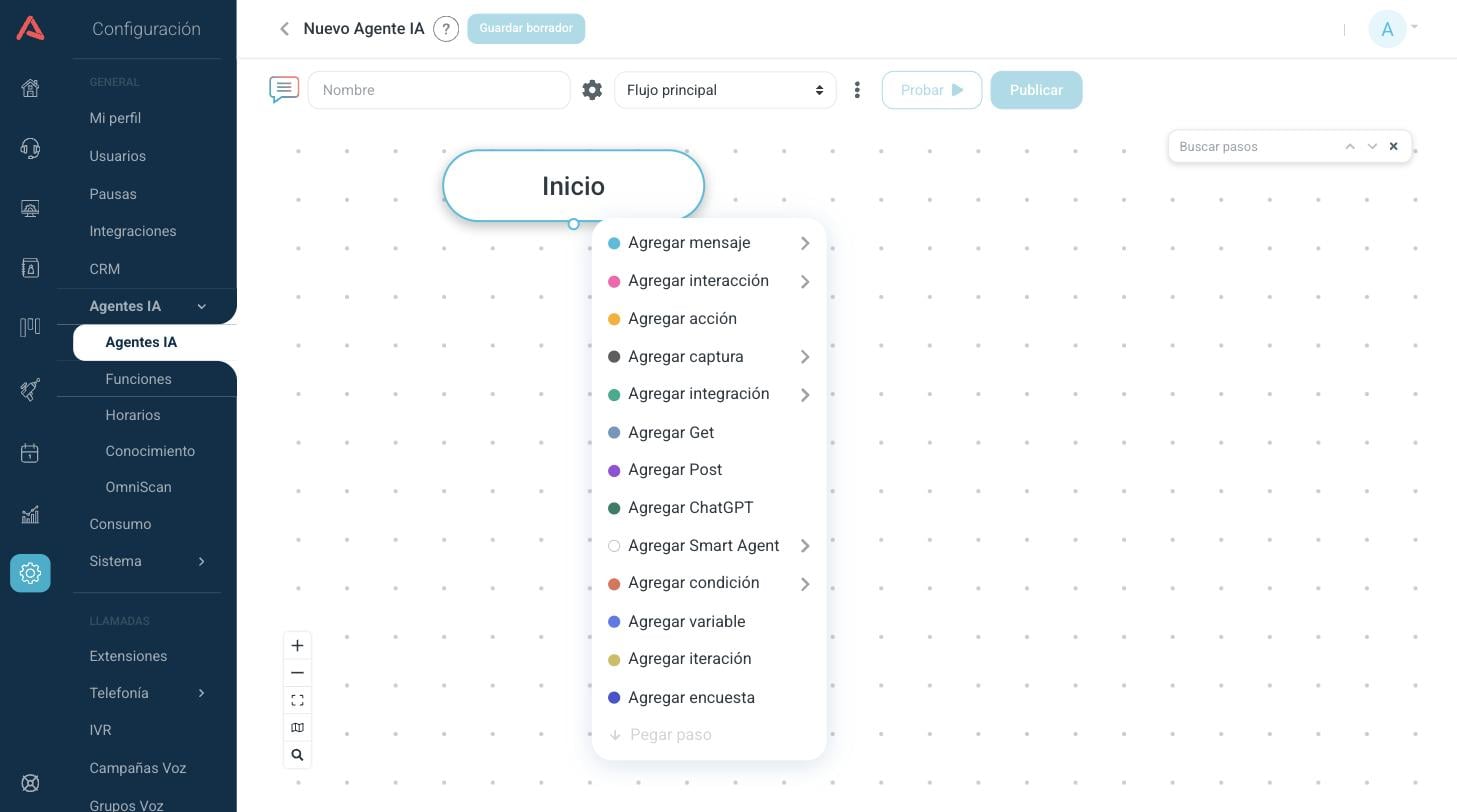
The entries with an arrow on the right open a submenu when you hover over them; the rest create the step straight away. The coloured circle to the left of each entry is the same colour the step's header will have on the canvas, so in time you come to recognise a flow at a glance.
Picking a type opens its settings window. Fill it in and click Save: the step is drawn underneath the step you added it from. If you close the window without saving, the step is not created.
The menu does not always offer the same options. What you can add depends on the type of agent (chatbot, voicebot or automation), on the flow you are in and, above all, on the step you are hanging the new one off. The options that do not apply come out greyed. The section Which step can go under which explains the rules.
What every step shares
Title
Every step has a Title field. It is the name you see on the canvas, the one that appears in the "go to step" selectors of the other steps and the one Search steps looks for. It comes with an automatic name (Message 1, Menu 2) and it is worth changing it for something that reads clearly: Greeting, Ask for the order number, Pass to an adviser.
Two steps in the same flow cannot have the same name. If you repeat a title, saving brings up There is already a step with that title.
The message fields
The fields where you write what the bot says carry three icons on the right: </> opens the large editor for long texts, the smiley inserts an emoji and the bin clears the contents of the field.
In any of those fields you can insert a variable by writing it in double braces, for instance {{NAME}}. When the text reaches the customer, the variable is replaced by its value. The full list of available variables is under Variable list, in the flow's more options menu (⋮).
Copying, pasting and deleting
Hovering over a step brings up three icons to its right:
- Delete (the bin).
- Copy: copies that step alone, without what hangs off it.
- Copy all: copies that step with all of its descendants.
Once you have copied, the Paste step option in the step menu turns on wherever the copied step fits. The pasted step arrives with the same contents and a new title, so as not to clash with the original.
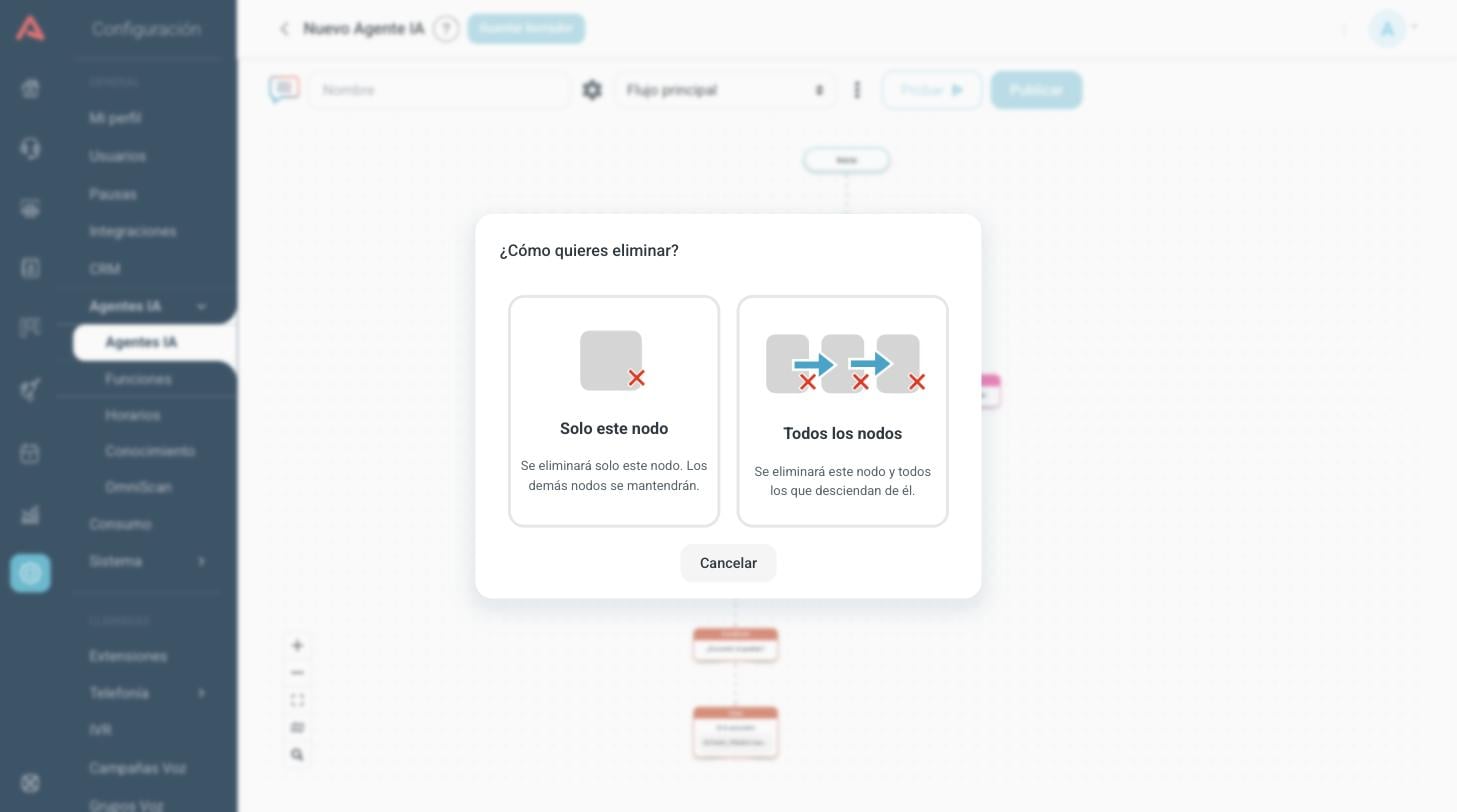
If the step has nothing hanging off it, it is deleted straight away. If it has descendants, this window appears with two options: Only this node leaves the steps below it where they are, and All nodes deletes the step and everything descending from it.
On some steps Only this node comes out disabled and the only option is to delete the lot. It happens with Menu, Button, List option, Open response, Invalid, Smart Agent, Condition, Case and Default: they are steps whose children make no sense without them, so they go together.
Messages
The message steps are the ones that talk. The bot sends whatever you write and moves straight on to the next step, without waiting for an answer.
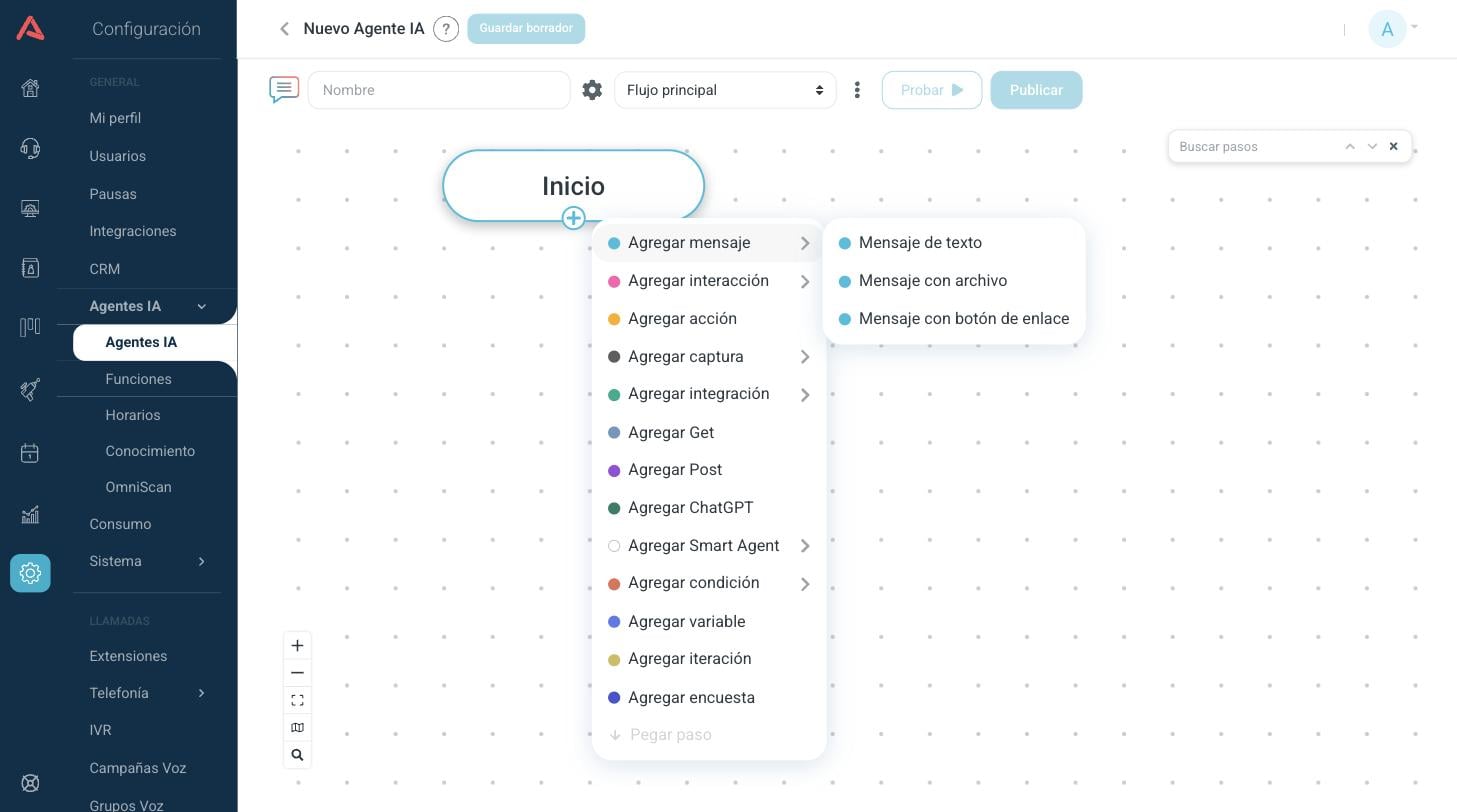
Text message
The most used step: a text the bot sends.
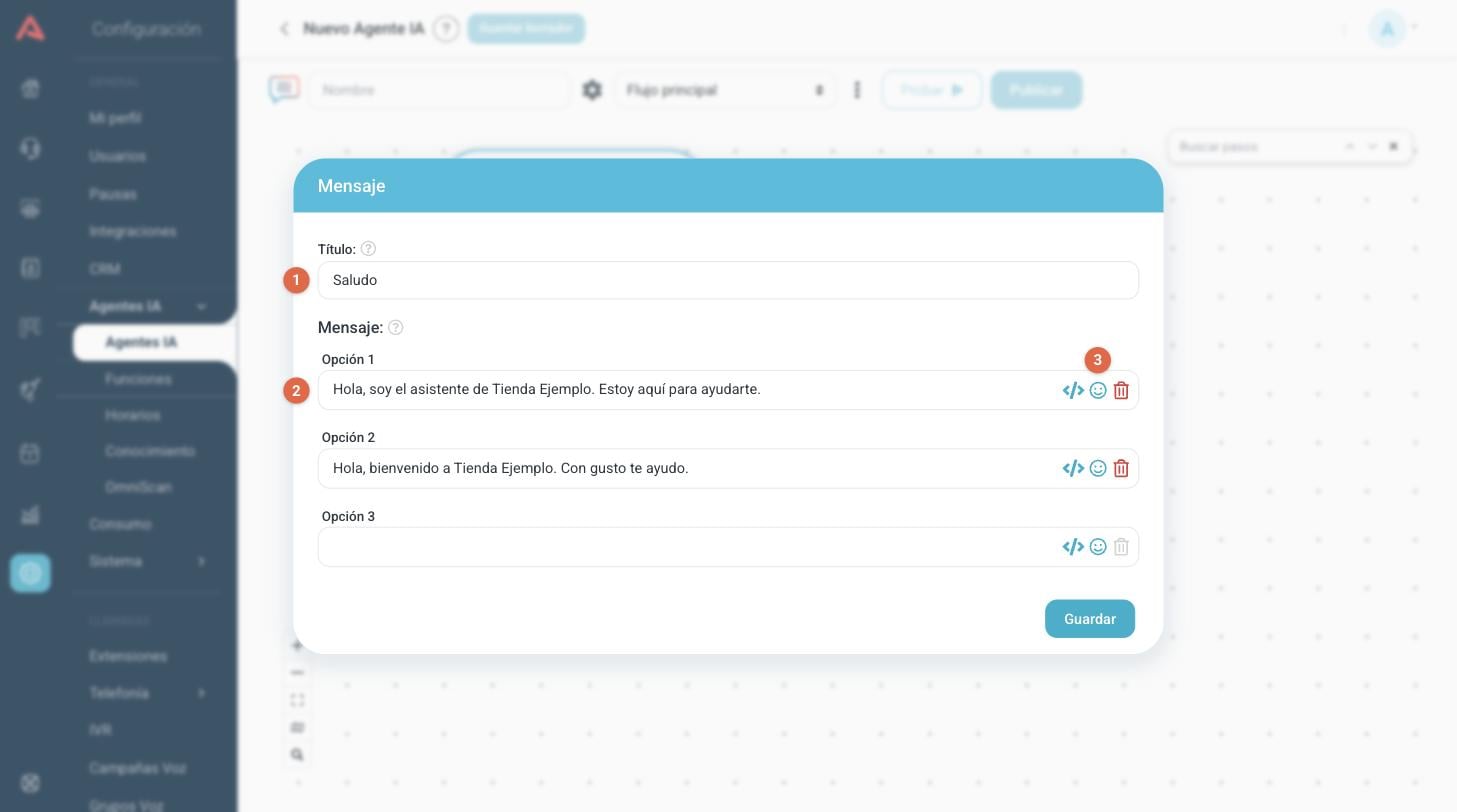
- 1 Title
- The name of the step on the canvas.
- 2 Message (Option 1, 2 and 3)
- You can write up to three versions of the same message. When the bot answers, it picks one at random, which helps keep the answers from sounding repetitive. Filling in Option 1 is enough.
- 3 Field tools
- Large editor, emojis and clear, available on each of the three options.
File message
Sends a file to the customer: an image, a PDF, an audio file or a video. On the canvas it is called File message.
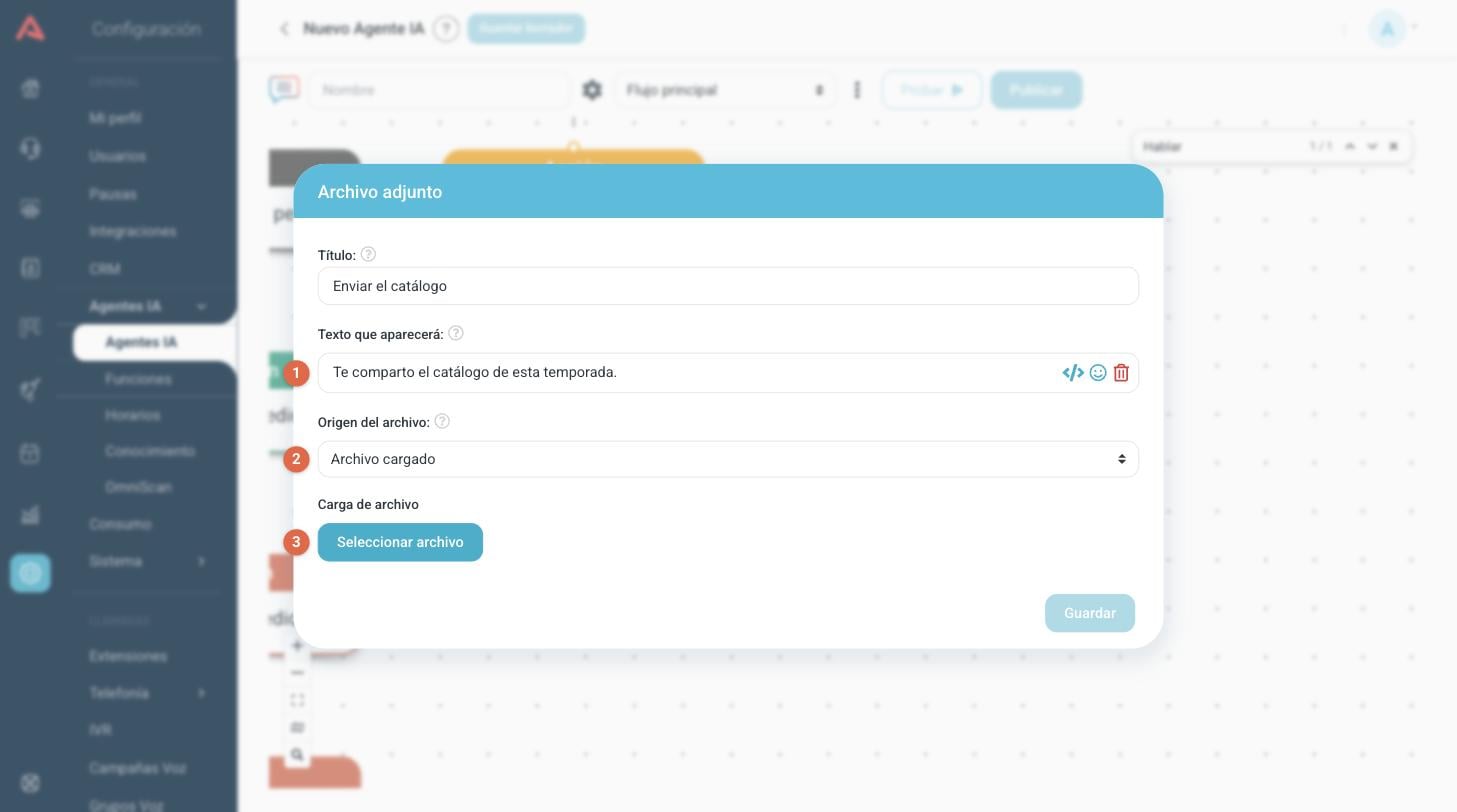
- 1 Text to display
- The message that goes with the file. It is optional.
- 2 File source
- Uploaded file always sends the same file, the one you upload here. File variable sends whatever file a variable is carrying, worked out at the moment the step runs.
- 3 File upload
- With Uploaded file, upload the file here. Afterwards you can look at it with Preview or replace it with Change file.
If you pick File variable, the form changes: it asks you which variable to send and for a Message when there is no file, which is sent if that variable comes in empty. Leave it blank to send nothing in that case. File variables are not typed by hand: they are produced by an earlier step, for instance a Get bringing in a file field from the CRM.
When the file is a video, the Auto play switch also appears, which plays it without sound as soon as it is shown. It only applies to the WebChat channel.
Link message
Sends a text with a button that opens a web page. It is there for taking the customer to a form, to a payment gateway or to the tracking of their order.
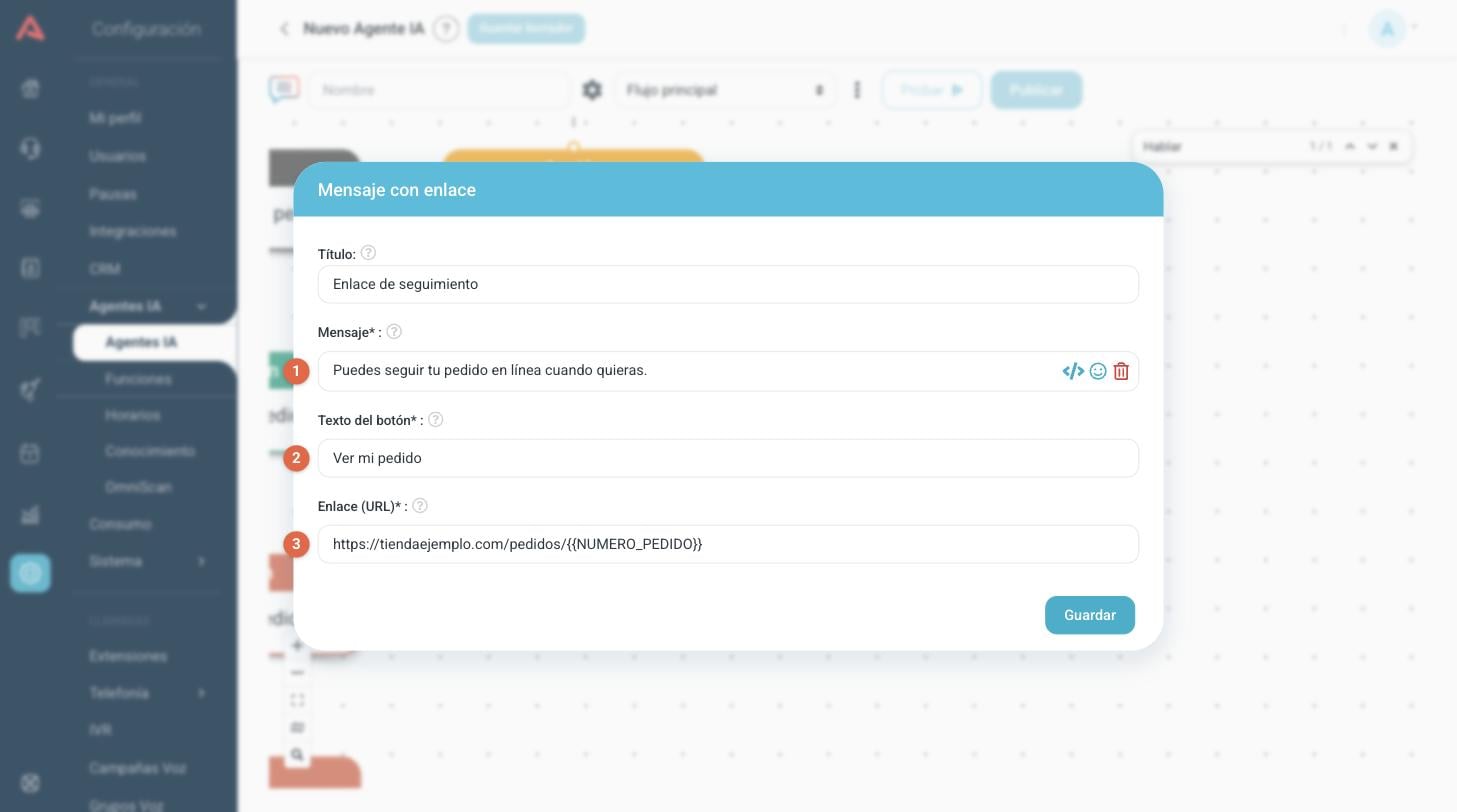
- 1 Message*
- The text shown next to the button. It is required because WhatsApp does not accept a link button with no text.
- 2 Button label*
- What the button says. At most 20 characters.
- 3 Link (URL)*
- The address the button opens. It has to start with
http://orhttps://. You can build it out of variables, as in the example.
Interaction
The interaction steps are the ones that wait for an answer from the customer and take a path depending on what they answer.
Menu
Puts a question and several options to the customer. Each option is a separate step hanging off the menu: a Button or a List option, depending on the type of menu.
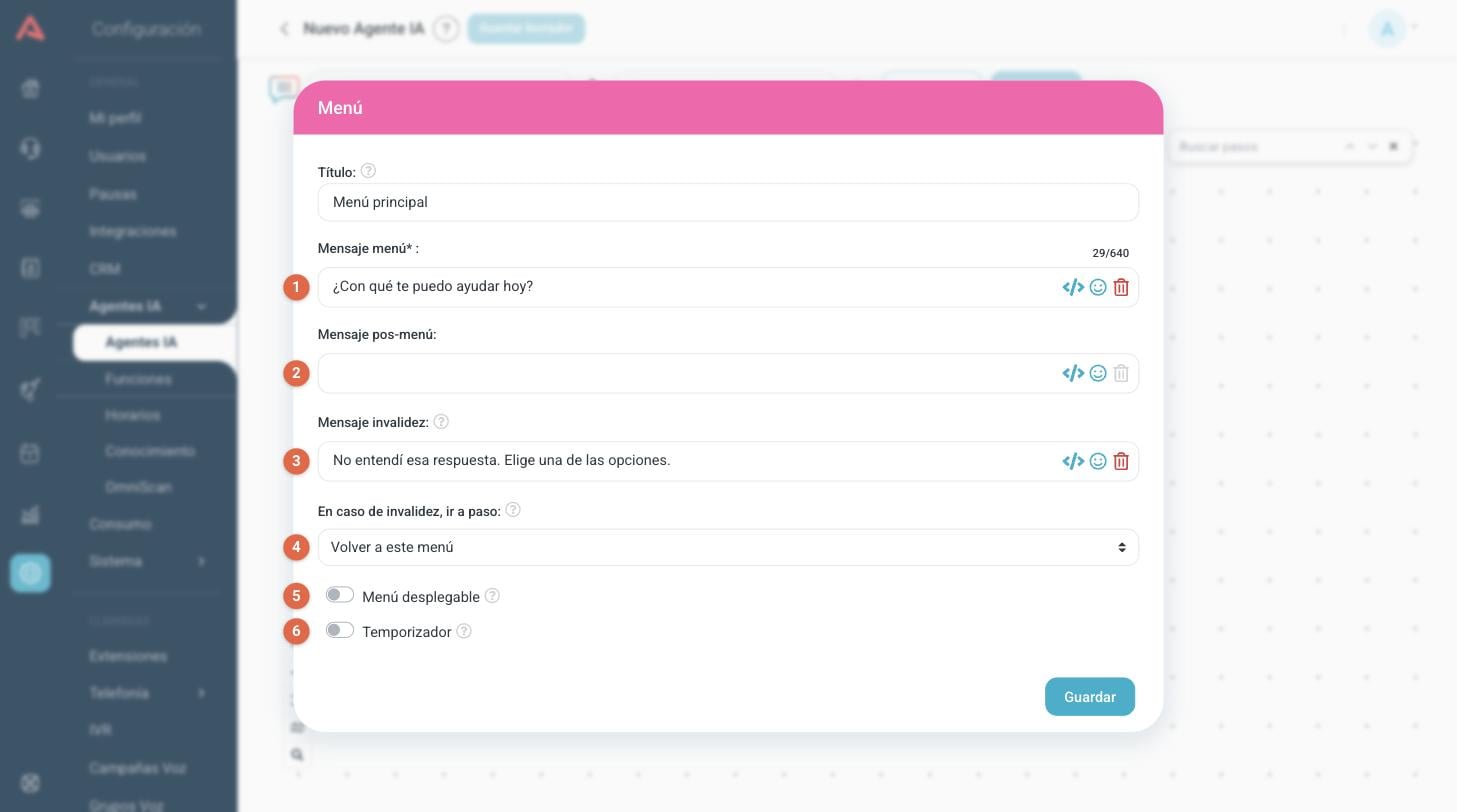
- 1 Menu message*
- The question that goes with the options. The counter on the right marks how many of the 640 allowed characters you have used.
- 2 Post-menu message
- An optional message sent after the customer picks an option.
- 3 Invalid answer message
- What the bot answers when the customer writes something that matches none of the options.
- 4 In case of an invalid answer, go to step
- Where to take the conversation after an invalid answer. If you leave it on Back to this menu, the bot repeats the menu.
- 5 List menu
- Switches the menu from buttons to a dropdown list. See below.
- 6 Timer
- Puts a time limit on the answer. See below.
Do not write the options inside the Menu message. The text is only the question; each option is added as a Button or List option step under the menu, and it is the channel that draws them. Writing them by hand leaves the customer with a list they cannot tap.
The 640 characters of the message are not a whim of Audara's: it is the cap Meta puts on a message travelling with buttons. Going over does not trim the text, it makes Meta reject the whole message and the customer receives nothing. If you need more text, put it in a Message step before the menu.
List menu and timer
Turning on either of the two switches brings up its fields.
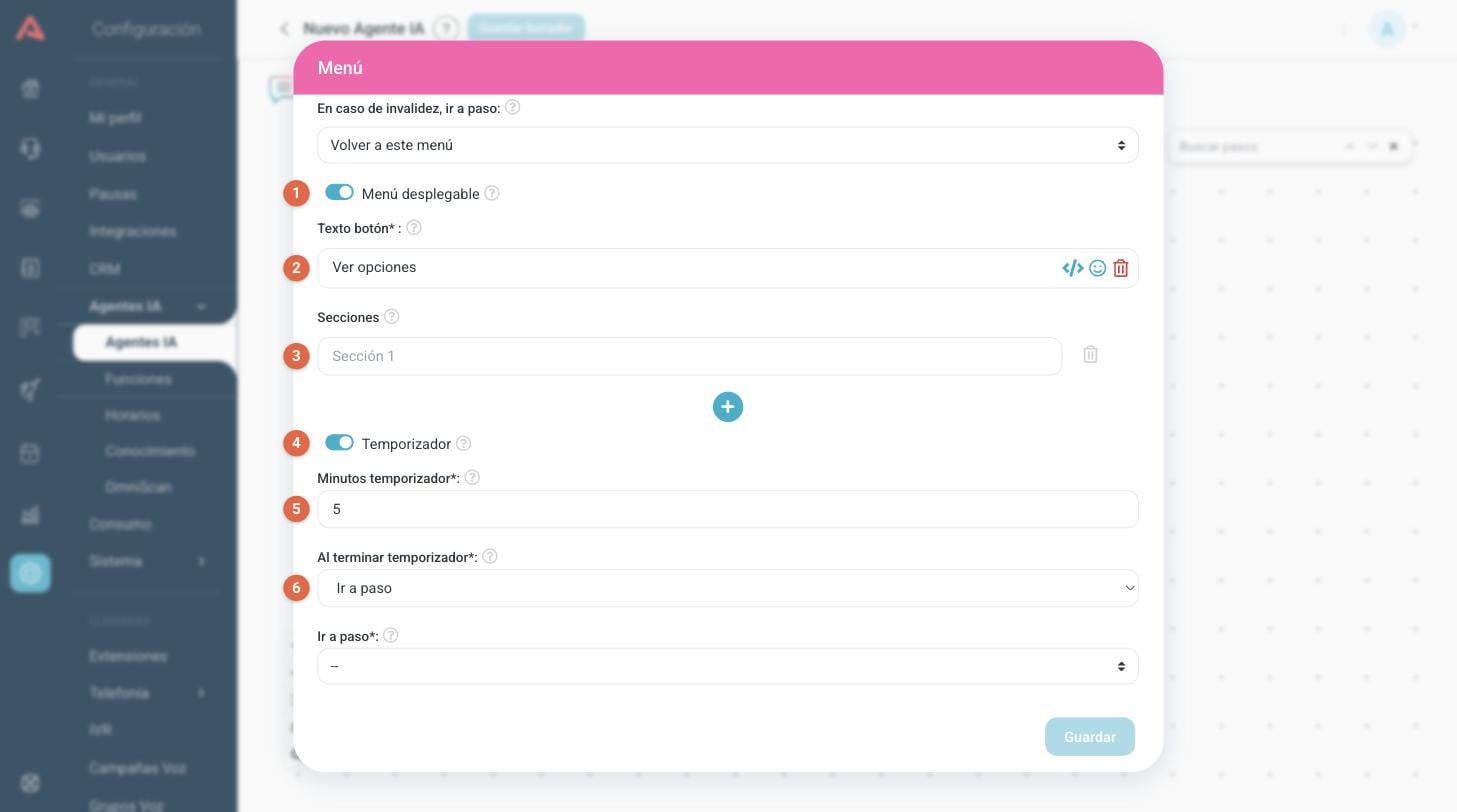
- 1 List menu
- Instead of buttons, the customer receives a button that opens a list. It works well on WhatsApp and on WebChat; on the other channels buttons or text are a better bet.
- 2 Button text*
- What the button that opens the list says. At most 20 characters.
- 3 Sections
- They are there to group the options inside the list. You can create up to 10. The name is only required, and only visible, if you create more than one.
- 4 Timer
- Turns on the wait with a time limit.
- 5 Timer minutes*
- How many minutes the bot waits for an answer before acting.
- 6 On timer finish*
- Go to step takes the conversation to the step you pick, and Finalize closes it with a final message you write right there.
A dropdown list takes 10 options in total, across all sections. It is not 10 per section. If you go over, WhatsApp rejects the whole message and the menu simply does not arrive. To offer more than ten, chain menus: leave the last row for "See more options" and have it lead to the next menu.
Button
One option of the menu, drawn as a button. Whatever hangs off this step is the path the conversation takes when the customer presses it.
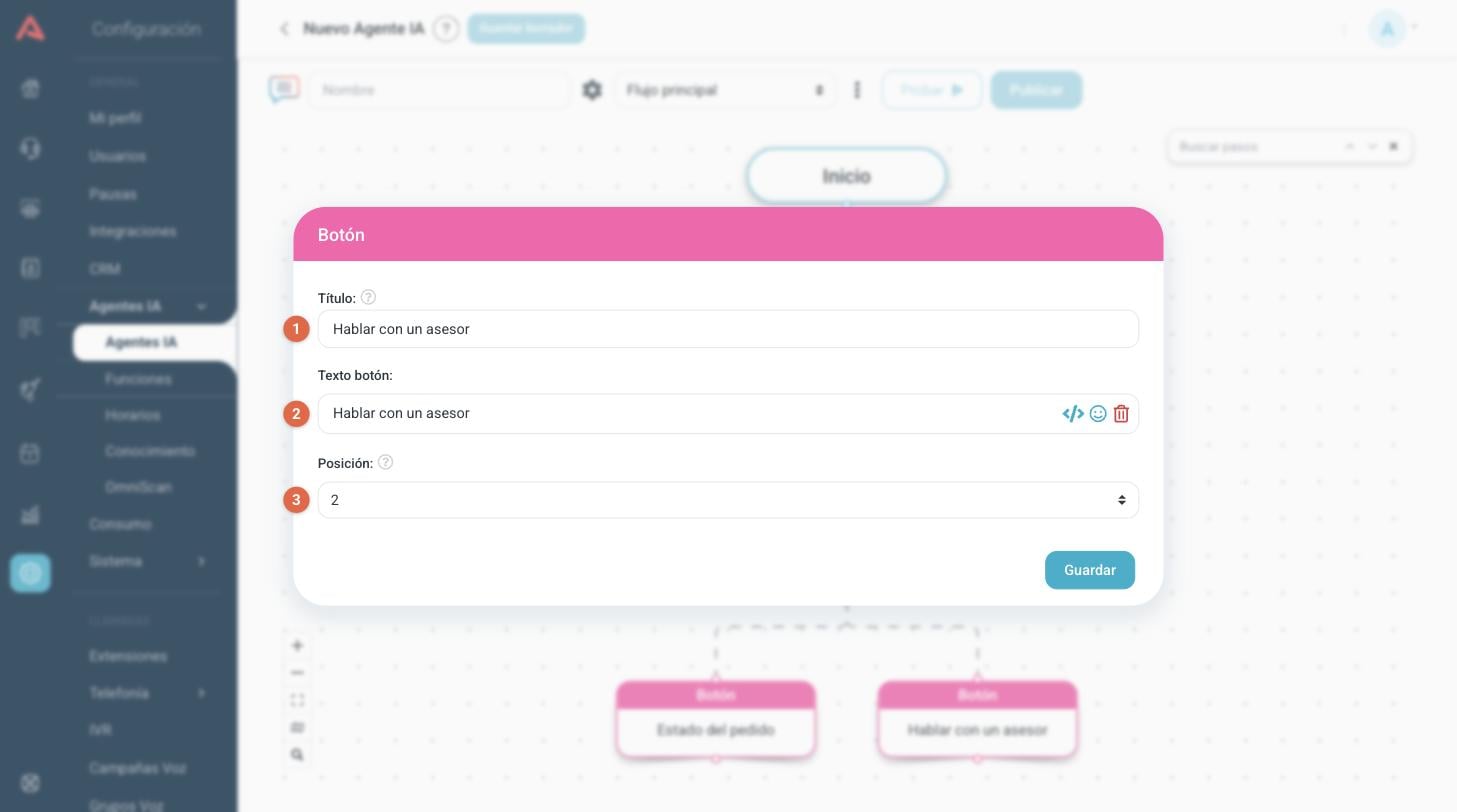
- 1 Title
- The name of the step on the canvas. It is not what the customer sees.
- 2 Button text
- What the button says. At most 20 characters.
- 3 Position
- The order of the button within the menu. The selector offers as many positions as the menu already has buttons, and warns you if you pick one another button is using.
A menu takes at most three buttons. Once it has three, the Button option comes out greyed. If you need more options, use a list menu.
List option
The equivalent of the button for a list menu. It can only be added if the menu has List menu switched on.
- Option
- What the customer sees on the row of the list.
- Description
- A second, smaller line under the title. It is optional.
- Section
- Which of the menu's sections this option goes in.
- Position
- The order within the list, just like on the button.
Open response
A path that is not fired by a button but by what the customer writes. If the message contains any of the keywords, the conversation takes this path.
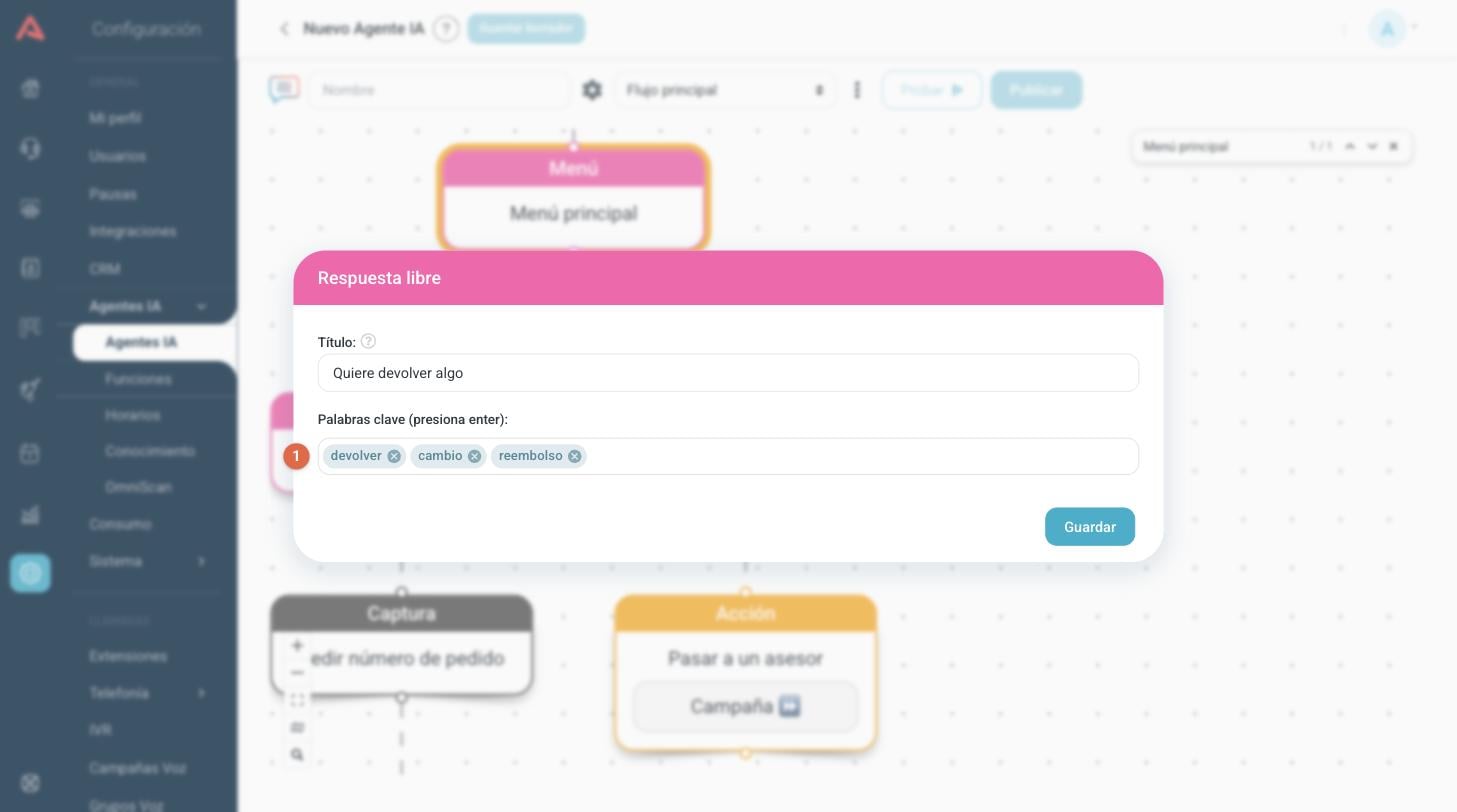
- 1 Keywords (press enter)
- Write a word and press Enter to add it. Each one stays as a tag you can remove with its ✕. You need at least one.
It is the way to serve the customer who answers in their own words instead of tapping a button. It is worth putting in several ways of saying the same thing, including the ones people write without accents.
Invalid
The path the conversation takes when the customer answers something the menu does not recognise. It has a single field, Text to display, with the message sent before carrying on down this path.
A menu takes one invalid step only. When there is one, it rules, and the menu's Invalid answer message and In case of an invalid answer, go to step fields stop being taken into account.
Capture
The capture steps ask the customer for a value and store it in a variable, to be used further on in a message, in a CRM query or in an integration.
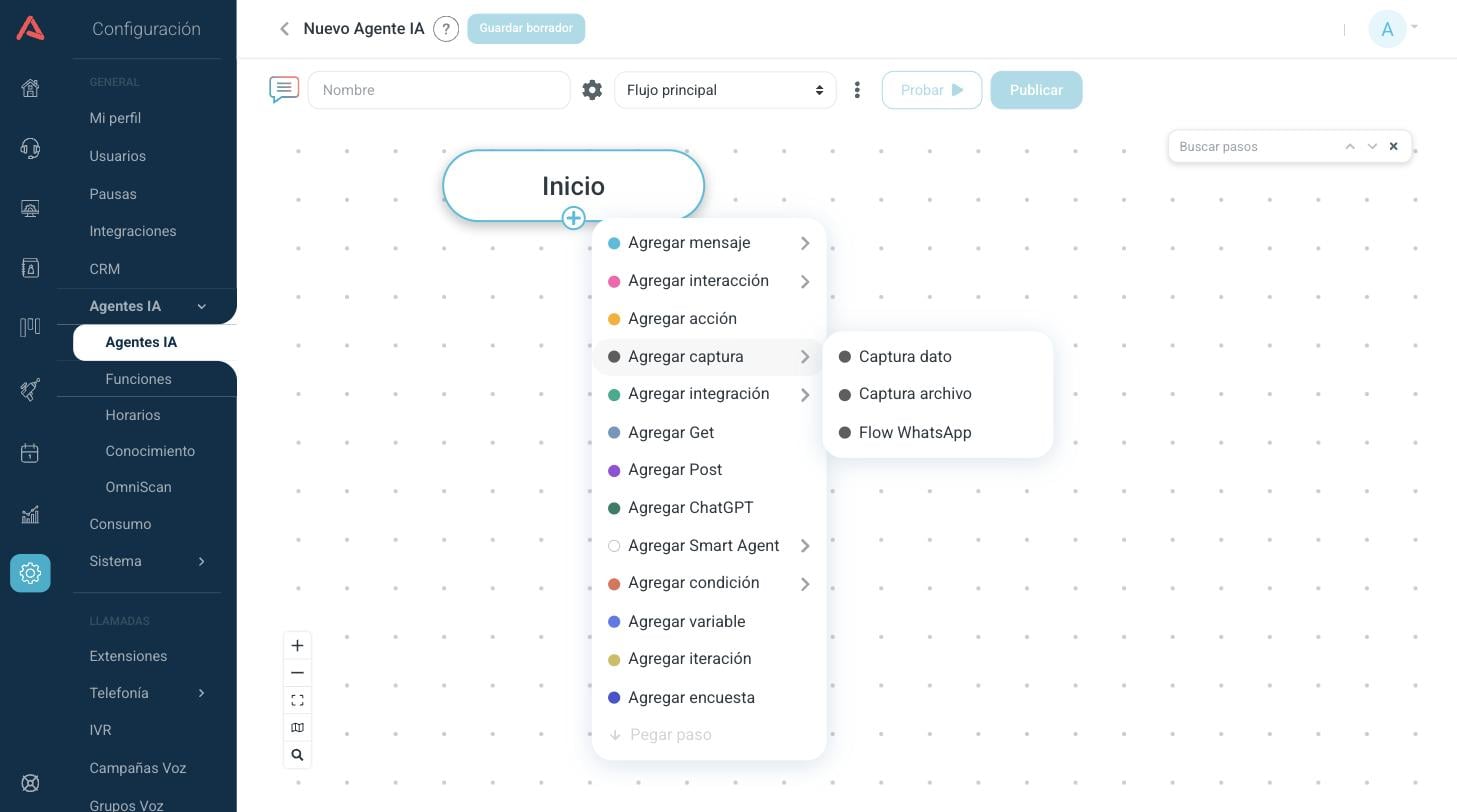
Capture data
Asks for a written value: an ID number, an email address, an order number.
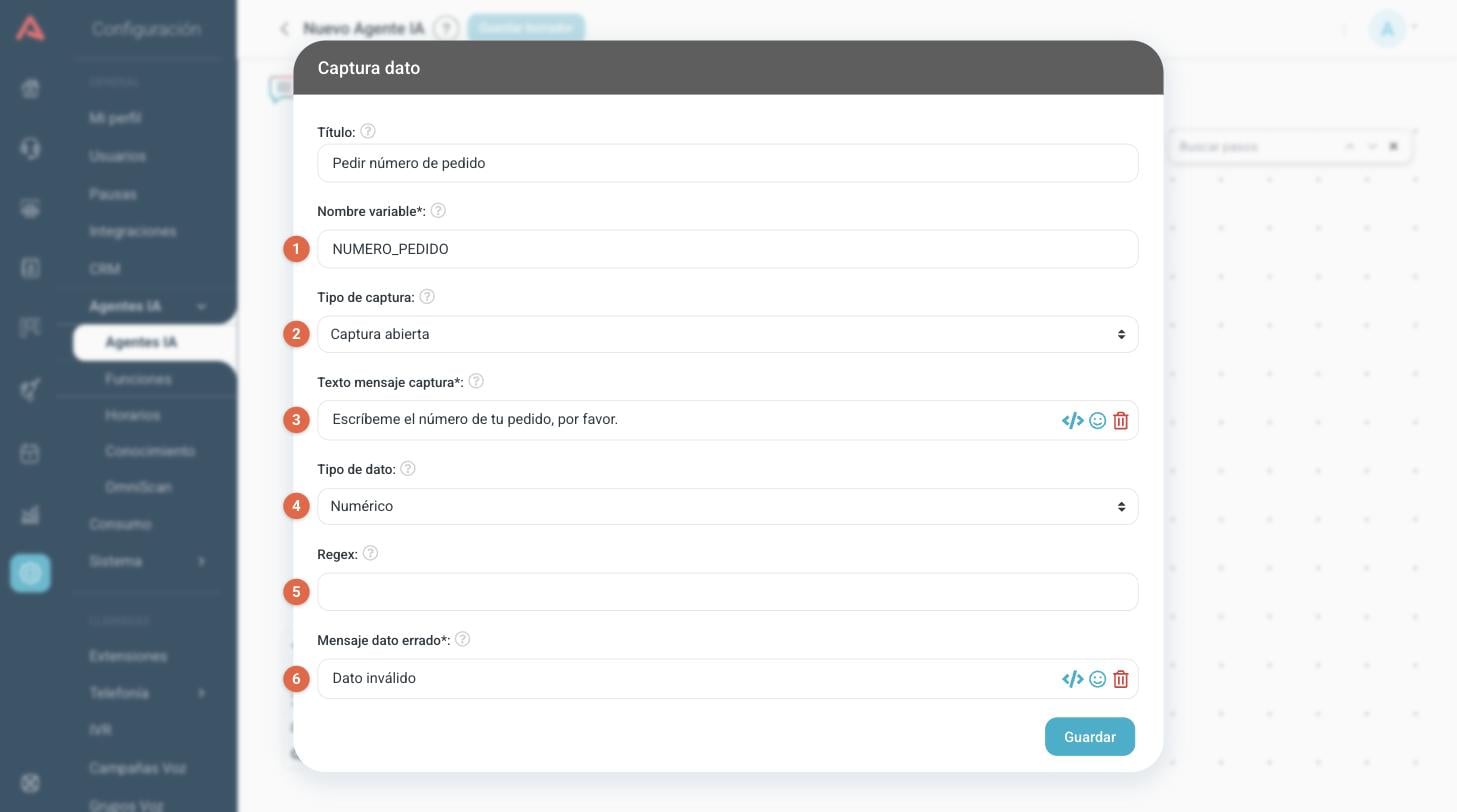
- 1 Variable name*
- The name you will use the value by afterwards. Write it in capitals with no spaces, like
ORDER_NUMBER. In messages it is used in double braces:{{ORDER_NUMBER}}. - 2 Capture Type
- Open Capture lets the customer write freely. Options shows them a dropdown list to pick from. Buttons shows them up to three answer buttons.
- 3 Capture message text*
- The question the bot asks for the value with.
- 4 Data type
- Text, Numeric or Email. If the customer answers with something that does not fit, the bot sends the error data message and asks again. It only appears on the open capture.
- 5 Regex
- A regular expression for validating the value when the three options above are not enough, for instance a number plate format.
- 6 Error data message*
- What the bot answers when the value does not pass validation. It comes with "Invalid data" and it is worth changing it for something that explains what is expected.
On the open capture two switches also appear. Remove spaces, which shows up with Data type: Text, strips every space out of whatever the customer answers and is very handy for spelled-out words, ID numbers or plates. Capitalize shows up with Text and with Email.
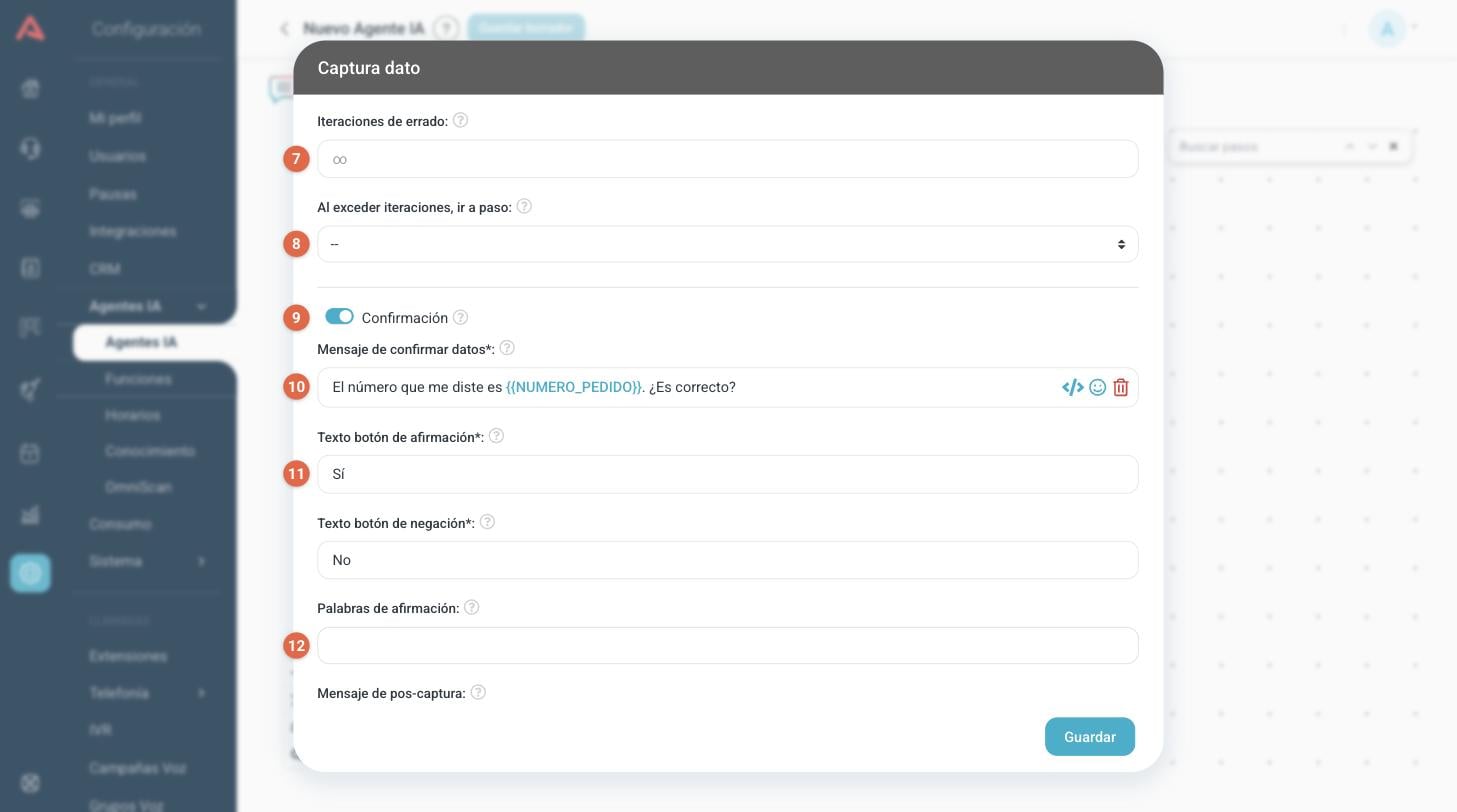
- 7 Error iterations
- How many times the bot asks again before giving up. Empty means it keeps insisting indefinitely.
- 8 On exceeding iterations, go to step
- Where to take the conversation when the attempts run out. Without this, the bot carries on asking.
- 9 Confirmation
- Turns on a second turn in which the bot repeats the value back to the customer and asks them to confirm it before carrying on.
- 10 Confirm data message*
- The confirmation question. Use the variable you have just captured so the customer sees what the bot understood.
- 11 Yes button text* and No button text*
- What the two confirmation buttons say. They come with Yes and No.
- 12 Confirmation words
- Words the bot takes as a yes when the customer writes instead of pressing the button.
Underneath are the Post-capture message, which is sent once the value is confirmed, and a pair of Confirmation iterations with their exit step, which work like the ones above but for the confirmation loop.
Always put in an iteration limit and an exit step, even if it is only to pass the conversation to an adviser. A bot that asks the same thing over and over is the quickest way to lose a customer.
File capture
Asks the customer for a file: the photo of an invoice, a proof of payment, a document.
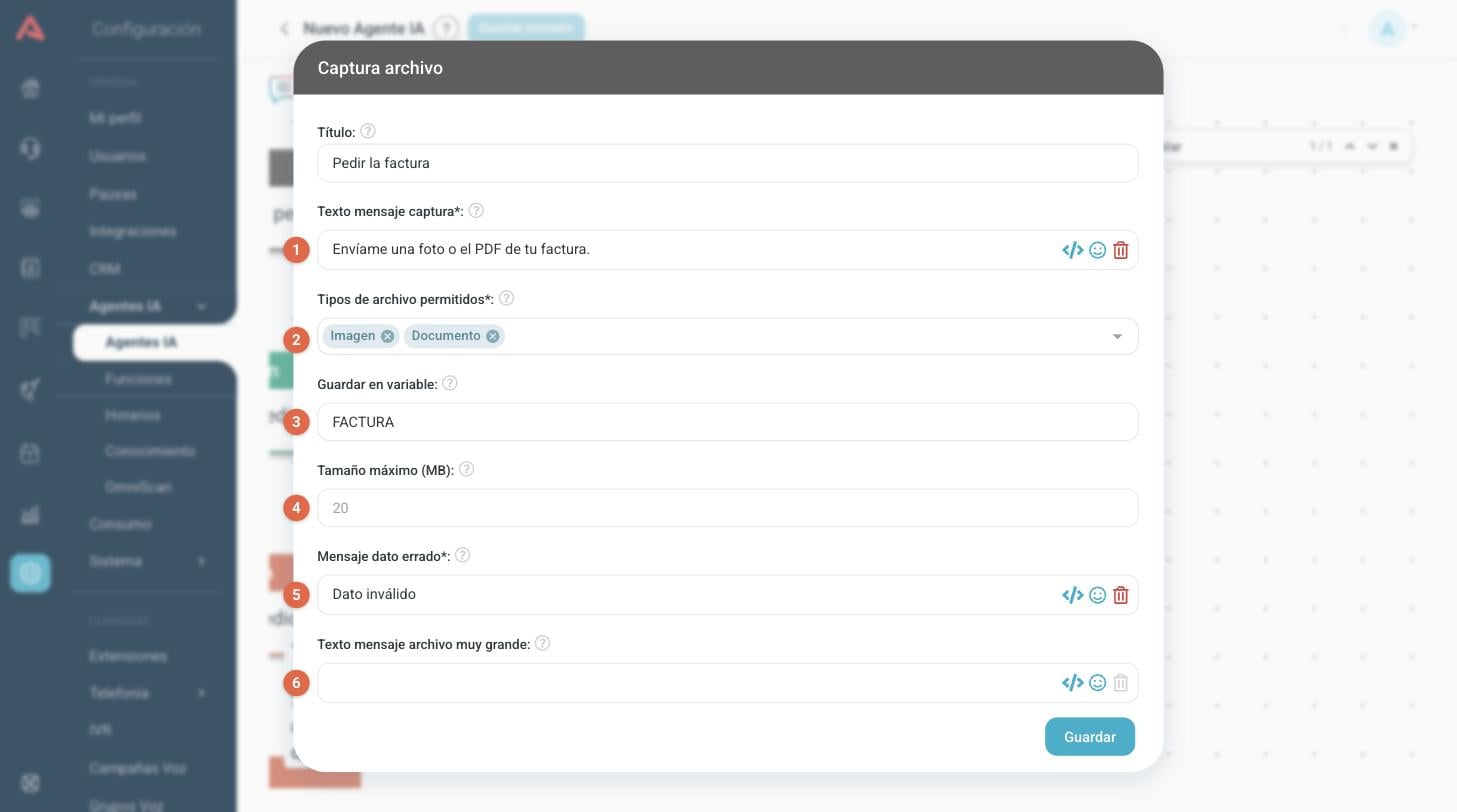
- 1 Capture message text*
- The message the bot asks for the file with.
- 2 Allowed file types*
- Image, Document, Audio or Video. You can pick several. If the customer sends something else, the bot answers with the error data message.
- 3 Save to variable
- The name of the variable the file is left in. With it, a later step can send it back to the customer or pass it to an integration. Leave it empty if you only want to ask for the file without storing it.
- 4 Maximum size (MB)
- If you leave it empty, 20 MB is used, which is also the cap you can set here.
- 5 Error data message*
- What the bot answers when the file is no good.
- 6 File too large message
- A separate message for when the file goes over the maximum size. If you leave it empty the one above is used, which tells the customer the file is invalid rather than that it is too big.
Further down are the Error iterations and their exit step, the same as on the data capture.
WhatsApp form
Opens a native WhatsApp form for the customer, of the kind built in Meta's WhatsApp Manager, and stores what they answer in variables. It is there to ask for several values at once without making a long chain of questions.
- WhatsApp number*
- The number the forms are read from. The forms belong to that number's WhatsApp Business account, so a form on one number does not exist on another.
- Form*
- Which form is opened for the customer. If the form is not published on Meta yet, the bot warns you: only published ones open for every user.
- Message text* and Button text*
- The text that goes with the button that opens the form, and what the button says. The button takes at most 30 characters.
- Fields to store
- Each field the form answers with is stored in the variable you pick. The fields are read from the form, so pick that first.
- Message once the data arrives
- An optional message sent as soon as the data comes in.
- If the channel is not WhatsApp, go to
- Forms only exist on WhatsApp. On any other channel the bot carries on from the step you pick here, usually a chain of questions asking for the same values one by one.
- Message if the Flow is not opened, Retries and When retries run out, go to
- What to do when the customer answers with text instead of the form, usually because they did not open it. The retry cap is 10: the bot never retries indefinitely.
Action
The Action step is the one that moves the conversation outside the current flow: it takes it to another step, hands it to a human agent, sends it to another AI agent, sends an email or ends it. The Action field decides which of them, and the rest of the form changes with what you pick.
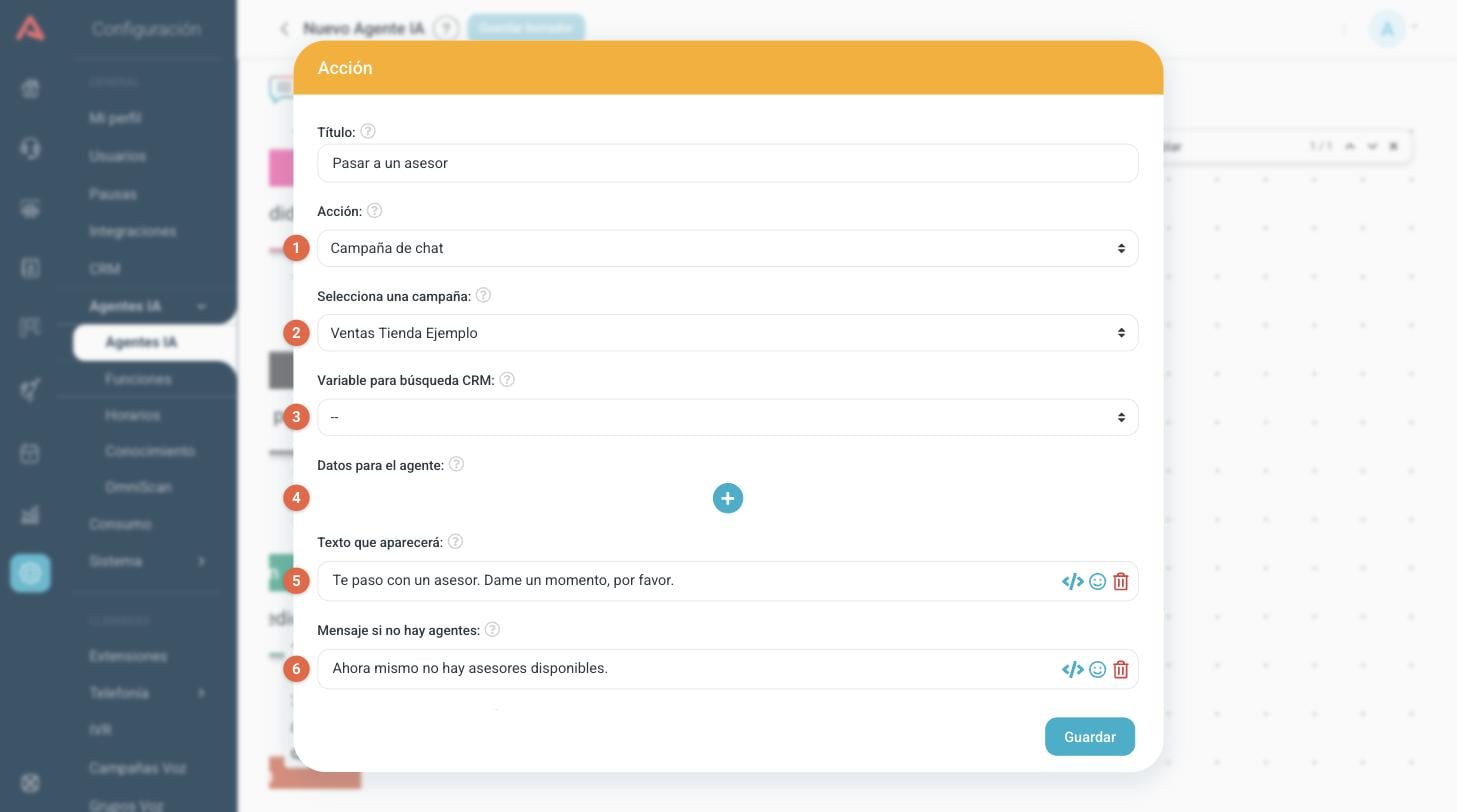
- 1 Action
- The type of action. The options are the ones in the list below.
- 2 Select a campaign
- The chat campaign that will receive the conversation. It is where the agents who will handle it are.
- 3 Variable for CRM search
- Which variable to look the customer up in the CRM by at the moment the chat is handed over, so the agent receives them already identified.
- 4 Data for the agent
- Flow variables the agent will see in the Detail tab of their tools when they answer. The value taken is whatever each variable holds at the moment of the handover. If you do not write a name for it, the variable name is shown.
- 5 Text to display
- The message the customer receives just before joining the queue.
- 6 Message if there are no agents
- What the bot answers when the campaign has nobody available.
Underneath are If no agents, go to step, Message if it is off hours and If it is off hours, go to step, so the conversation is not left without a way out when there is nobody to take it.
The option is called Chat campaign because in Audara a chat campaign is the group of agents that serves a channel. It is the way to pass the conversation to a person.
The types of action
- Flow
- Jumps to another step, in whichever flow. It is the way to reuse a part of the flow without repeating it and to build paths that come back to the main menu.
- Chat campaign
- Hands the conversation to the agents of a campaign. Chatbots only.
- AI Agent
- Passes the conversation to another AI agent, which carries on from its own main flow.
- Send Email
- Sends an email using a template. You can take the recipient from a variable, write one or several fixed ones, or both.
- Send WhatsApp
- Sends a WhatsApp message using an approved template, from the number you pick.
- Send Telegram
- Sends a Telegram message. The destination can come from a variable or be a list of fixed ids. Each person has to have written to the bot first; if not, that destination fails.
- OTP Authentication
- Sends the customer a one-time code by email or by WhatsApp and asks them to type it in. It has fields of its own for the maximum attempts, the code expiry, the wait before resending and every message in the process.
- Finalize
- Closes the conversation with a final message.
- Go to checkpoint (inactivity)
- Puts the conversation back where it left off before the inactivity fired. It only appears inside the inactivity flow.
CRM data: Get and Post
These two steps are the door between the conversation and Audara's CRM: Get looks a record up and brings its data into the flow, Post creates or updates a record with what the bot captured.
Get
Looks a contact or a business up in the CRM using a chat variable, and leaves its fields available as variables.
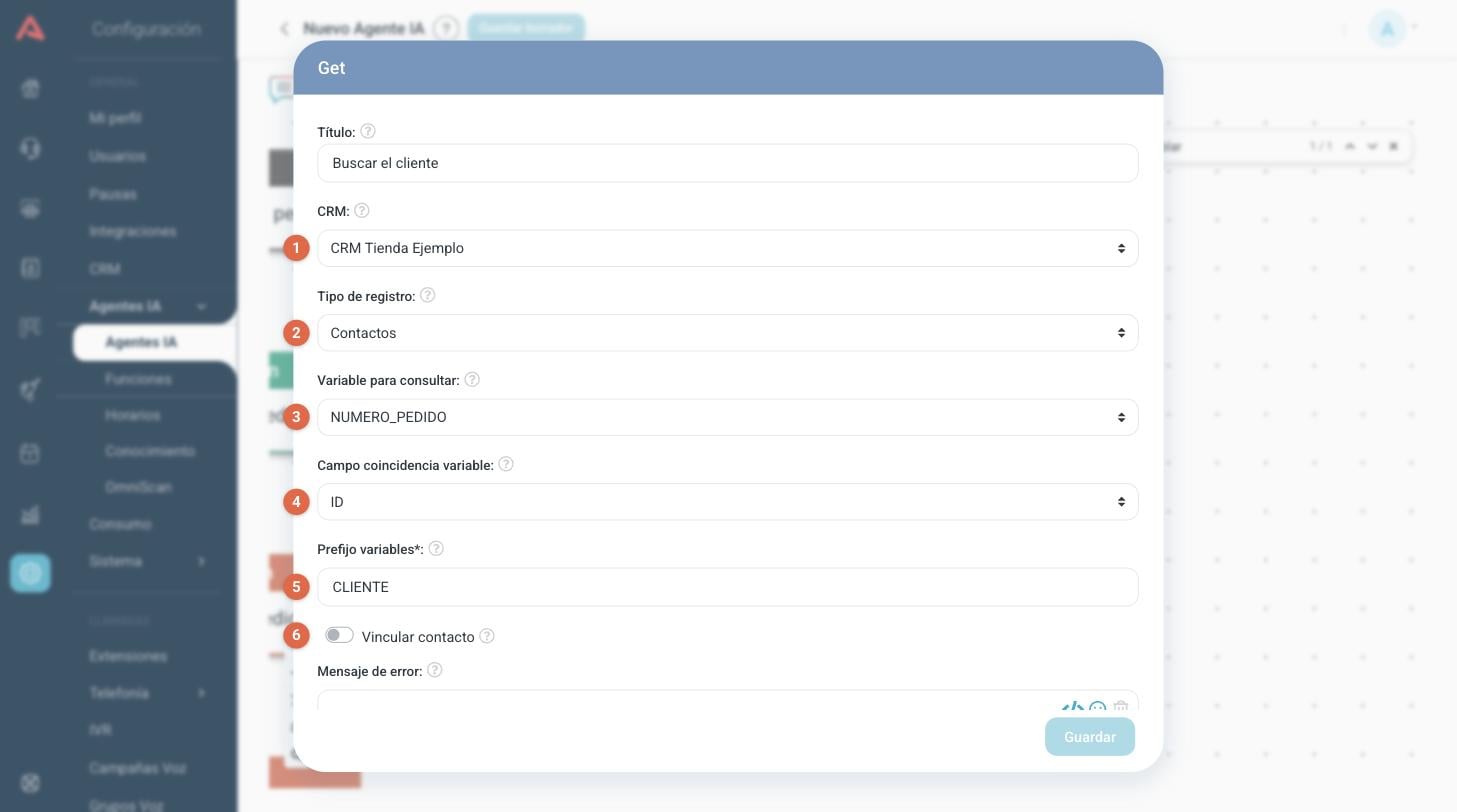
- 1 CRM
- Which CRM to look in.
- 2 Record type
- Whether the step works on the CRM's Contacts or on its Businesses.
- 3 Variable to query
- The chat variable whose value is going to be looked up, usually something you captured earlier.
- 4 Variable match field
- Which CRM field that value is compared against.
- 5 Variable prefix*
- It is put in front of the name of every variable the query brings back, so they do not clash with the ones you already have. With the prefix
CUSTOMER, the Name field arrives as{{CUSTOMER-NOMBRE}}. - 6 Link contact
- If the search finds a contact, it associates it with the interaction automatically. That way the chat stays attached to the customer's record in the reports and in the agent panel.
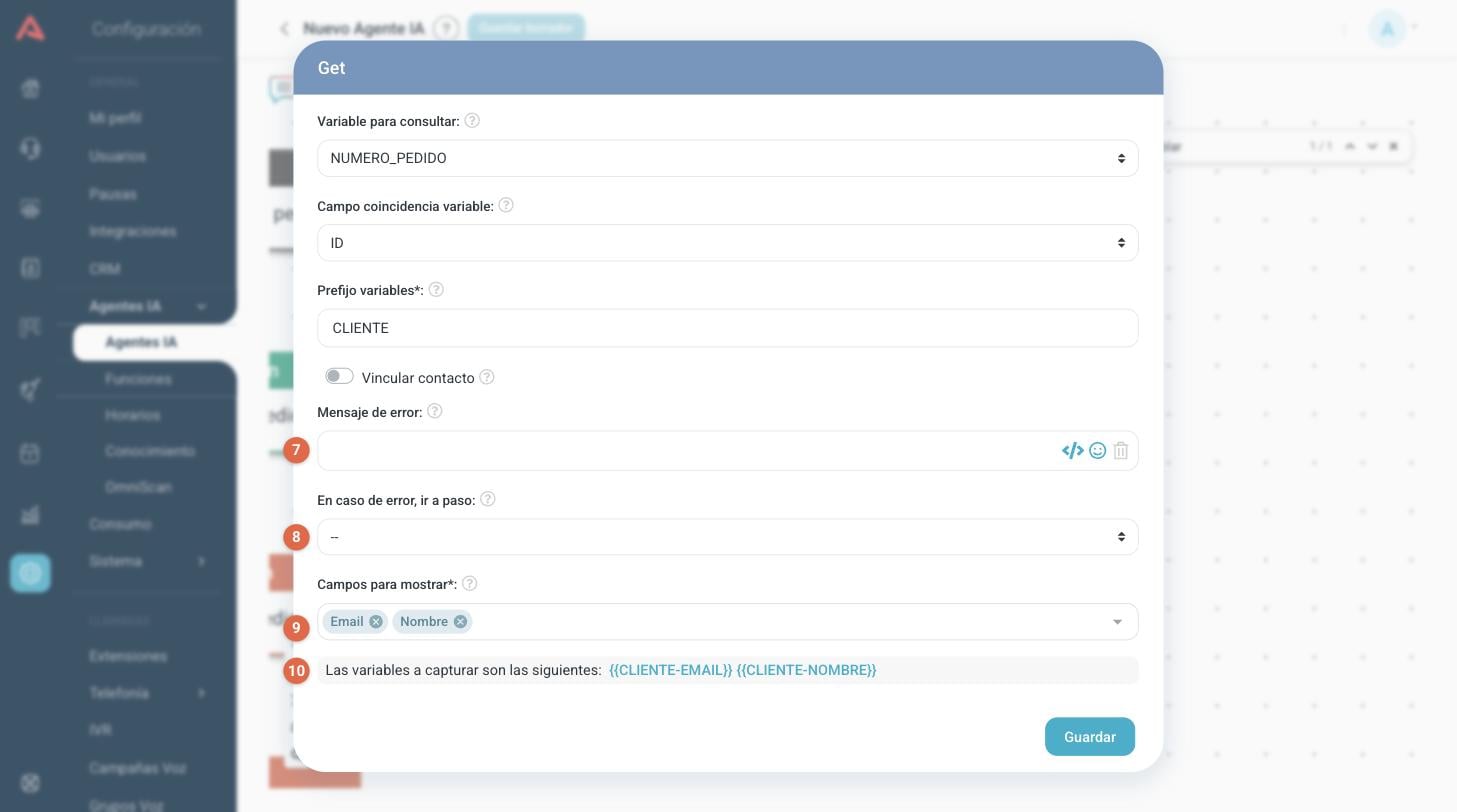
- 7 Error message
- What the bot answers if the query fails or finds nothing.
- 8 In case of error, go to step
- Where to take the conversation in that case.
- 9 Fields to display*
- Which fields of the record to bring in. Each one becomes a variable.
- 10 The variables that will be captured
- The list, already built, of the variables this step leaves available. Copy it as it is into the messages further down the flow.
Post
Creates a record in the CRM with what the bot captured. With Create and edit switched on, if the record already exists it updates it instead of creating a new one.
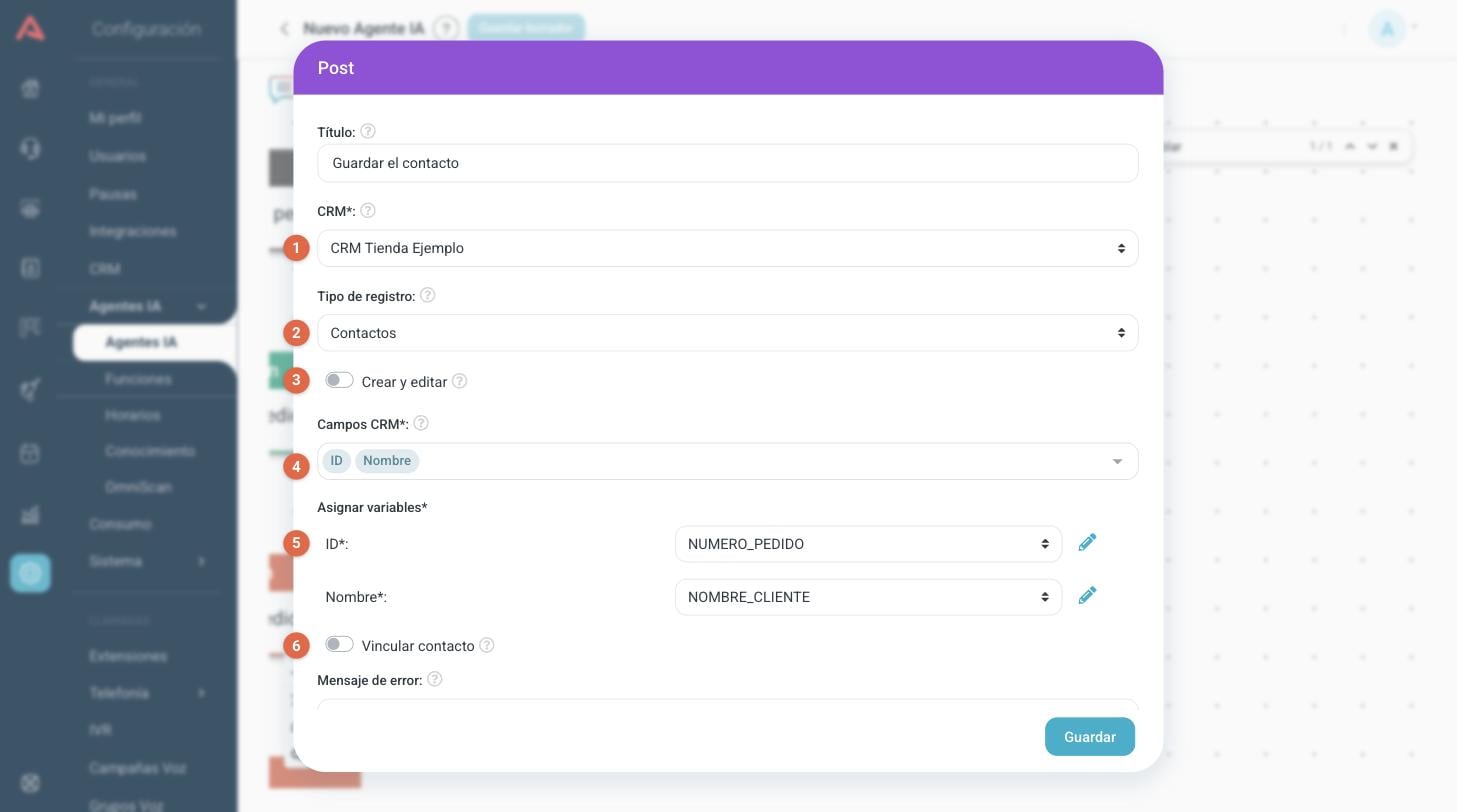
- 1 CRM*
- Which CRM the record is stored in.
- 2 Record type
- Contacts or Businesses.
- 3 Create and edit
- By default the step only creates new records. Switching it on means that if one already exists with the same key field, it is updated in its place and only the fields you send here change; the rest are kept.
- 4 CRM fields*
- Which fields you are going to write. The CRM's required ones arrive already in place, and if one is missing the form tells you which: until they are there, creating new records is going to fail.
- 5 Assign variables*
- What value each field carries. The selector picks a chat variable; the pencil on the right switches the field over to writing a fixed value.
- 6 Link contact
- If the contact is created successfully, it associates it with the interaction automatically.
Underneath are Error message and In case of error, go to step, for when the CRM rejects the record.
Integrations: REST API and MCP
These two steps take the conversation out of Audara to talk to a system of yours and bring the answer back into the flow.
REST API
Calls one of the REST integrations you have configured under Setup > Integrations > API Rest and stores the fields it answers with in variables.
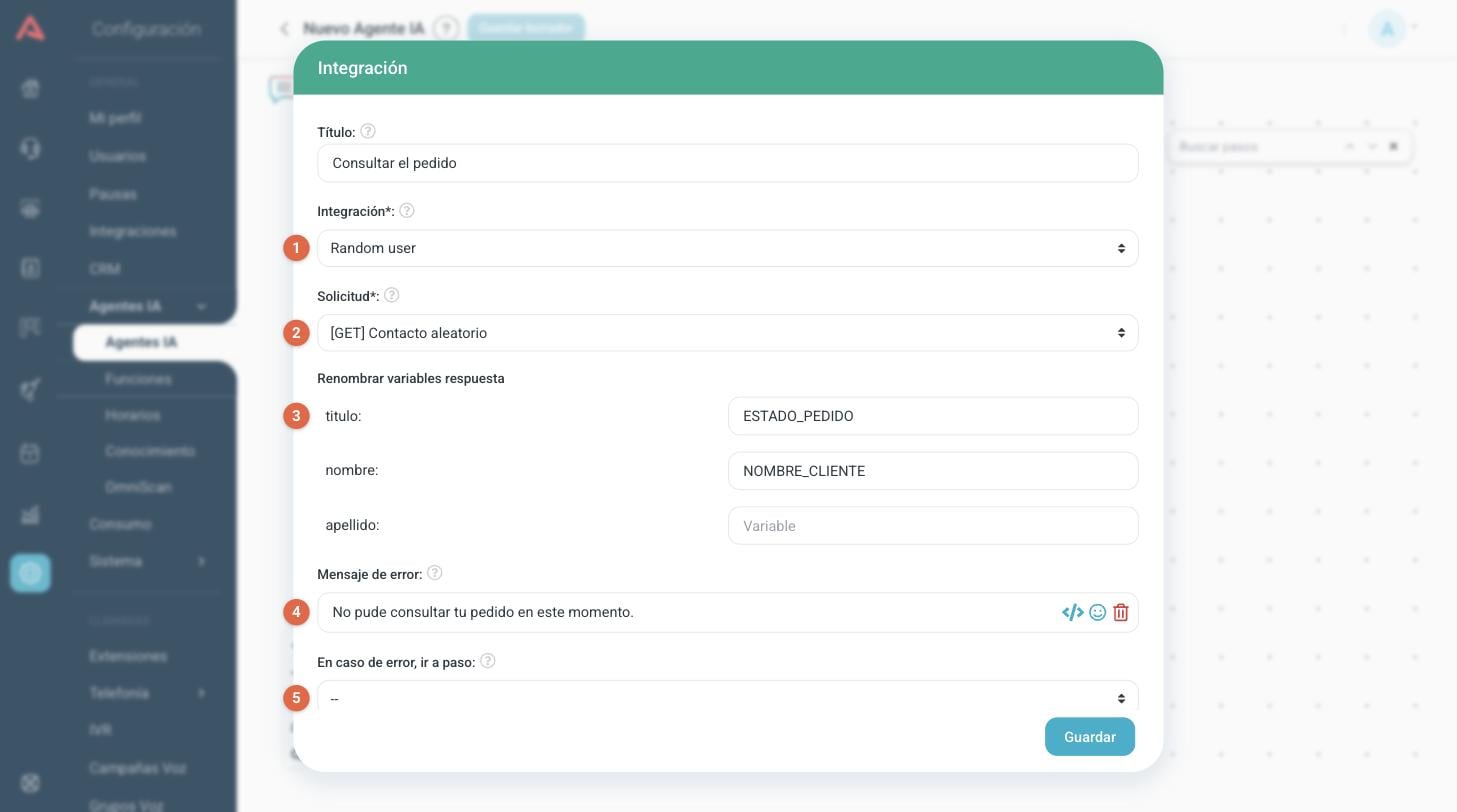
- 1 Integration*
- Which of your REST integrations to use.
- 2 Request*
- Which of that integration's requests to run. The method (GET, POST) goes in front of the name.
- 3 Assign response variables
- The fields the request captures, each with the variable you want it stored in. If you leave one empty, the field is stored under its own name.
- 4 Error message
- What the bot answers if the request fails.
- 5 In case of error, go to step
- Where to carry on in that case.
If the request expects data, Variable to send also appears, where each value takes the value of a chat variable or a fixed text. The structure of the request (URL, method, headers, body) is not defined here but in the integrations module; see the API REST article.
MCP
Runs a tool from an MCP server connected to your account. The step picks the MCP server and the Tool, builds the Data to send out of chat variables or fixed text, and stores each field of the answer in the variable you name. You can also store the whole answer exactly as it arrived, which is useful when the tool answers with text rather than data.
The fields that can be captured are not written here: they come from having tested the tool under Setup > Integrations > MCP. The step is explained in detail in the MCP Integrations article.
ChatGPT
Hands the turn over to a language model so it answers in its own words, rather than with a fixed text.
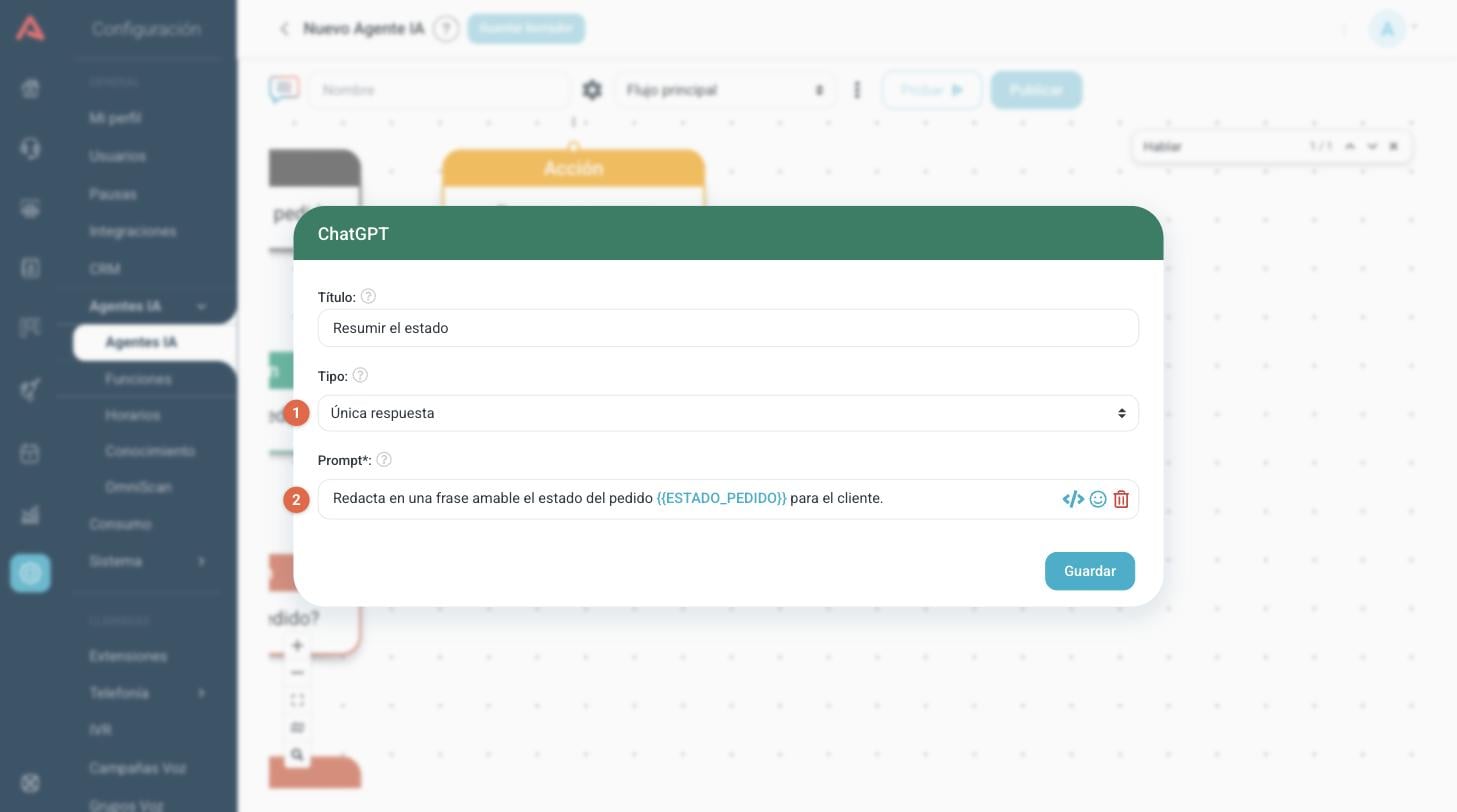
- 1 Type
- Single prompt generates one message and carries on to the next step. Assistant uses an assistant already created on your OpenAI integration. Conversation leaves the model talking to the customer until the exit condition is met.
- 2 Prompt*
- The instructions for the model. You can put chat variables in it with double braces, as in the example, so it answers about real data from the conversation.
With Assistant you get the assistant selector and a Start message. With Conversation you get Wait for query, which makes the model wait for the customer to write before speaking, and When it finishes, go to step.
This step needs a Select LLM in the agent's general settings, the ones behind the cog icon. Without it the form warns you and the step cannot be saved.
Smart Agent
The Smart Agent is a step of conversation with artificial intelligence, far more complete than ChatGPT: it has a prompt, examples, a tone, a word limit and, above all, functions. For each function you assign it, the canvas draws a Smart Function step underneath, which is the path the conversation takes when the model decides to call it, and off that can hang a Smart Function Result step, which tells the agent whether what it did went well or badly.
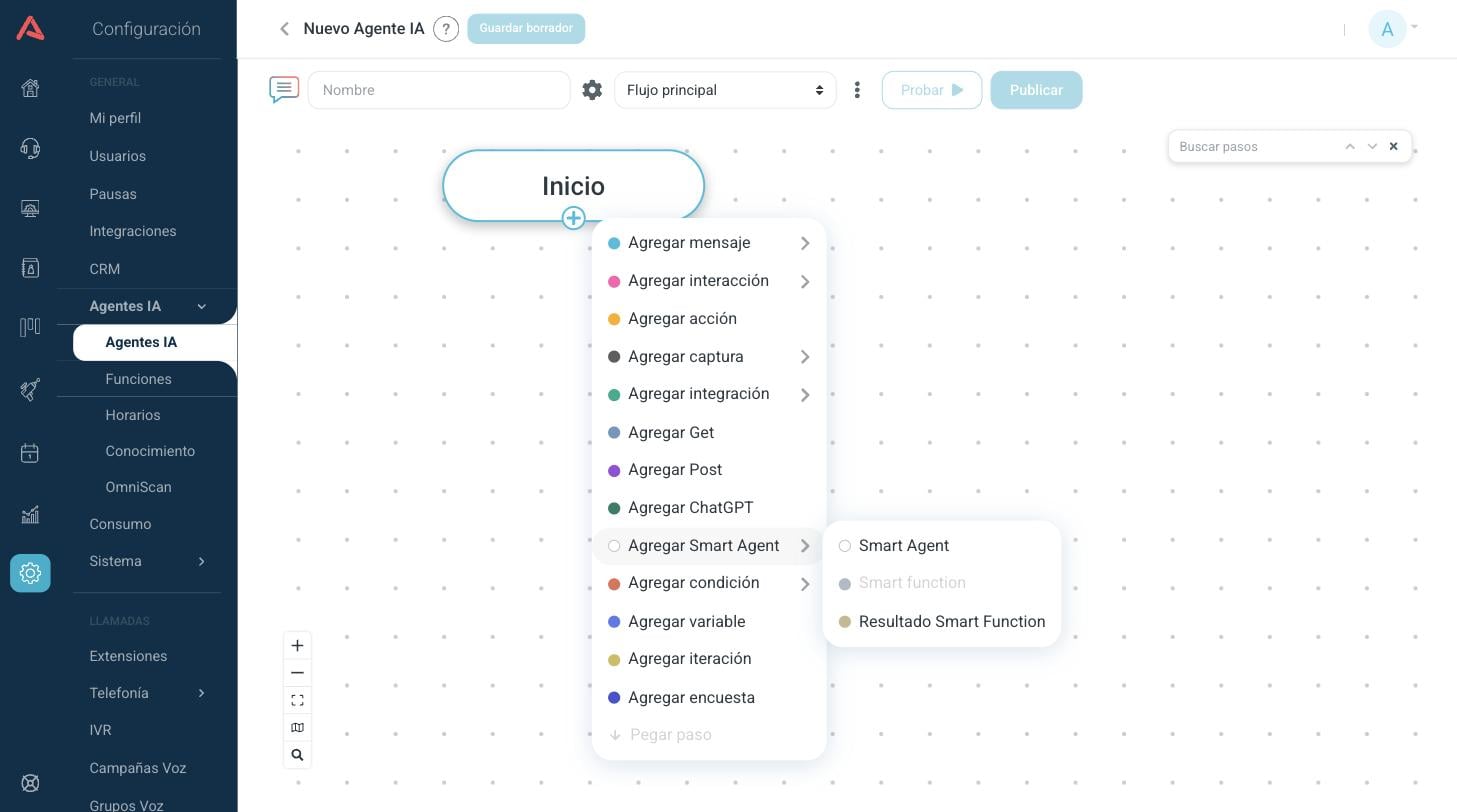
The three steps are explained separately, because the subject is worth more than a section. Here it is enough to know that they go together and in that order: the Smart Agent holds the conversation, the Smart Function is each thing it can do, and the Result tells the agent how it turned out.
Logic: condition, variable and iteration
These steps do not talk to the customer. They are there so the flow can make decisions and keep count.
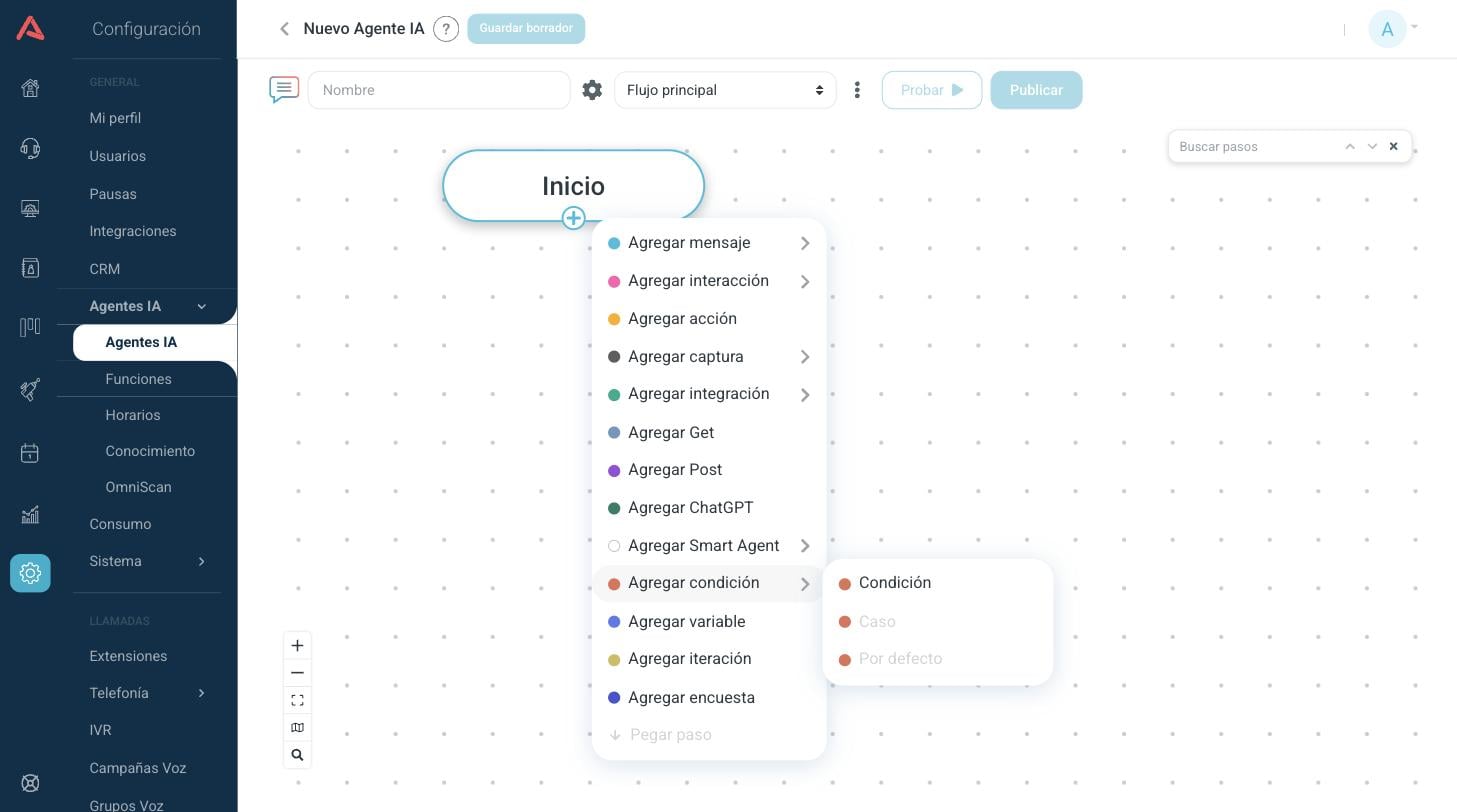
Condition
Opens a fork. The step itself only has a Title: all the logic lives in the paths you hang off it, which are Case steps and, optionally, a Default.
Case
One path of the condition, with the rules that turn it on.
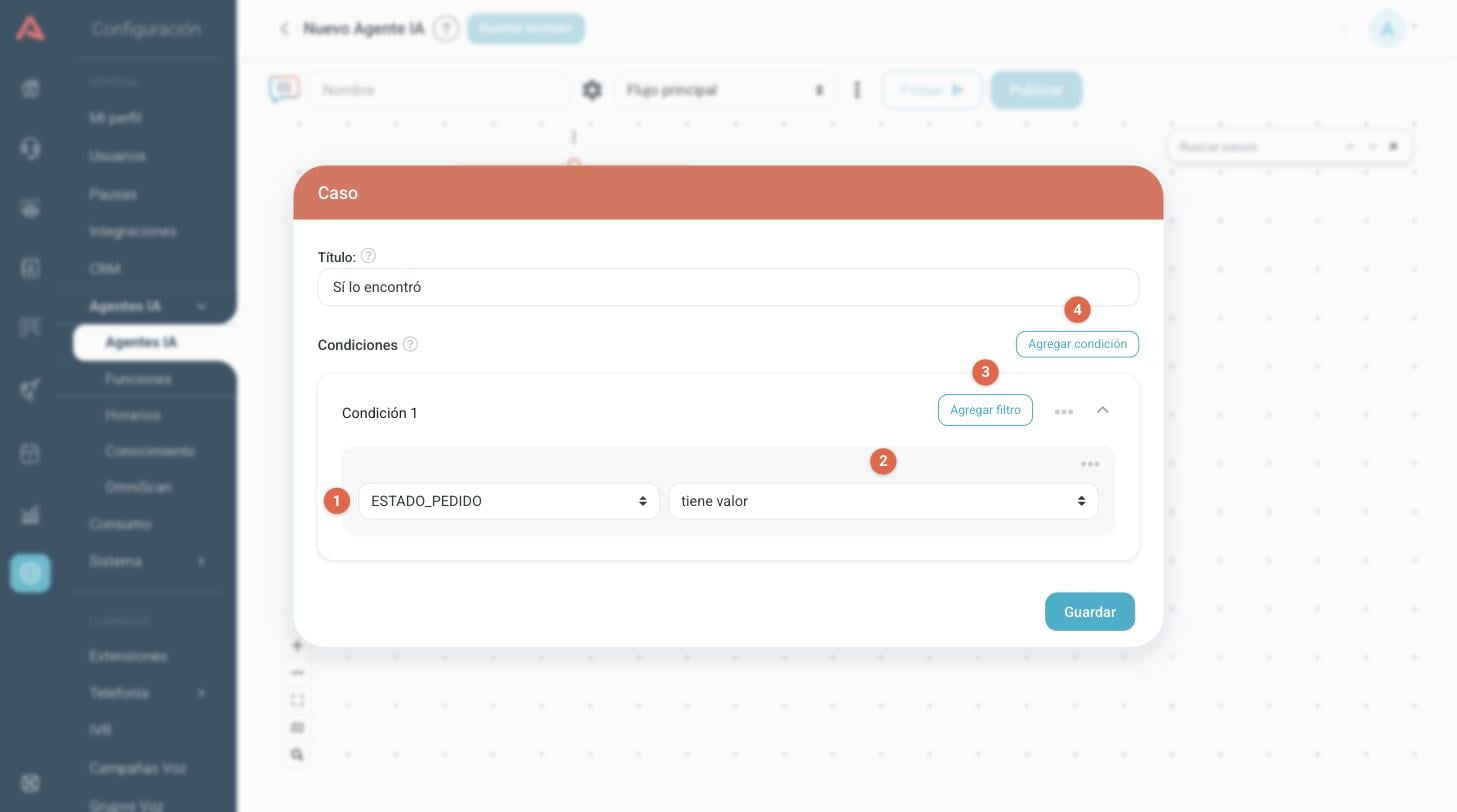
- 1 Variable
- Which chat variable is evaluated.
- 2 Type
- Equal, not equal, greater, less, greater or equal, less or equal, has value or is empty. With the last two the value field disappears, because it is not needed.
- 3 Add filter
- Adds another rule to the same condition. The filters in a group are combined with AND: they all have to be met.
- 4 Add condition
- Adds another group of rules. The groups are combined with OR: one being true is enough.
Cases are evaluated in order and the first one that matches wins. If two cases can be true at the same time, the leftmost one is the one that runs. On the canvas, the Case step shows a summary of its condition under the title, so it reads without being opened.
Default
The path the conversation takes when no case matches. It only has a Title, and a condition takes one only. It is always worth putting in: without it, a value you did not foresee leaves the conversation with no way out.
Set variable
Stores a value in one or several variables, without asking the customer anything. It is there for building texts, for leaving flags a condition reads later, or for renaming something that came in from an integration.
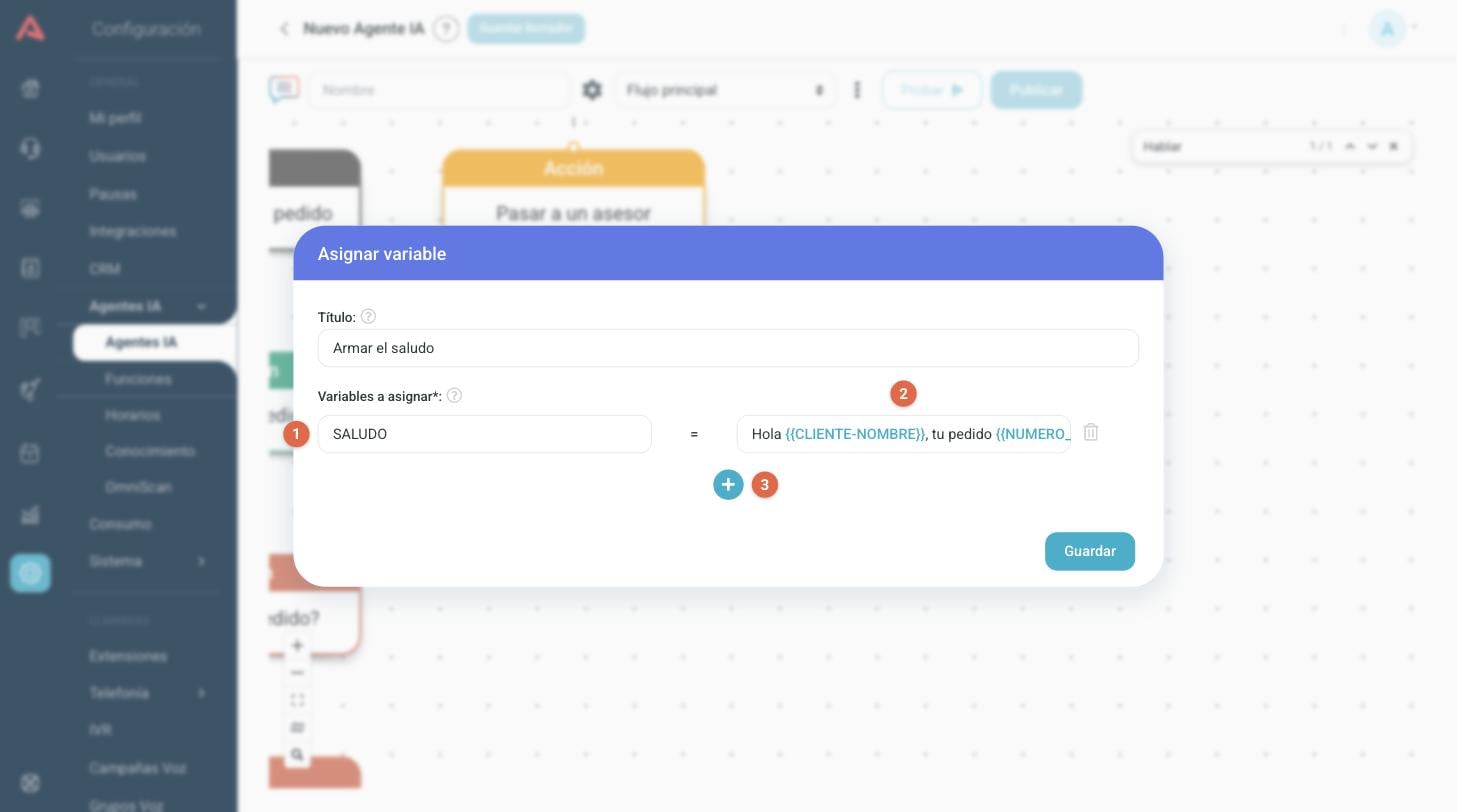
- 1 Variable name
- In capitals with no spaces, just as in the capture.
- 2 Value
- A fixed value or an expression. You can refer to other variables with double braces.
- 3 Add row
- Adds another assignment. They are applied in order, so a row can use a variable assigned by the row above it.
Iteration
Counts how many times the conversation passes through this point and, on reaching the cap, sends it somewhere else. It is the way to break a loop: a menu that keeps repeating, a query that fails again. It has two fields, Iterations* with the number of rounds allowed and On exceeding iterations, go to step with the way out.
Survey
Asks the customer to rate the service and stores the answer for the reports. It normally goes in the survey flow, the one that runs when a chat that was with an agent finishes.
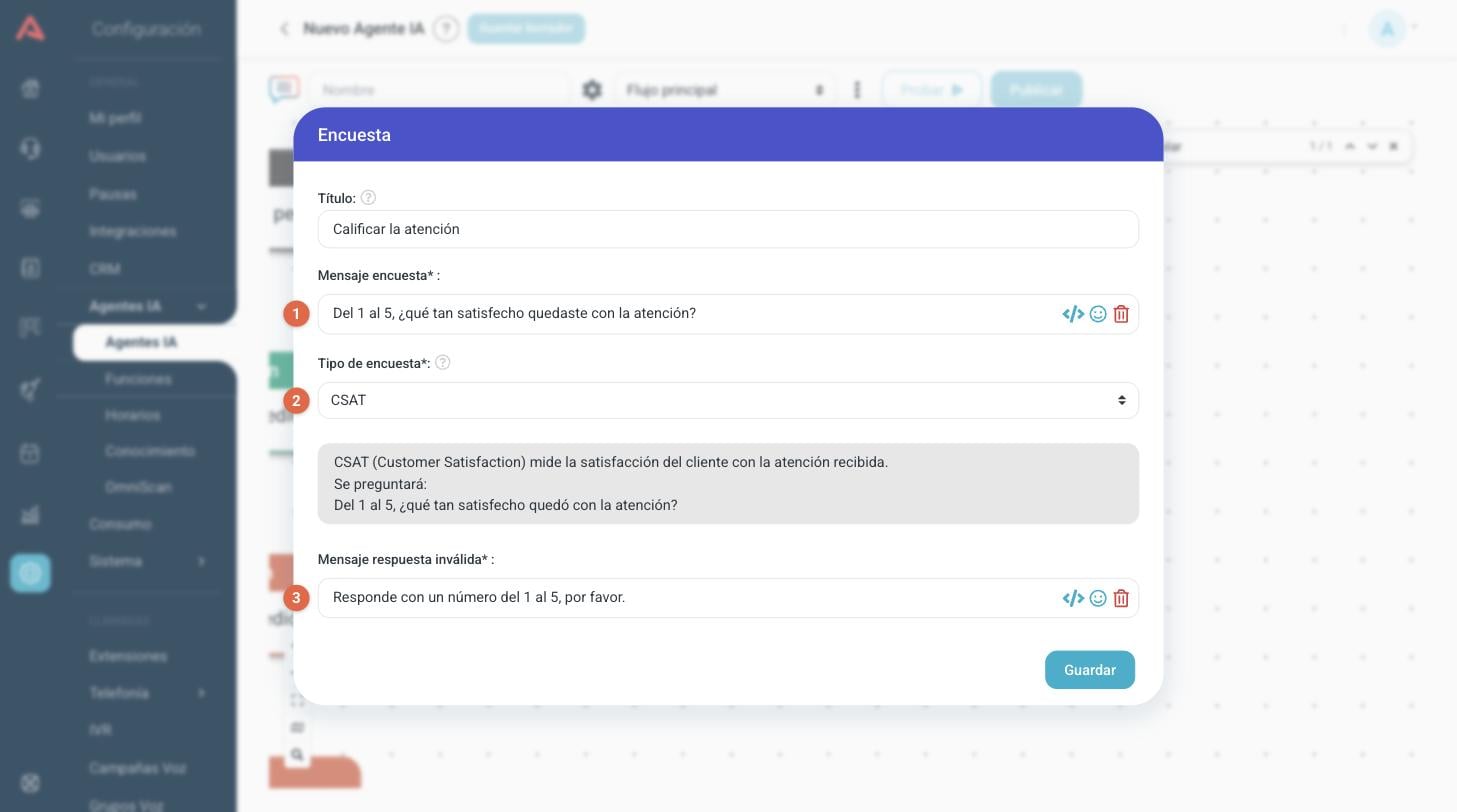
- 1 Survey message*
- The question put to the customer.
- 2 Survey type*
- Underneath the selector, the bot explains what the type you picked measures and what the customer is asked.
- 3 Invalid response message*
- What the bot answers when the rating does not come in the expected format. It does not appear with the Comment type, where any text will do.
The types available are:
- CSAT
- Satisfaction with the service received, from 1 to 5.
- FCR
- Whether the query was resolved in this chat. It is answered 1 for yes and 2 for no.
- NPS
- How likely the customer is to recommend the service, from 1 to 5.
- Comment
- Free text, for gathering opinions or suggestions.
- Custom rating
- A 1 to 5 question with your own identifier. Picking it brings up the Identifier field: a short name, with letters, numbers and underscores, that groups the results in the reports. If you use the same identifier in several bots, their answers are added up in the same group.
With FCR you also get Positive keywords and Negative keywords, so the bot understands a yes or a no written in words rather than with the number.
Which step can go under which
The step menu does not always offer the same things. When an option comes out greyed it is because it cannot hang off that step, and these are the rules.
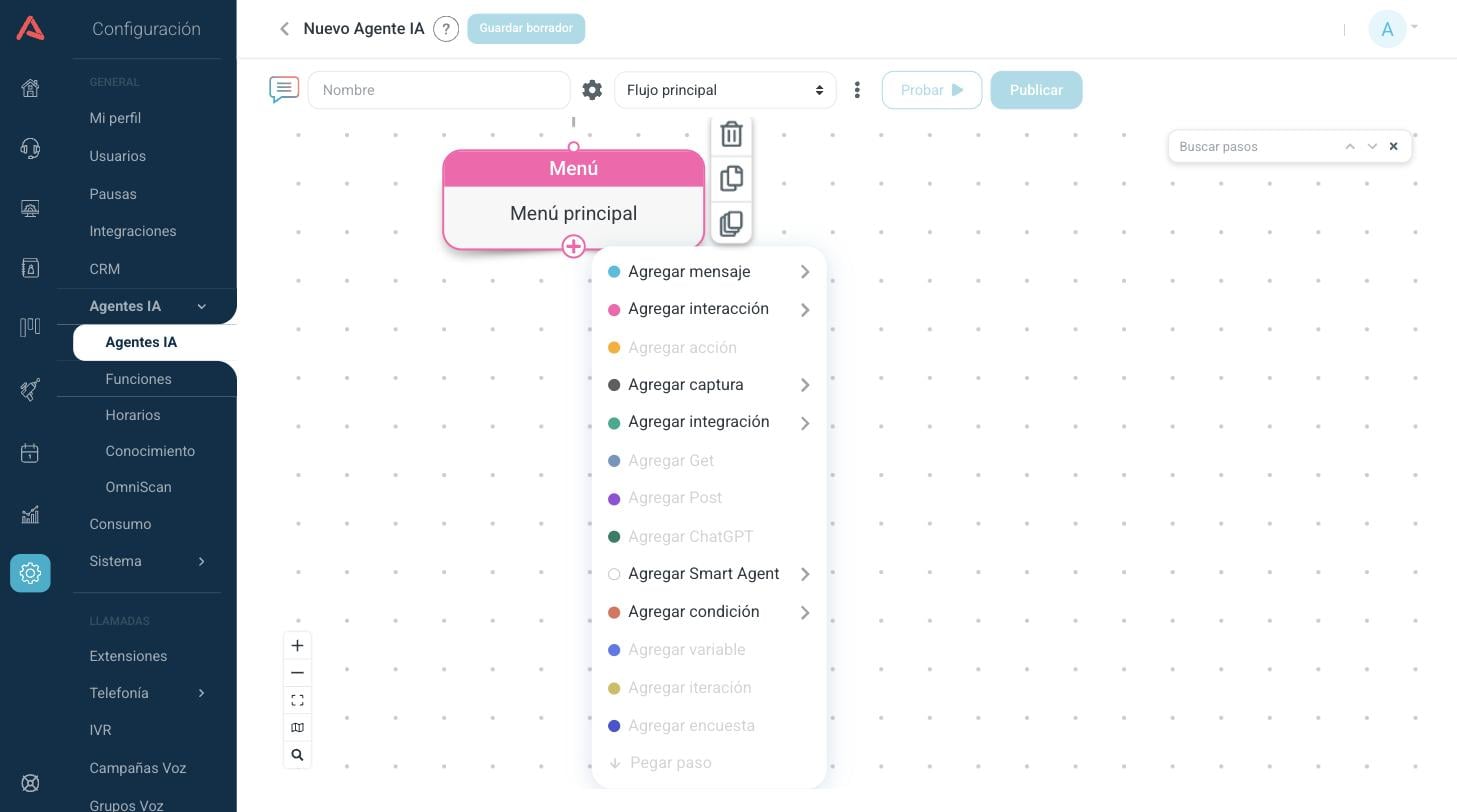
- Off a Menu
- Only Button, List option, Open response and Invalid can hang. Button and List option exclude each other: a button menu does not take list options and the other way round. And there can only be one Invalid.
- Off a Smart Agent
- Only Smart function can hang.
- Off a Condition
- Only Case and Default can hang, and there can only be one Default.
- Outside those three
- Button, List option, Open response, Invalid, Smart function, Case and Default cannot be used: they always need their parent step.
- Branching or inserting
- Only the Menu, the Smart Agent and the Condition split into several paths. On any other step, if you add a new one when it already had one underneath, the new one is inserted between the two rather than opening a second branch.
- In the survey flow
- The menu shrinks to the bare minimum: the message steps and the Survey itself. And an Action step in that flow takes nothing hanging off it: the path ends there.
Steps you do not see in a chatbot
The menu also changes with the type of agent. These steps exist, but not in a chatbot:
- Capture variables
- Voicebots only. It declares the variables the bot receives when the call starts, which are configured on the IVR's Voicebot step.
- Bulk Get and Export report
- Automation agents only.
It happens the other way round too: a voicebot has no Button, no List option, no File capture and no WhatsApp form, because those are things that only exist in a written chat.
If you come across a Condition step with a Result hanging off it instead of Cases, it is one of the old conditions. It still works, but new conditions are built with Case and Default.
An example flow
With what is in this article you can already read a whole flow from beginning to end.
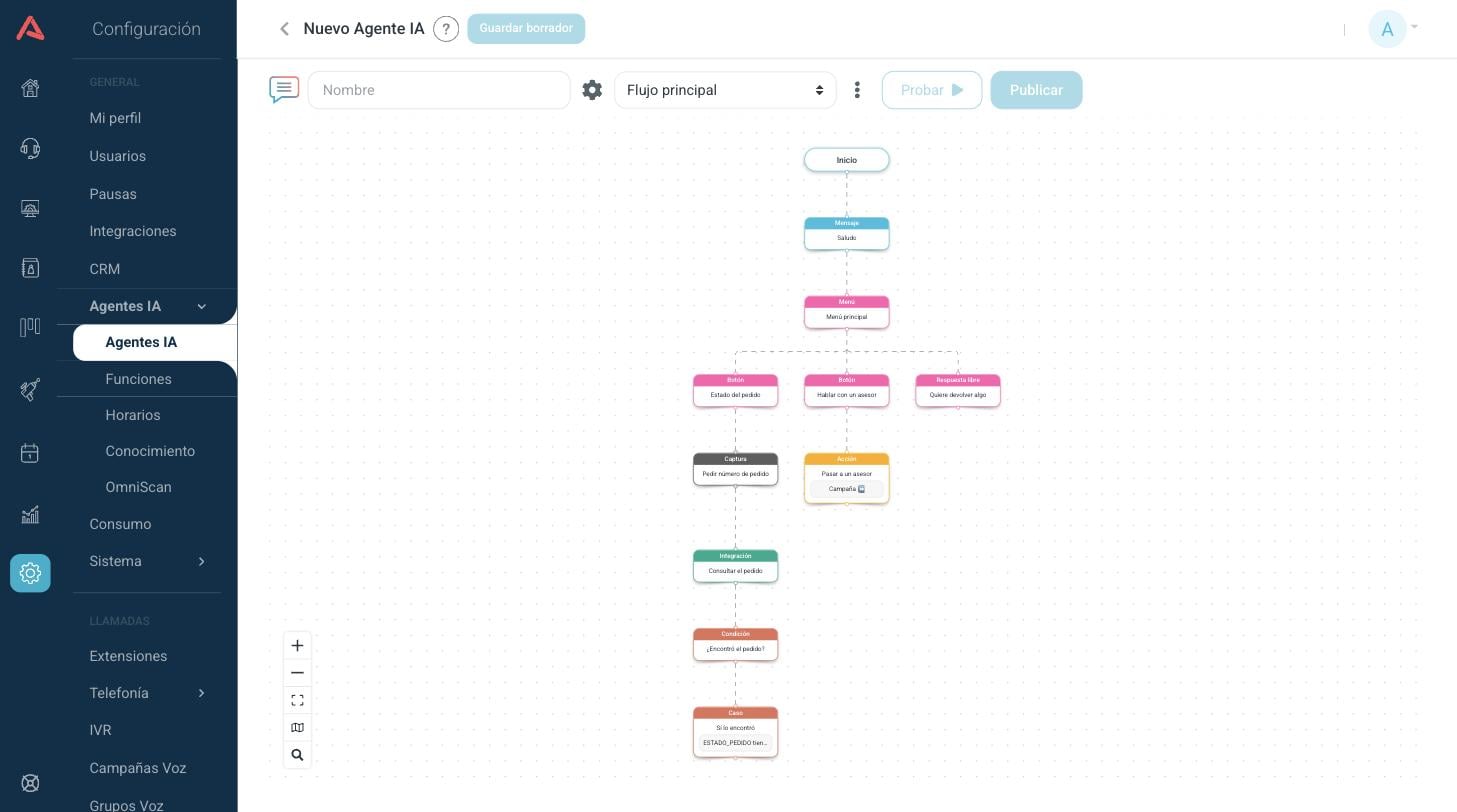
The bot says hello with a Message and opens a Menu. Three paths come out of it: two Buttons and an Open response for the customer who writes instead of tapping a button. The order status button leads to a Capture that asks for the number, to an Integration that looks it up and to a Condition that separates the case where the order turned up from the case where it did not. The other button leads to an Action that hands the conversation to an adviser.
Give every step a title that reads on its own. The canvas shows the title, not the contents, so a flow with titles like "Message 3" or "Capture 2" is impossible to maintain a few months later, and the "go to step" selectors of the other steps turn into a list of meaningless names.