REST Integrations
Connecting Audara to your own services over REST
What this module is for
The API Rest module lets you integrate Audara with outside services through their APIs: you define the URL of the service, how to authenticate and the requests you want to run, and those requests become available to your chatbot and voicebot flows. You will find it under Setup > General > Integrations, on the API card.
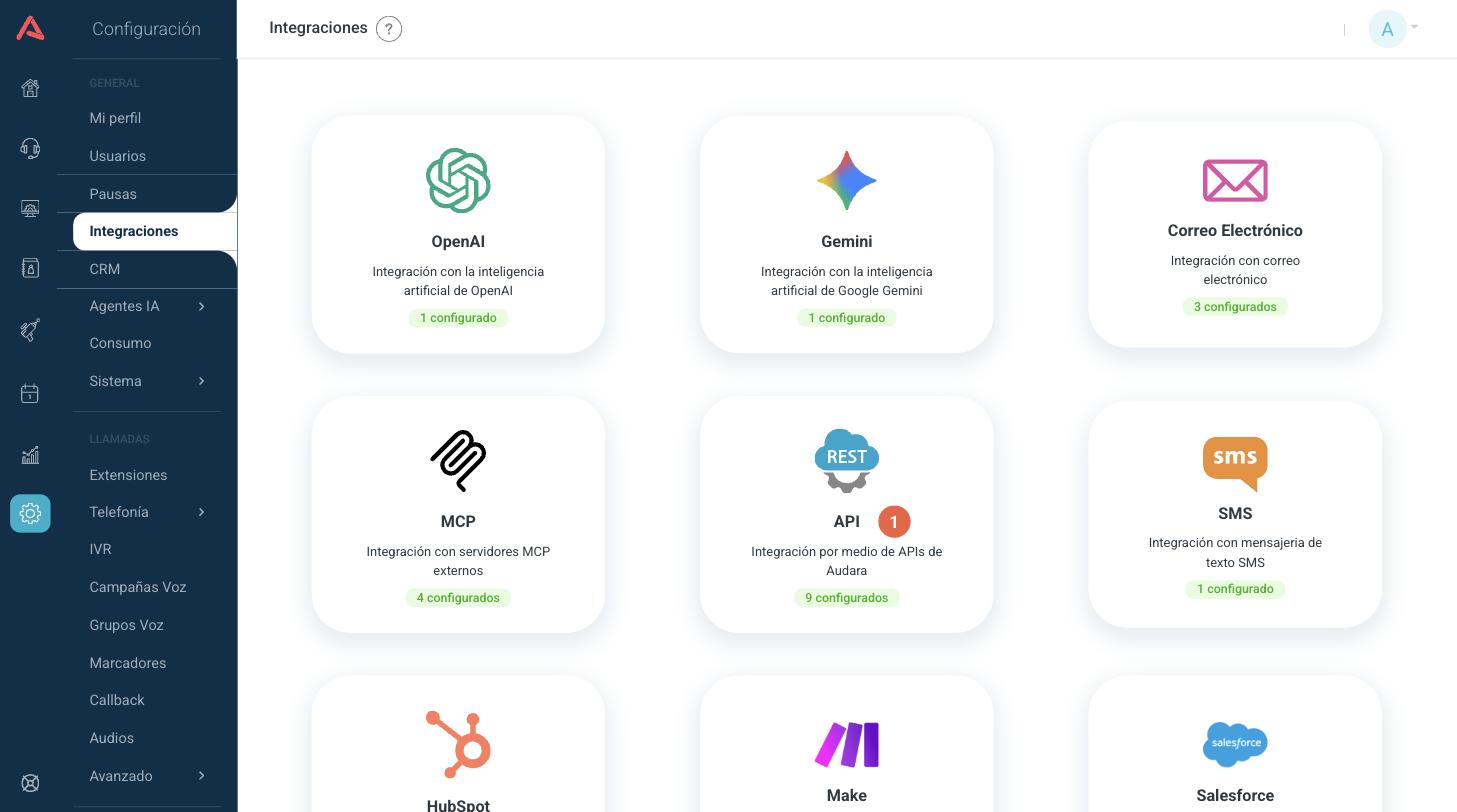
- 1 Open the API card to see the list of REST integrations. The card shows how many integrations you have configured.
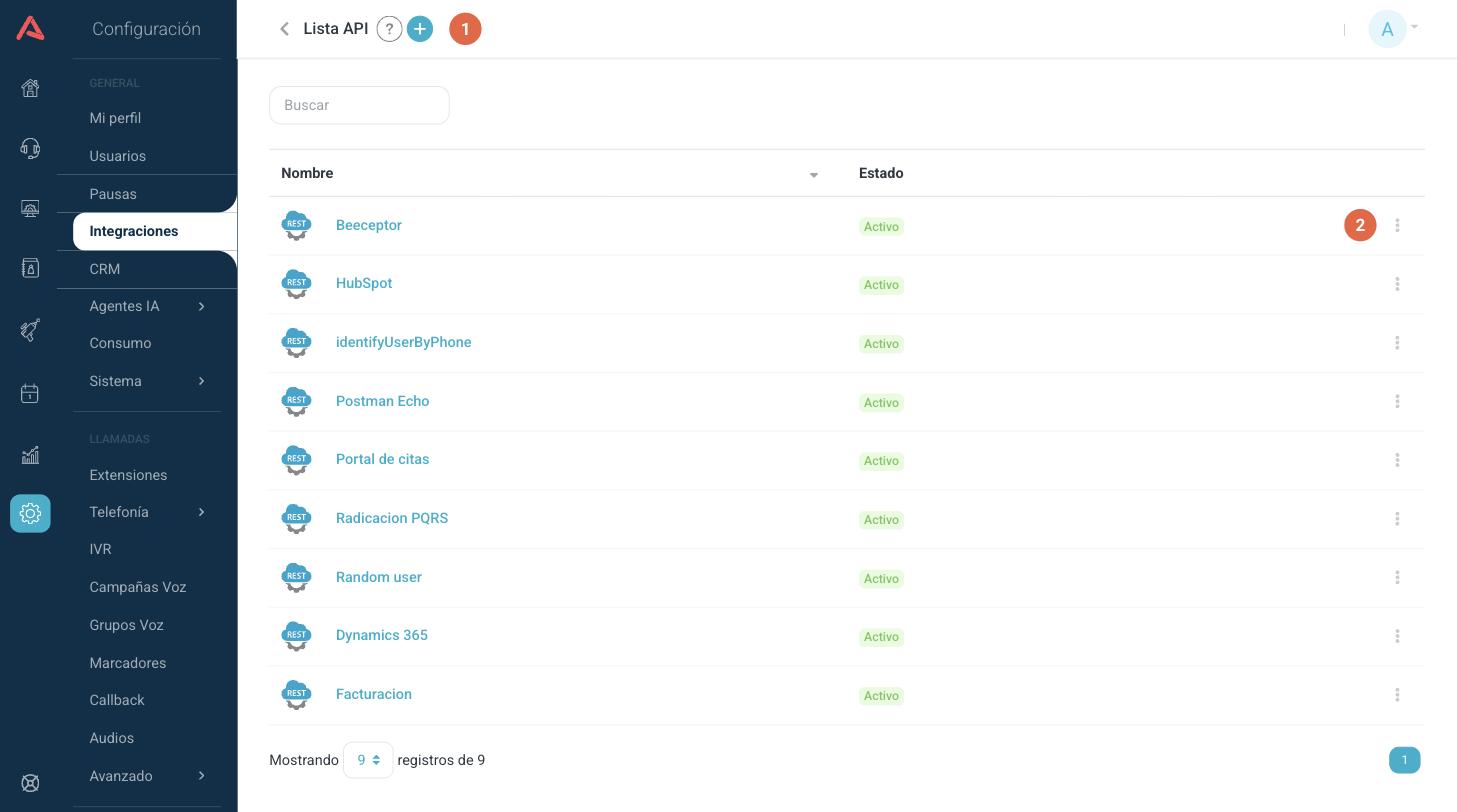
- 1 Create a new integration with the (+) button in the header.
- 2 Open the more options menu (⋮) of each integration to edit, deactivate or delete it.
The list shows the Name of each integration and its Status (active or inactive). Click the name to open and edit it.
Creating an integration
Press the (+) button in the header of the list. The settings are organised into three tabs: Settings, Requests and Authentication. The required fields are marked with an asterisk (*). Filling them in turns on the Save button.
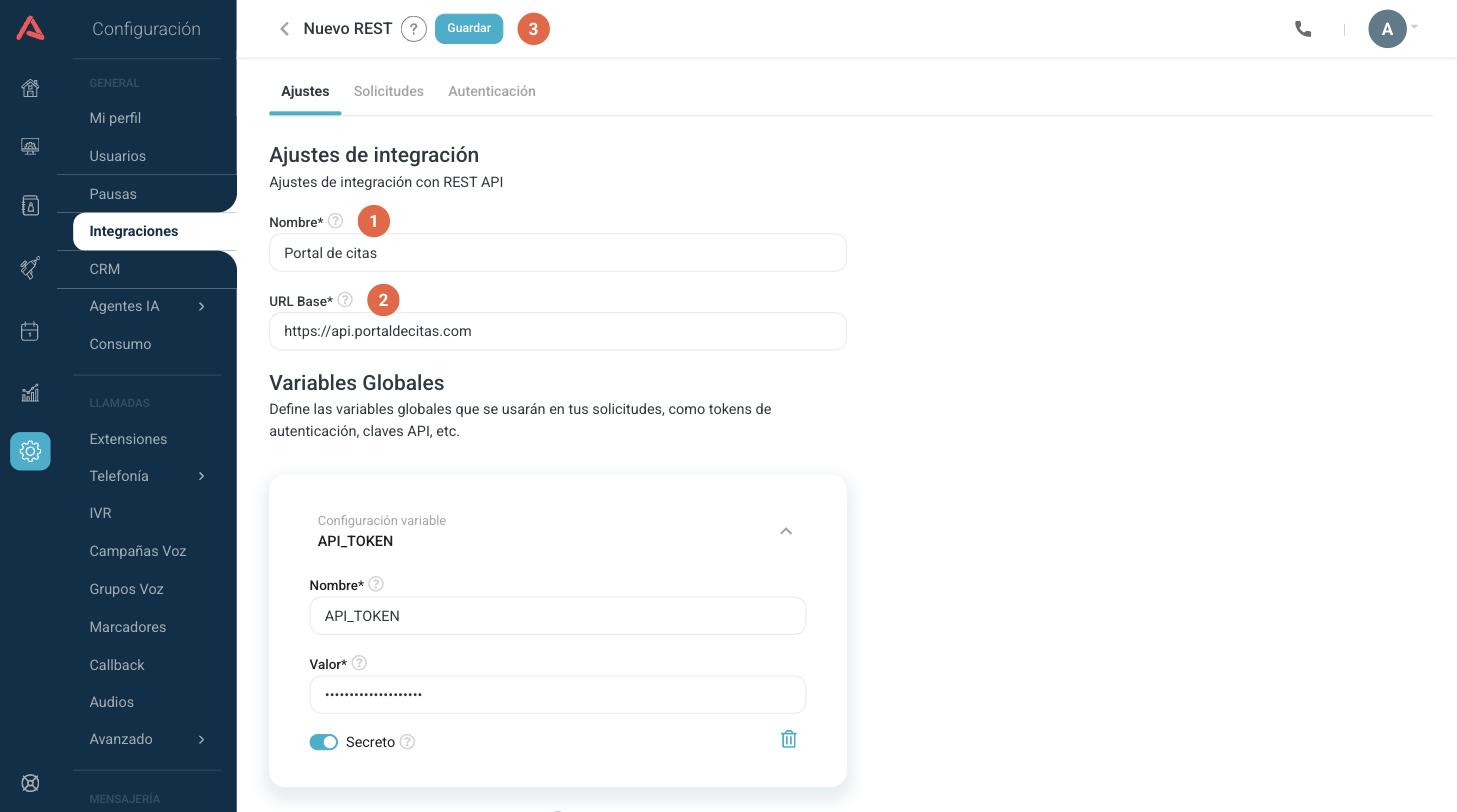
- 1 The fields that identify the integration.
- 2 The URL every request in this integration points at.
- 3 Saves the integration once you have filled in the required fields.
- Name*
- The name of the integration. It is the one you will see when using it from other modules.
- Base URL*
- The base URL for the REST requests of this integration. The path of each request is added onto this URL.
Global Variables
On the same Settings tab you define the global variables that will be used in your requests, such as authentication tokens or API keys. You define the value once and reuse it in the headers of the integration.
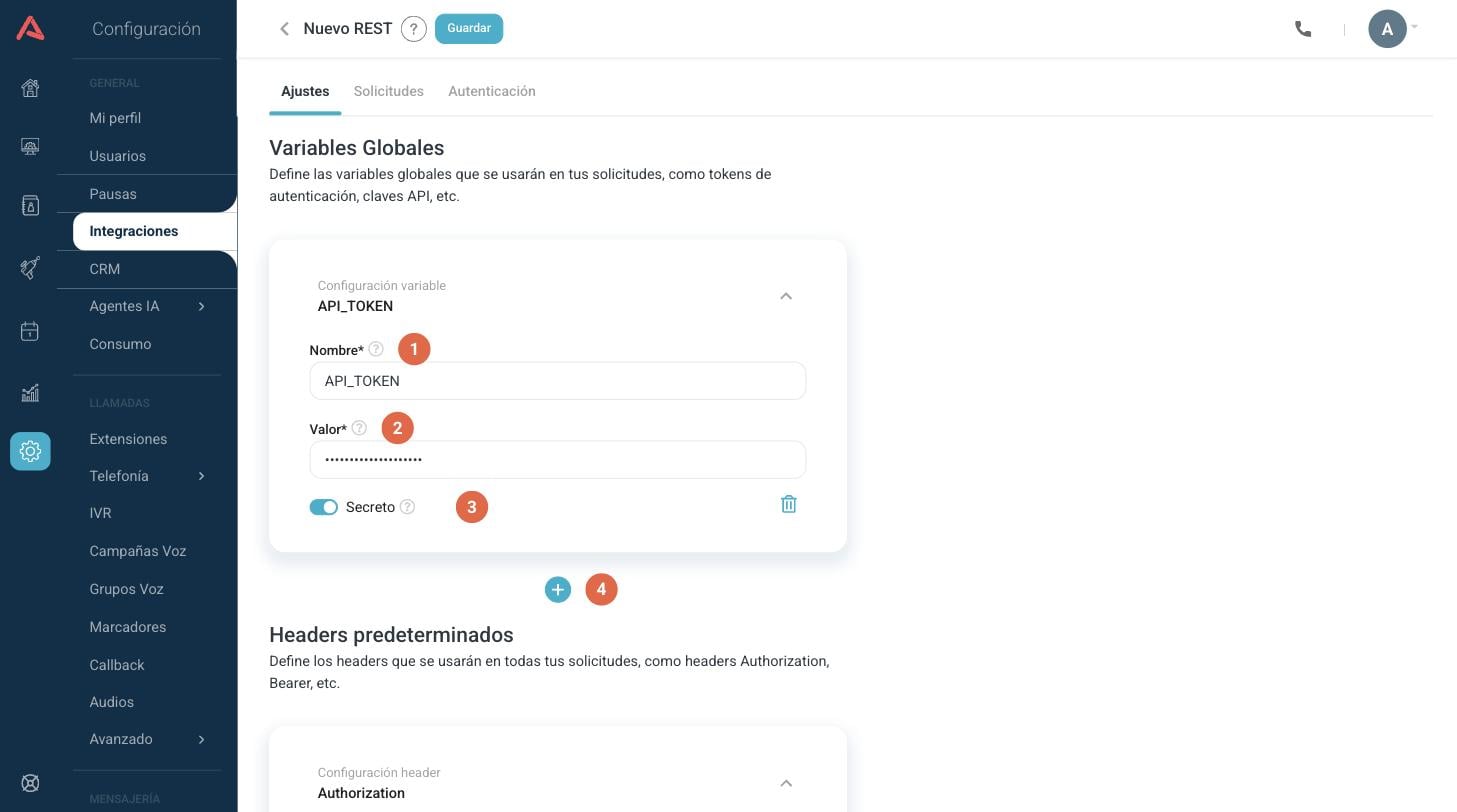
- 1 The name you identify the variable by.
- 2 The value of the variable. If it is secret, it is shown hidden.
- 3 The Secret switch for protecting the value.
- 4 Add another variable with the (+) button.
- Name*
- The name of the variable. It cannot be repeated within the integration.
- Value*
- The value of the variable, for instance the token or the key handed over by the outside service.
- Secret
- If the variable is secret, its value is hidden when editing the integration and in the logs.
Store tokens and keys as secret global variables instead of writing them straight into each header. That way you update them in one place and they are not left visible to other administrators.
Default Headers
This is where you define the headers that will be sent on every request of the integration, such as Authorization or Bearer headers.
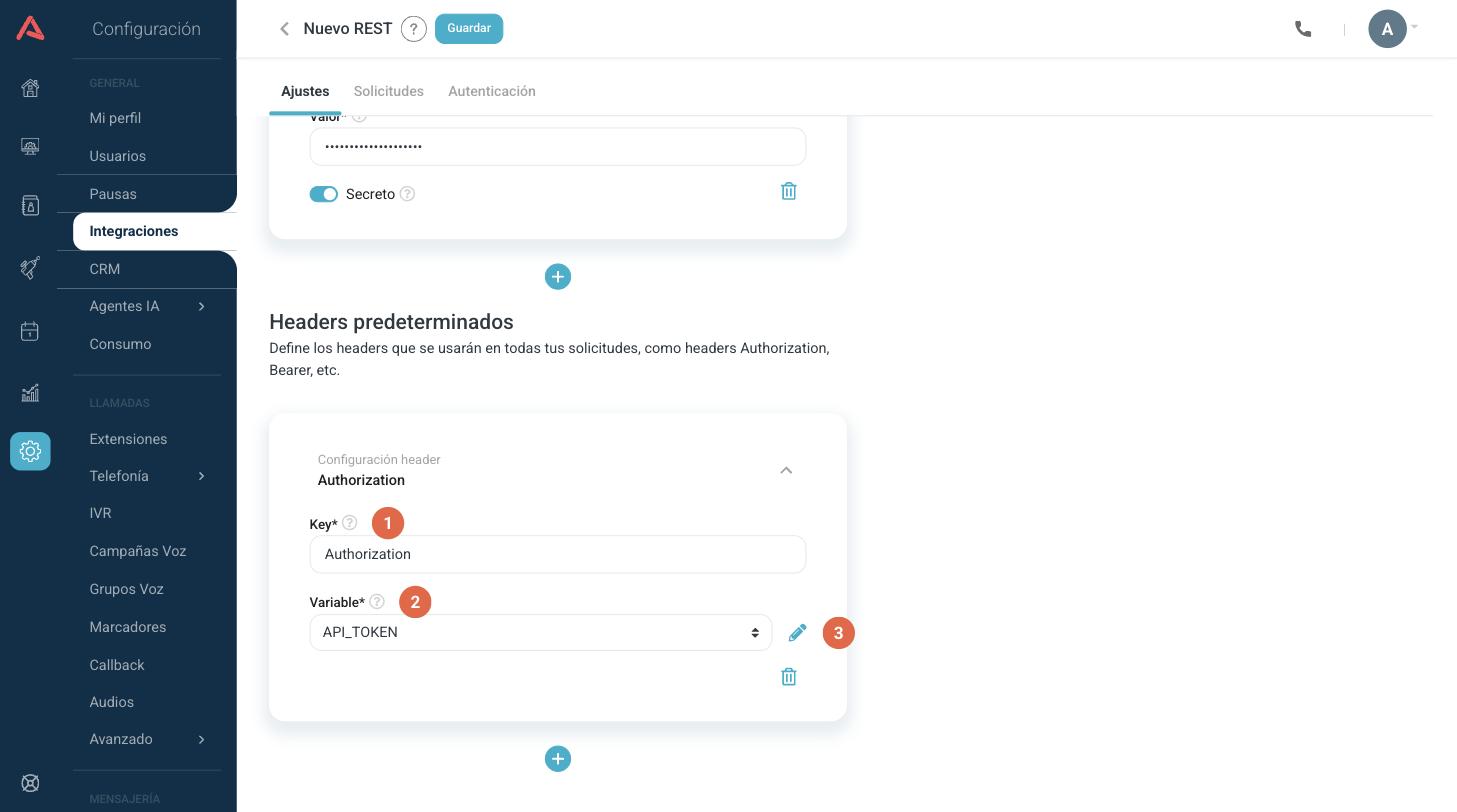
- 1 The key of the header, for instance Authorization.
- 2 The global variable that will be used as the value of the header.
- 3 Switch between using a global variable and a fixed value with the icon next to the field.
The value of a header can come from two sources:
- Variable*
- Uses one of the global variables defined under Settings. Ideal for tokens and keys you want to reuse.
- Fixed value*
- Uses a static value, such as "application/json" or a version number. In this mode it gets a Secret switch of its own, in case the fixed value should be hidden too.
Authentication
On the Authentication tab you configure how the integration authenticates with the outside service. Use it for APIs that require OAuth 2.0.
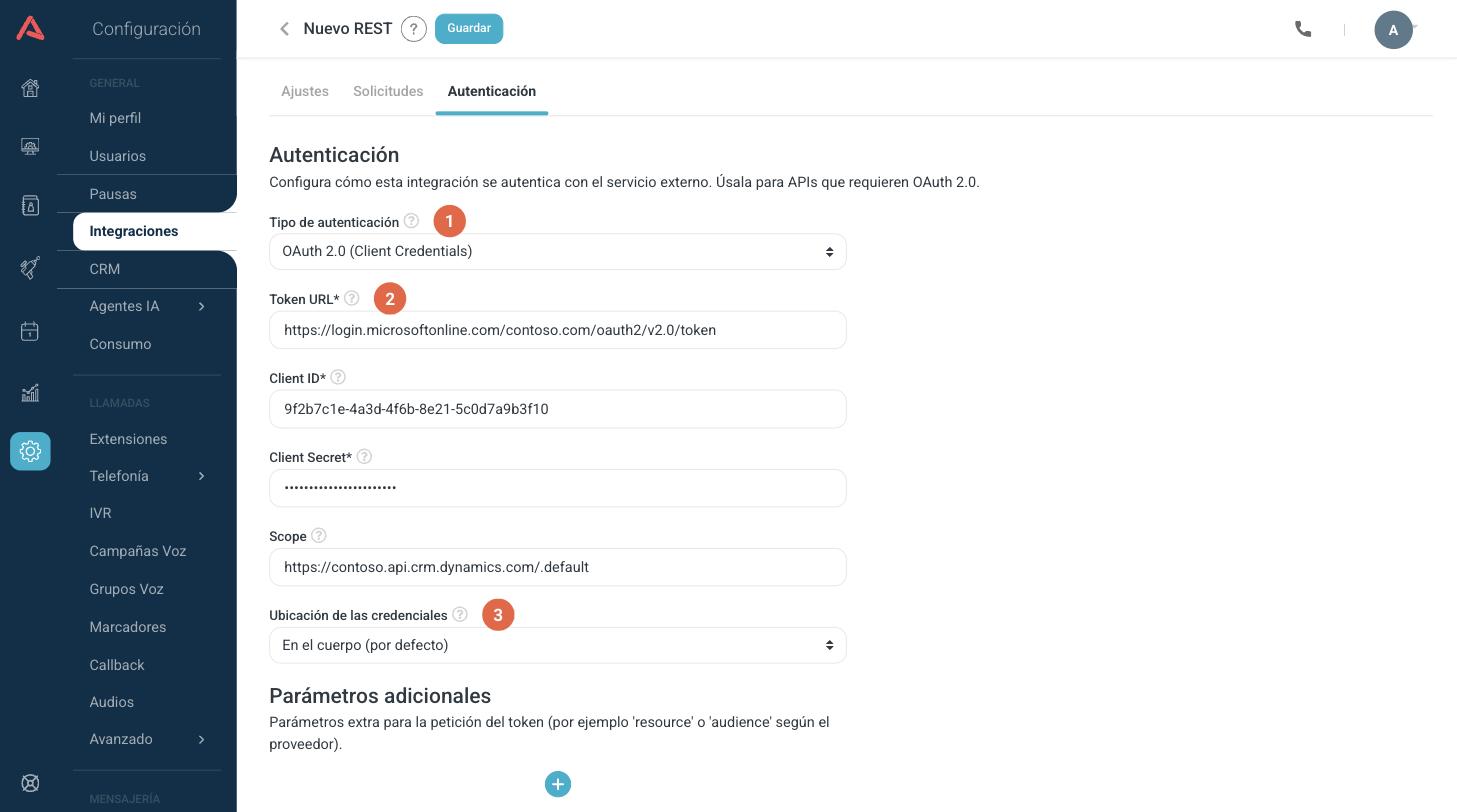
- 1 The authentication type of the integration.
- 2 The endpoint that issues the token, according to the provider.
- 3 Where the credentials are sent when asking for the token.
- Authentication type
- Pick None to use static headers only, Bearer Token for a fixed token, or OAuth 2.0 (Client Credentials) to get and renew a token automatically.
Bearer Token
- Token*
- The token that will be sent as an "Authorization: Bearer" header on every request. It is stored securely and hidden when editing.
OAuth 2.0 (Client Credentials)
- Token URL*
- The endpoint that issues the token. For Microsoft it takes the form https://login.microsoftonline.com/<tenant>/oauth2/v2.0/token.
- Client ID*
- The identifier of the application registered with the provider.
- Client Secret*
- The secret of the application. It is stored securely and hidden when editing.
- Scope
- The scope of the token. For Dynamics it takes the form https://<org>.crm.dynamics.com/.default.
- Credentials location
- Where the Client ID and the Secret are sent in the token request. Most providers take them in the body; some require a Basic header.
- Extra parameters
- Extra parameters for the token request, for instance "resource" or "audience" depending on the provider. Each one is defined as a key and a value.
With OAuth 2.0 the platform asks for the token and renews it automatically when it expires. You do not need to update it by hand or create headers for it.
Requests
On the Requests tab you define the requests that will be used from your integrations, such as GET or POST. Each request is stored on the integration and ready to be used from your bots.
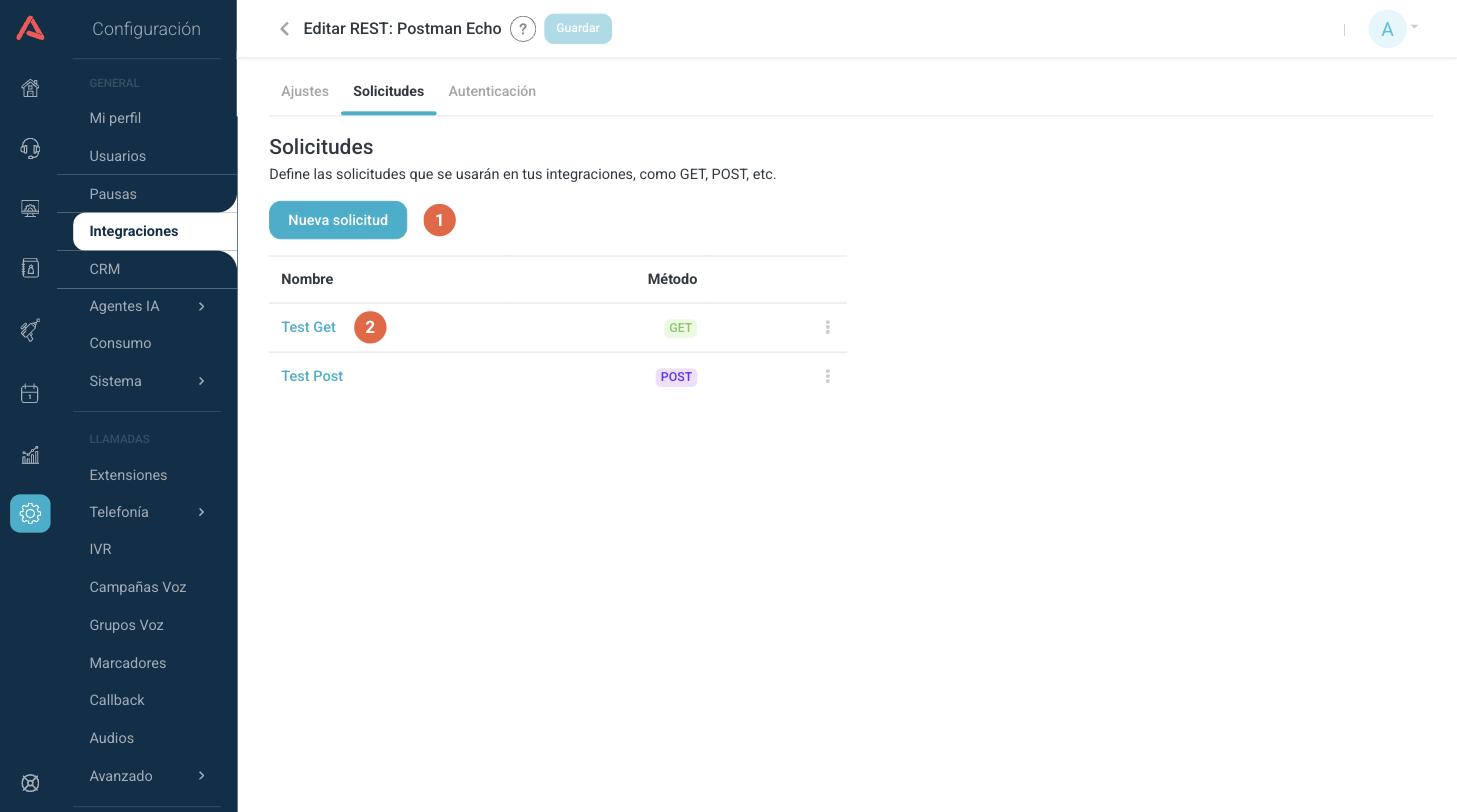
- 1 Create a request with the New Request button.
- 2 Click the name of a request to edit it.
Creating or editing a request opens the form alongside the Test Request panel:
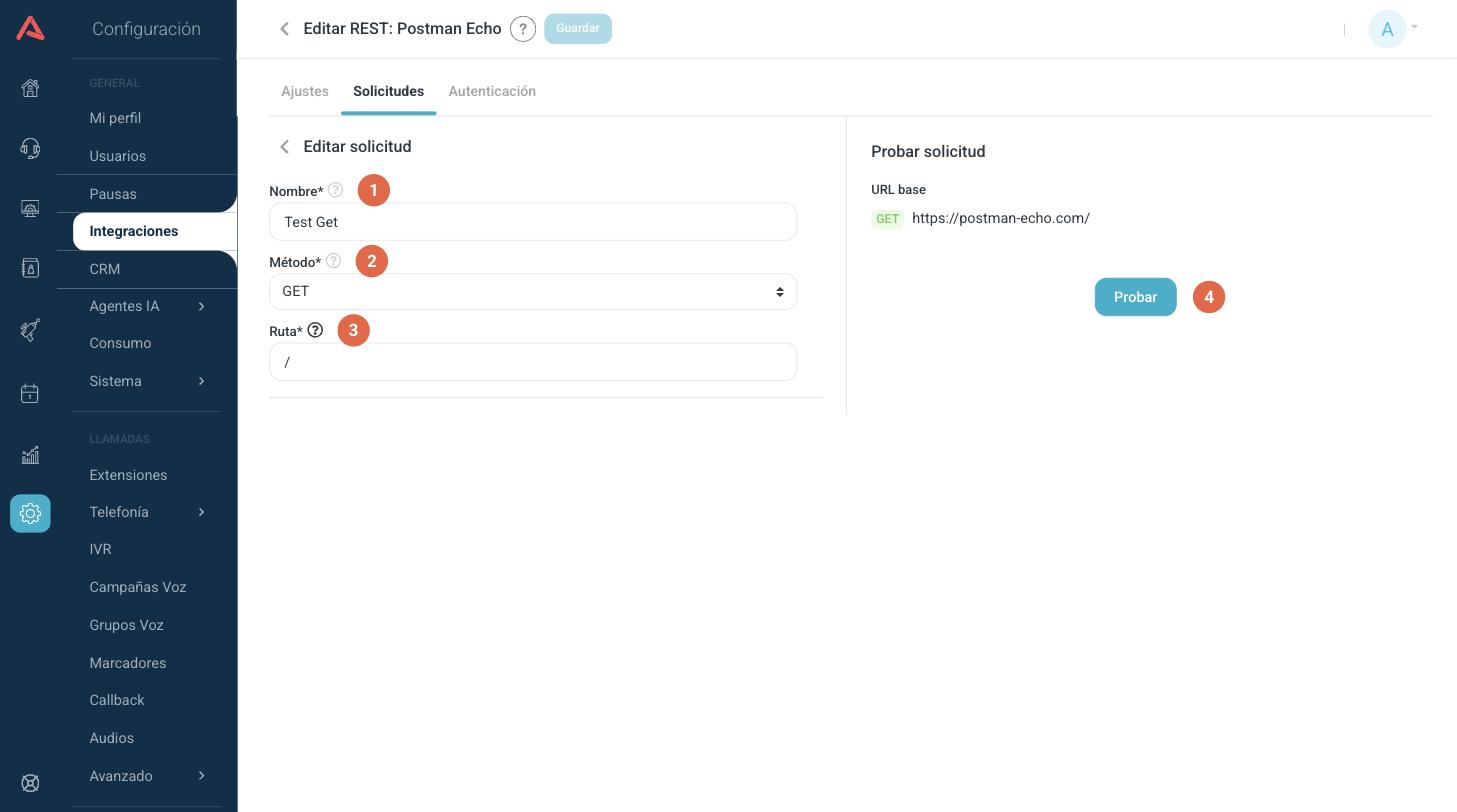
- 1 The name of the request.
- 2 The HTTP method.
- 3 The path that is added onto the Base URL.
- 4 Runs the test request with the Test button.
- Name*
- The name of the request. It cannot be repeated within the integration.
- Method*
- The HTTP method of the request: GET, POST, PUT or PATCH. Each one has its colour in the list of requests, so they can be told apart at a glance.
- Path*
- The path of the request. It is added onto the Base URL of the integration and can include parameters.
- Body JSON*
- The body of the request, for the methods that send one. It has to be valid JSON.
- Send as
- The format the body is sent in: JSON or Form-data.
When the request sends data, that is with POST, PUT or PATCH, the form also shows the sending format and the body. With GET those two fields do not appear.
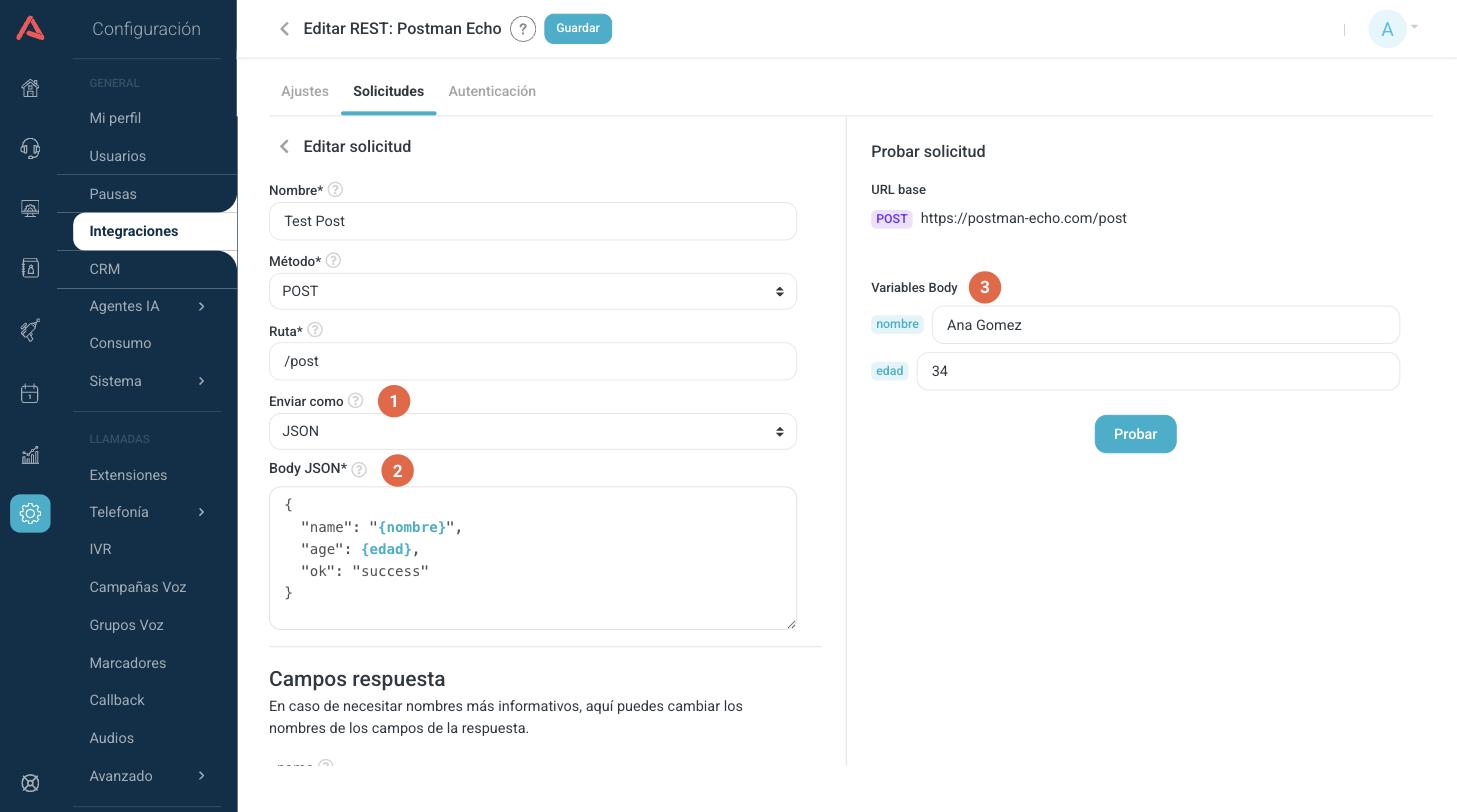
- 1 Pick the format the body is sent in: JSON or Form-data.
- 2 Write the body of the request. You can use variables in braces, like {name} or {age}, to be filled in with data from the conversation when the request runs from a bot.
- 3 The Test panel picks up the variables in the body and asks you for a test value for each one.
The same goes for the path: if it uses variables, they appear in the Path Variables section of the Test panel. The values you write there are only used for the test.
A request has 60 seconds to answer. If your service takes longer, the request is cut off and the bot's step carries on with the error, instead of sitting there waiting.
Sending a file to your API
When a chatbot asks the person for a file, that file can be stored in a variable and sent on to your service later from one of these requests. On the bot side, the step that asks for it is the file capture, and that is where you pick which variable it is stored in; on the integration side you do not have to configure anything special, just use that variable in the body like any other.
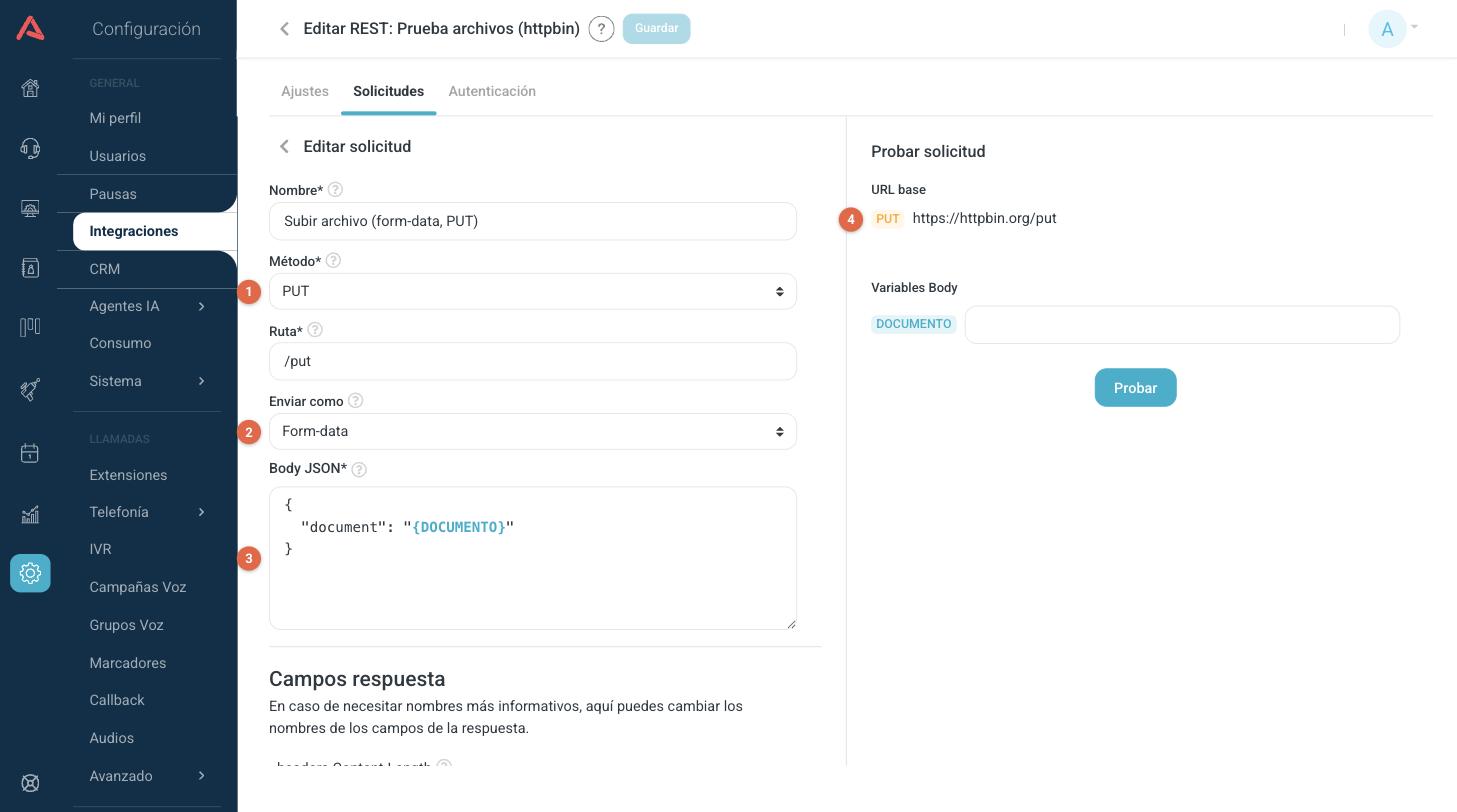
- 1 The method. Many upload services use PUT.
- 2 Send as decides whether it uploads the file or a link to it.
- 3 The file variable goes in the body like any other, in braces.
- 4 In the Test panel, the method is shown in its colour.
What the request decides is how the file travels, and that comes from the Send as field:
- Form-data
- The file travels inside the request, the way it does when you upload it from a web form. It is what most services that receive files expect.
- JSON
- Instead of the file, what travels is a link to download it, which lives for one hour. Your service receives the address and fetches the file itself within that window.
There is no third option, and you do not have to coordinate the two ends: you pick the format and Audara builds the matching request.
A file cannot weigh more than 20 MB. The step that asks for it in the chatbot can demand less, never more, so if you need a lower cap for your case, that is configured over there.
If your upload endpoint is a PUT, you can use it already: PUT is one of the methods that send a body and it appears in the selector alongside POST and PATCH.
Testing and choosing fields from the answer
The Test Request panel shows the method and the full URL that is going to be run. Press Test to send the real request to the service and see the answer.
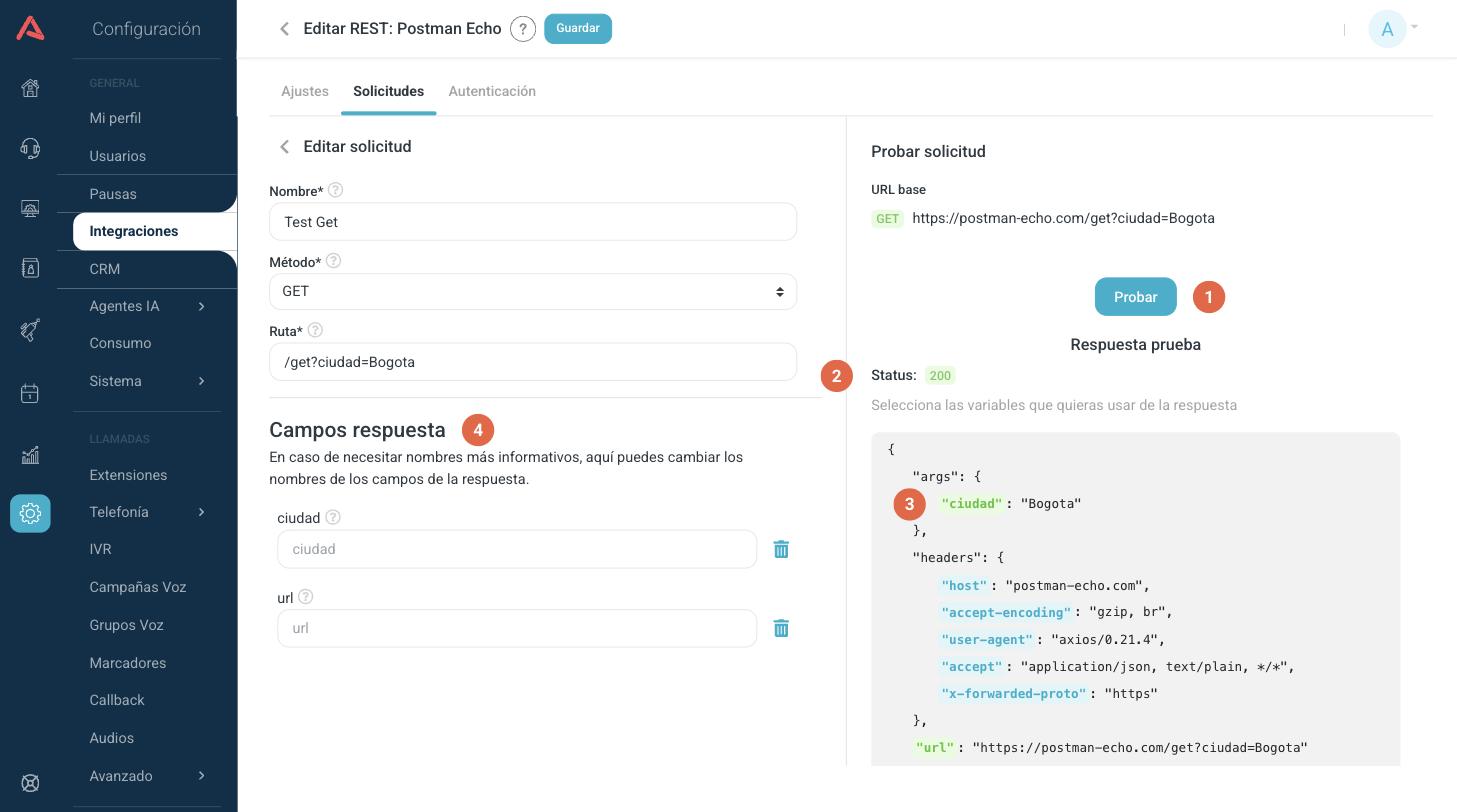
- 1 Run the test with the Test button.
- 2 The Status tells you the outcome of the request.
- 3 Click the highlighted fields of the answer to select them as variables.
- 4 The selected fields appear under Response Fields.
The fields you select are the ones that become available as variables when using the request from other modules. Under Response Fields you can rename them to something more informative; if you leave the field empty, it keeps the original name from the answer.
The Test button runs the real request against the outside service. Be careful when testing requests that create or modify data, such as POSTs.
List type answers
When the answer brings in an array of items, for instance a list of contacts or of available appointments, you can treat the whole array as a single list variable.
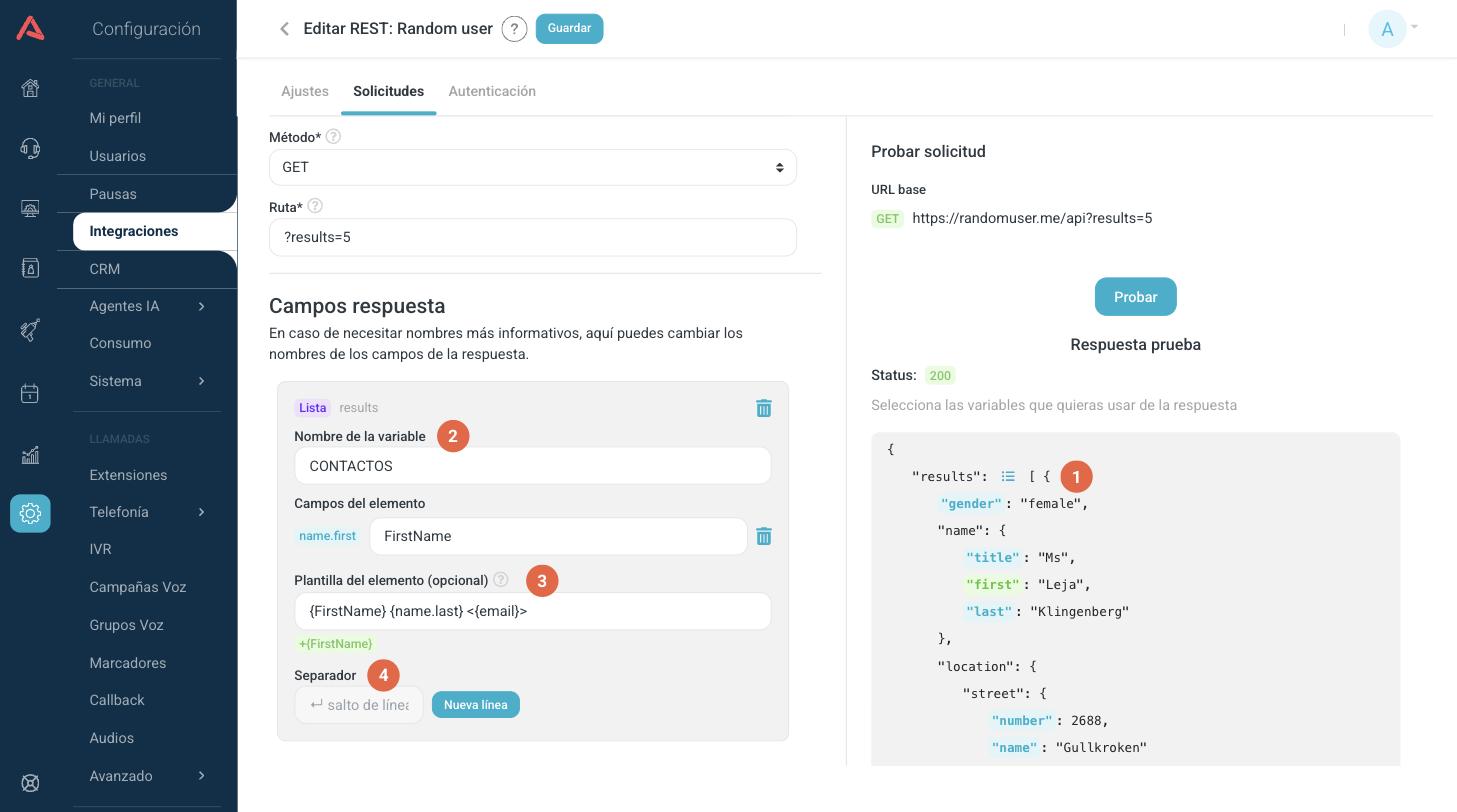
- 1 Press the list icon next to the array to treat it as a list. The answer collapses and shows only the first item as a sample.
- 2 The name of the variable that will hold the list.
- 3 The template each item is shown with.
- 4 The text that separates the items when the list is joined up.
- Variable name
- The name you will use the whole list by from other modules.
- Element fields
- The fields of each item you want to use. Select them by clicking the highlighted fields inside the sample item, and rename them if you need clearer names.
- Item template (optional)
- How each item is shown. Insert values with {FieldName}, using the name you gave the field, or with the direct path such as {name.first}. For instance: {Name} <{email}>. If you leave it empty, the selected fields are joined up separated by a space.
- Separator
- The text placed between each item when the list is joined up. By default it is a comma and a space, and the New line button uses a line break.
Where the integrations are used
The requests you configure become available in your bots' flows:
- Chatbots: the integration step runs a request, sends it variables from the conversation and stores the fields of the answer as chat variables, ready to be used in the messages and conditions that follow.
- Voicebots: voice flows run the same requests and use the fields of the answer inside the call.
In both cases, the fields and lists you defined under Response Fields are the ones that show up as available variables.
Editing, deactivating or deleting
Click the name of an integration to edit it. From the more options menu (⋮) on the right of each integration you can Edit, Deactivate or Delete. A deactivated integration keeps its settings but stops being available.
Before deleting an integration, check which bots use it. A flow depending on a deleted request will stop getting that data.