Chatbot
The module, the flow canvas and how to publish an agent
What this module is for
An AI Agent is an assistant that serves your customers with nobody on the other end. A chatbot is the agent that works in text: it answers on WhatsApp, on your website chat, on Instagram, on Messenger or on Telegram, it resolves the frequent questions, it captures data and, when it needs to, it hands the conversation over to a human agent.
You will find it under AI Agents, in the main menu. All three kinds of agent Audara can build live there together, because all three are put together with the same flow editor. This article covers the module and the editor using a chatbot; the full catalogue of steps and the voice agents have articles of their own.
What you build in this module is a flow: a sequence of steps the conversation moves through. Each step does one thing (sends a message, offers a menu, stores a value, calls an outside service) and decides where the customer goes next.
The list of agents
The entry screen is the list of all your agents.
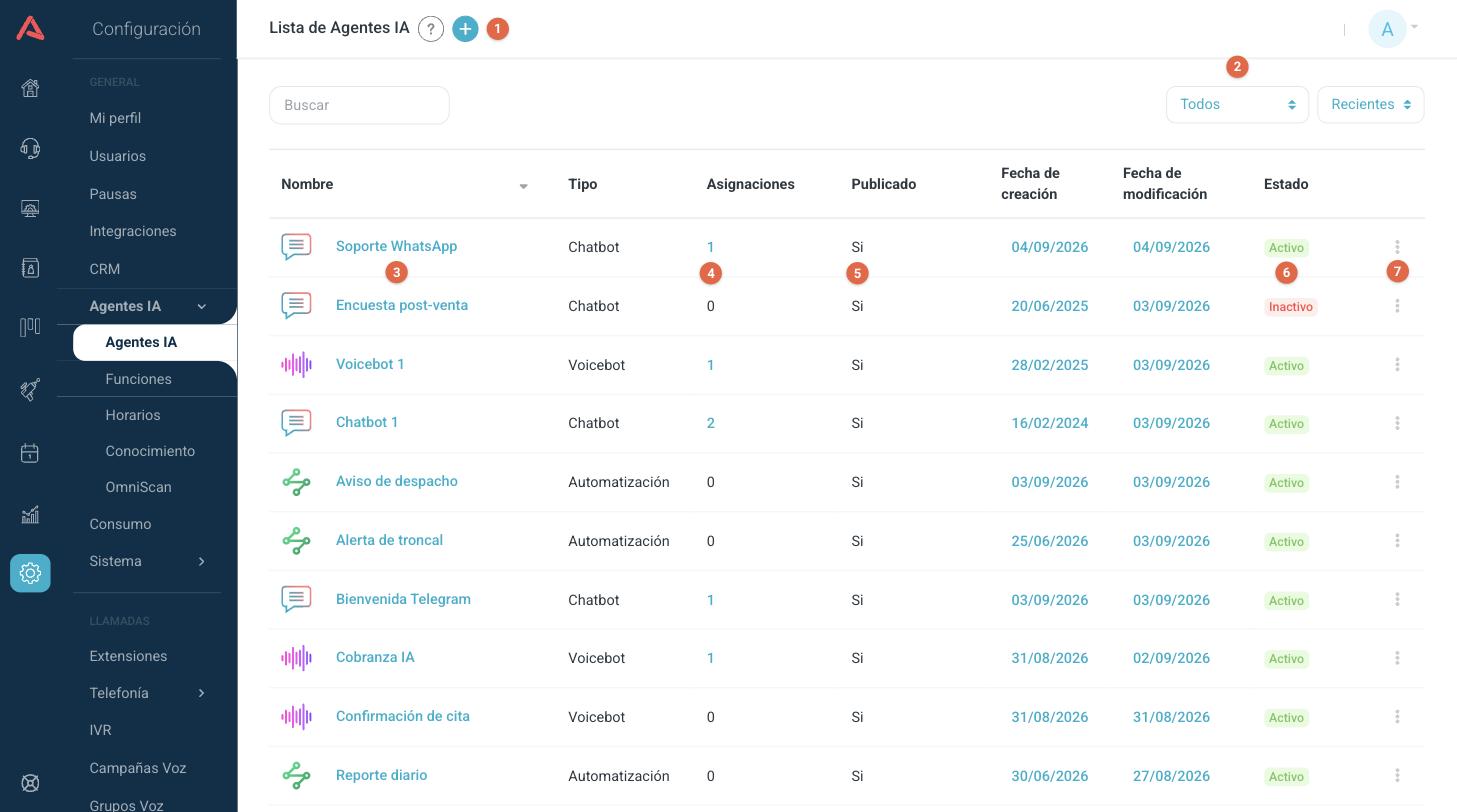
- 1 Create a new agent with the (+) button in the header.
- 2 Filter the list by agent type, and sort it with the selector next to it.
- 3 Click the name to open the agent in the editor.
- 4 Assigned counts how many channels or IVRs this agent is set on. If the number is zero, the agent exists but nobody is using it.
- 5 Published tells you whether the agent already has a version answering. An agent that says No only exists as a draft.
- 6 Status: an inactive agent keeps everything you built, but stops answering.
- 7 The more options menu (⋮) lets you edit the agent, turn it on or off and delete it.
Creating a chatbot
Press the (+) button. The first thing Audara asks you is what type of agent you are going to build, because that decides which steps you will have available afterwards.
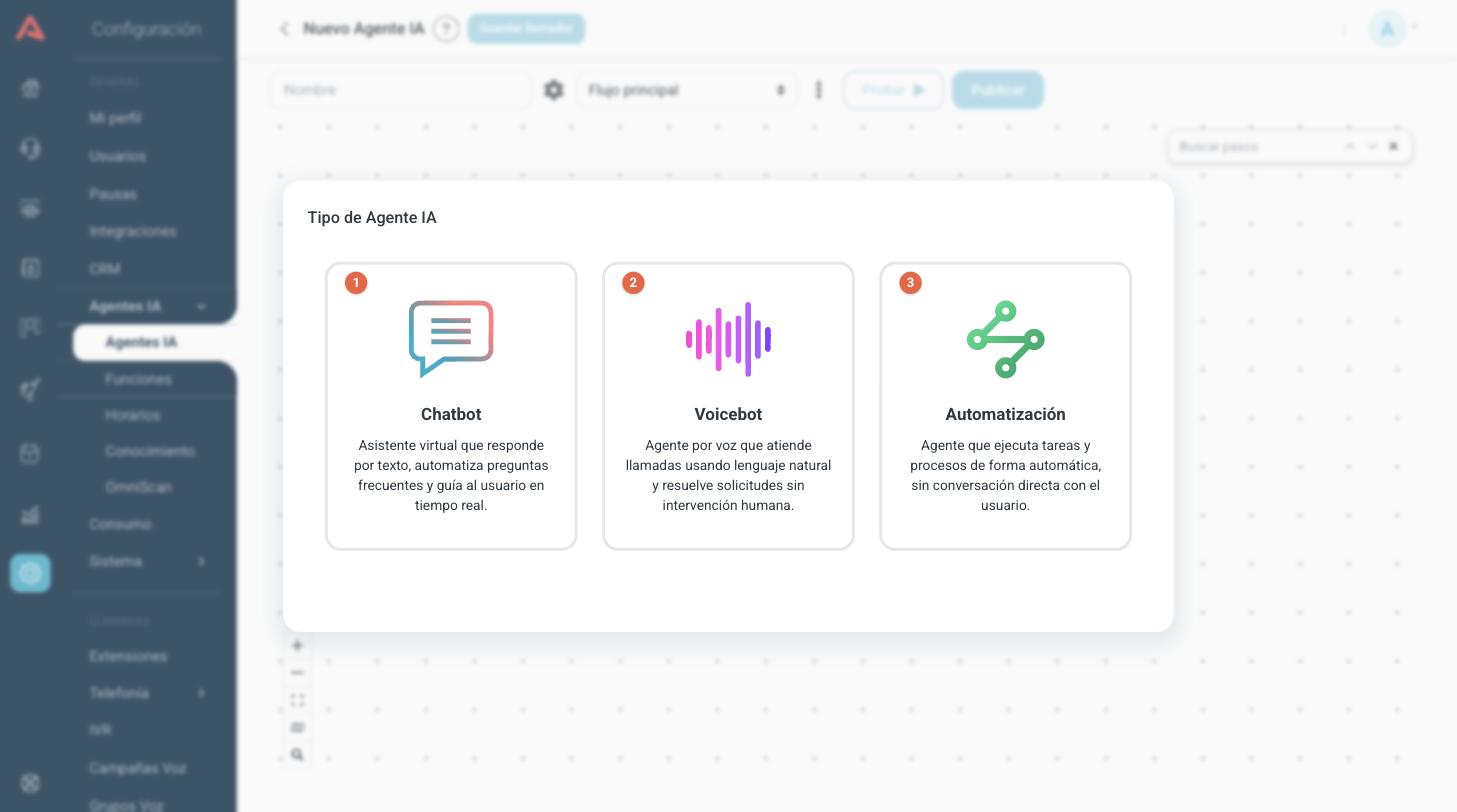
- 1 Chatbot: answers in text on the chat channels. It is the one this article covers.
- 2 Voicebot: answers calls and talks to the customer. It has its own article, because it adds voice, speech recognition and conversation timings.
- 3 Automation: runs tasks on its own, with no conversation with anybody. It has its own article, because it is triggered differently and brings steps the other two do not have.
Picking the type opens the editor, with an empty flow and a single step: Start.
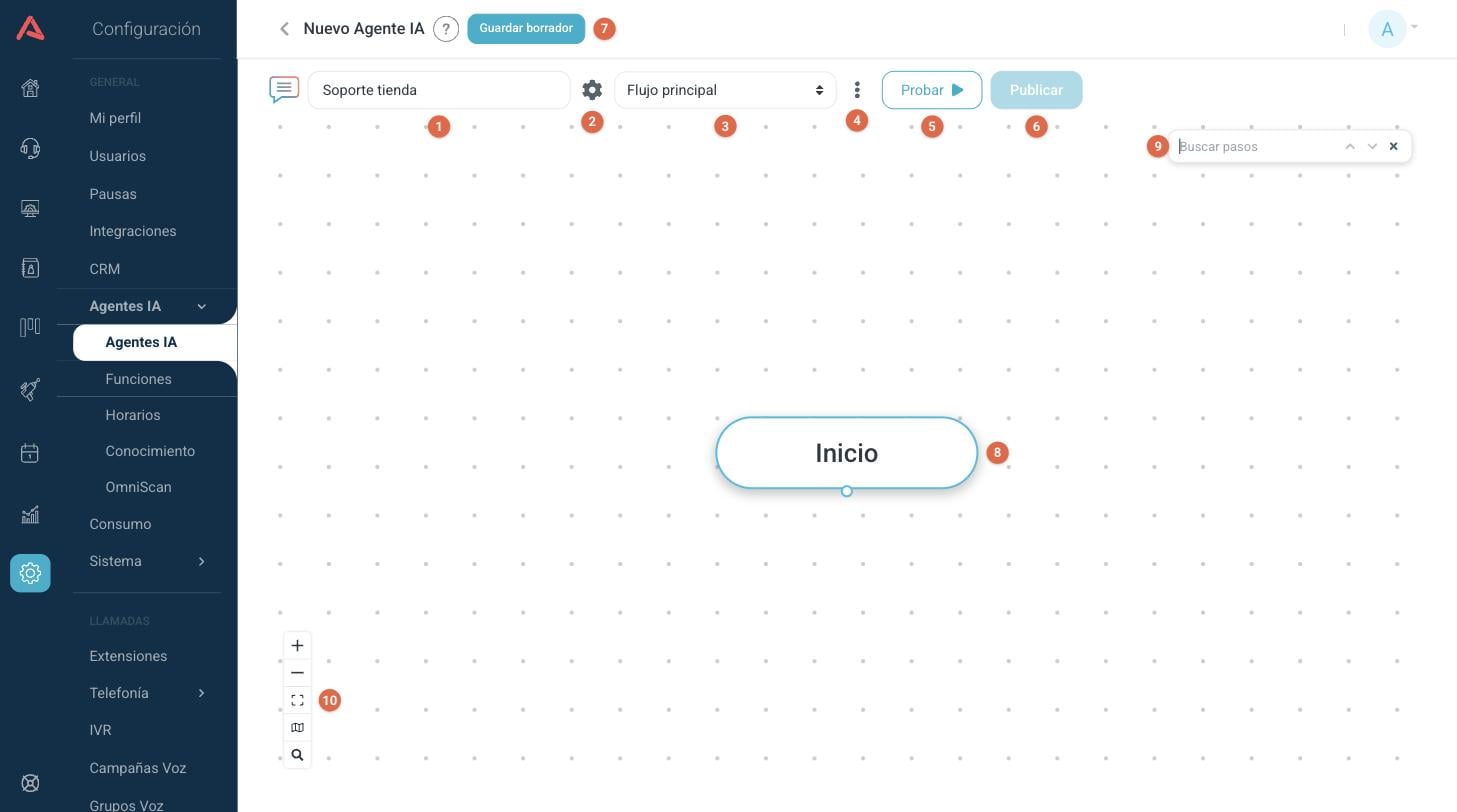
- 1 Agent name. It has to be at least three characters long and it cannot repeat the name of another agent.
- 2 General settings (the cog): the settings for the whole bot, not for one step.
- 3 Selected flow. An agent can have several flows and this selector says which one you are looking at.
- 4 Flow menu (⋮): create flows, keywords, variables, arrange, history and assignments.
- 5 Test: opens a test conversation against what you have on screen.
- 6 Publish: takes your changes to the version that serves your customers.
- 7 Save draft: saves your work without anybody seeing it yet.
- 8 The Start step, where every conversation comes in. It cannot be deleted.
- 9 Search steps: type the name of a step and the canvas centres on it. In a large flow it is the quickest way to get around.
- 10 Zoom, fit and canvas map controls.
Until you press Save draft, the agent does not exist: if you leave the screen, everything you put together is lost. Give it a name and save as soon as you start.
General settings
The cog opens the settings that apply to the whole agent.
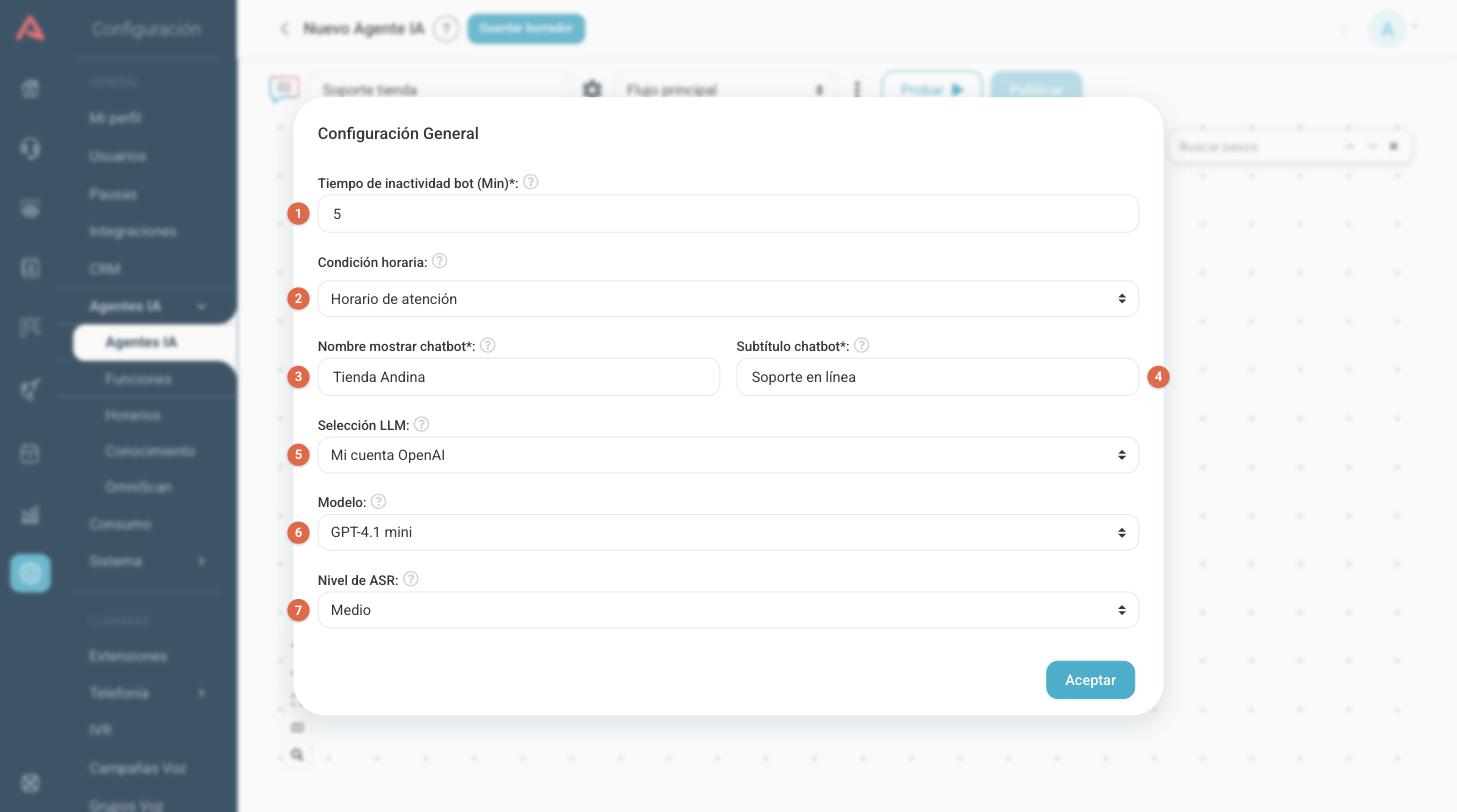
- 1 Bot inactivity time (Min)*
- How many minutes the conversation waits without the customer writing before going to the Inactivity flow. It takes between 1 and 120 minutes.
- 2 Time condition
- The hours this bot answers in, taken from AI Agents > Schedules. Outside those hours the conversation starts in the Off hours flow instead of the main one.
- 3 Chatbot display name*
- The name the customer sees when talking to the bot on the Webchat channel. It is not the name of the agent in the list.
- 4 Chatbot subtitle*
- The line that goes under the name in the Webchat.
- 5 Select LLM
- The artificial intelligence integration this bot will use in the steps that need it. It comes from the integrations you have configured.
- 6 Model
- The model from the chosen provider that the bot runs on.
- 7 ASR Level
- How fine the speech recognition is that the chatbot uses to understand the voice notes the customer sends it.
Press Accept to go back to the canvas. Like everything else, these settings stay in the draft until you publish.
The canvas
The flow is drawn as a tree coming down from Start. Each card is a step: at the top, in colour, it says what type it is; underneath, the title you gave it.
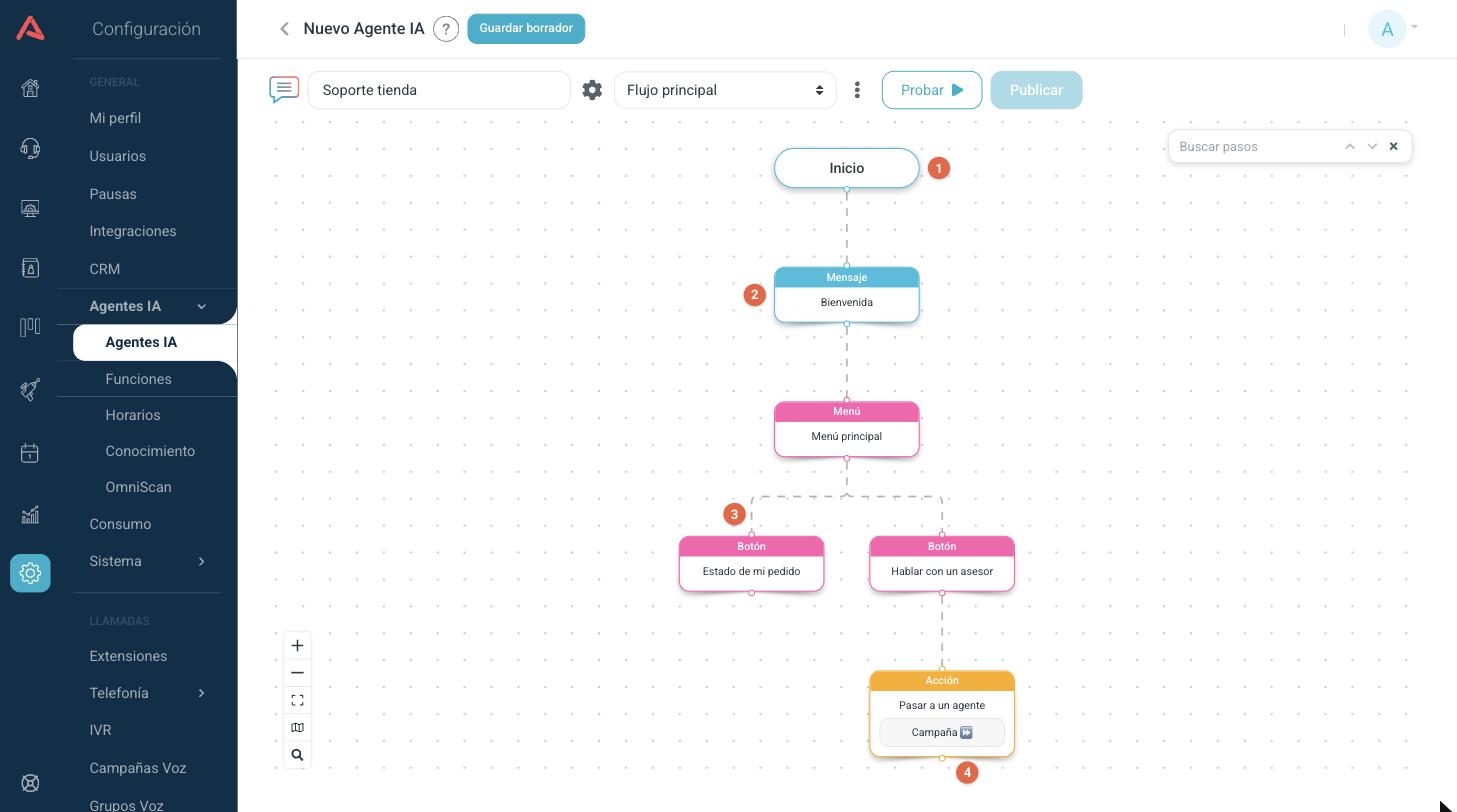
- 1 Start: the entry point of the flow.
- 2 A step. The colour of the header identifies the type, and the same colour is used in the menu you added it from.
- 3 A branch. A menu opens one path per option, and each path carries on by itself.
- 4 The outgoing connector. Hover over it and a (+) appears to add the next step.
To move around the canvas, drag the background. To move a step, drag it. If you leave the mouse over a step, three buttons appear to its right: delete, copy the step on its own and copy the step with everything hanging off it. Once you have copied, the (+) anywhere else in the flow offers Paste step.
When you delete, Audara asks whether you want to remove only that step or all of its descendants as well. And to select several steps and move them together, hold down the Shift key and drag over the background of the canvas.
When you add two paths under the same step, the second one is drawn in the same place as the first and it looks as though nothing happened. Use Arrange > Vertical from the flow menu and the tree sorts itself out, with each branch in its place.
Adding and configuring a step
Click the (+) on a step's connector and the step menu opens, grouped into families.
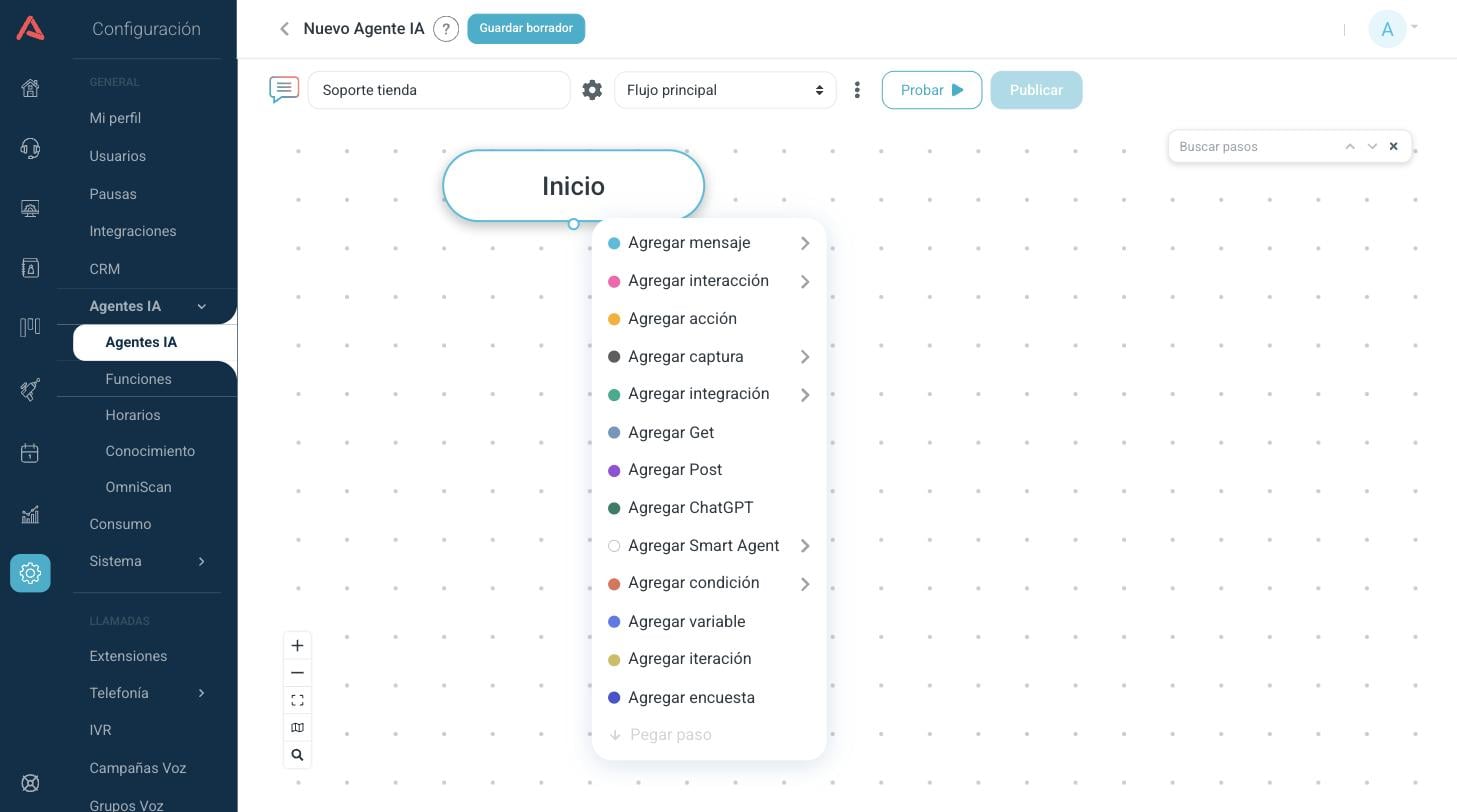
The groups are messages, customer interaction, actions, data capture, integrations, Get and Post queries, ChatGPT, Smart Agent, conditions, variables, iterations and surveys. Not all of them are available at all times: the ones that make no sense at the point you are standing on come out greyed. A Menu button, for instance, can only hang off an Options menu.
Picking a type opens the settings window for that step. The fields change with the type, but the shape is always the same.
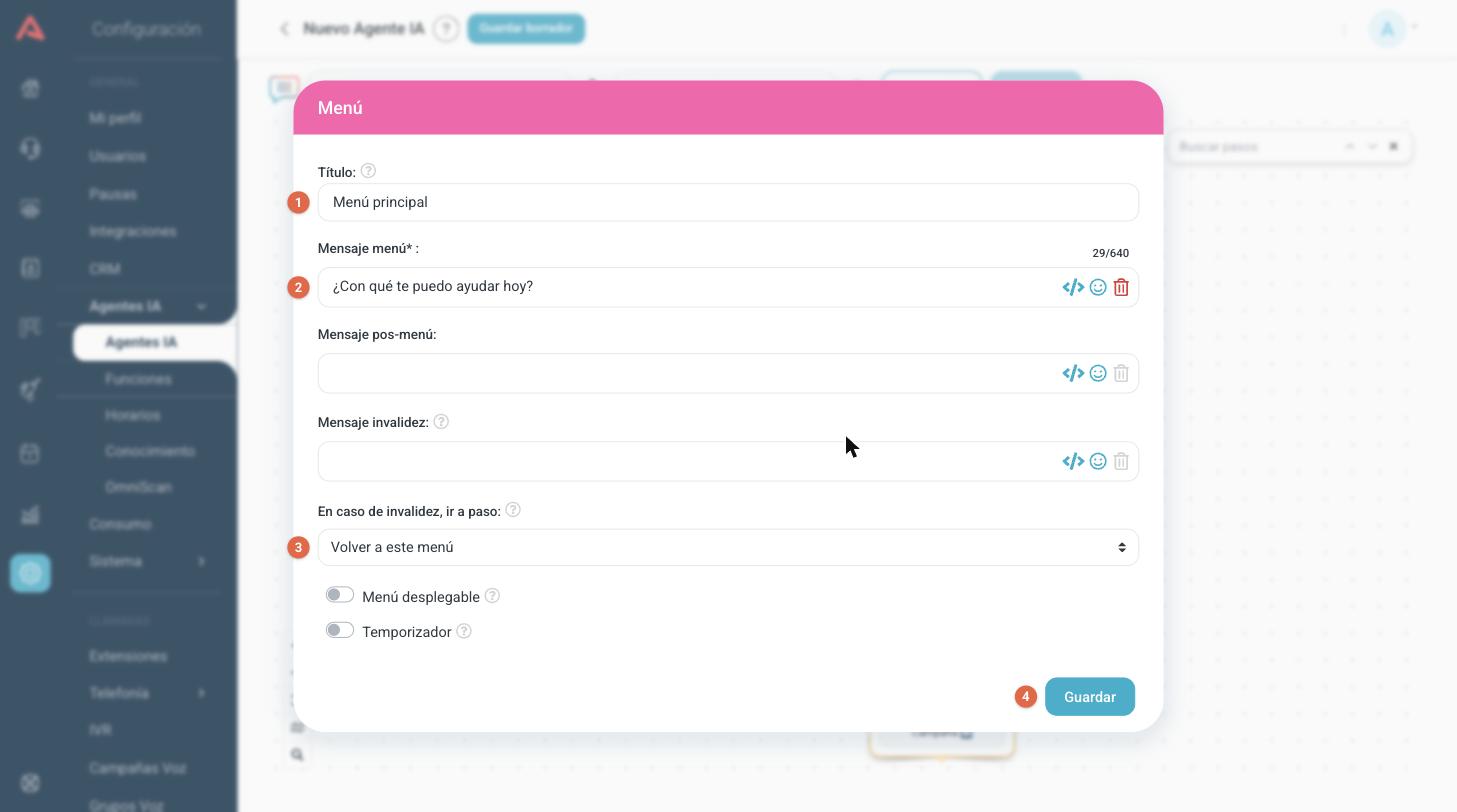
- 1 Title: the name you will see on the canvas and in the destination selectors. Give it something that reads clearly, because it is how you will find this step later.
- 2 The fields belonging to that type of step. Here, the message the bot introduces the menu with.
- 3 Where the conversation goes when the customer answers something that matches none of the options.
- 4 Save closes the window and leaves the step on the canvas. It turns on when there is something to save.
To open a step again and edit it, click on it on the canvas.
Every type of step has its own fields and its own rules. The full walk through, type by type, is in the article on the steps in a flow.
The flows
An agent is not a single flow. When you create it, Audara already gives you four:
- Main flow
- Where the normal conversation comes in.
- Inactivity flow
- Where the conversation goes when the customer stops answering for the time you configured.
- Off hours flow
- Replaces the main one when the conversation starts outside the bot's time condition.
- Survey flow
- Runs once the conversation has finished, if the chat campaign that handled it has this agent configured as its survey.
You can also create your own, up to 25 in total, to break a large bot into pieces that make sense on their own. The (⋮) menu next to the selector is where everything you do with flows lives.
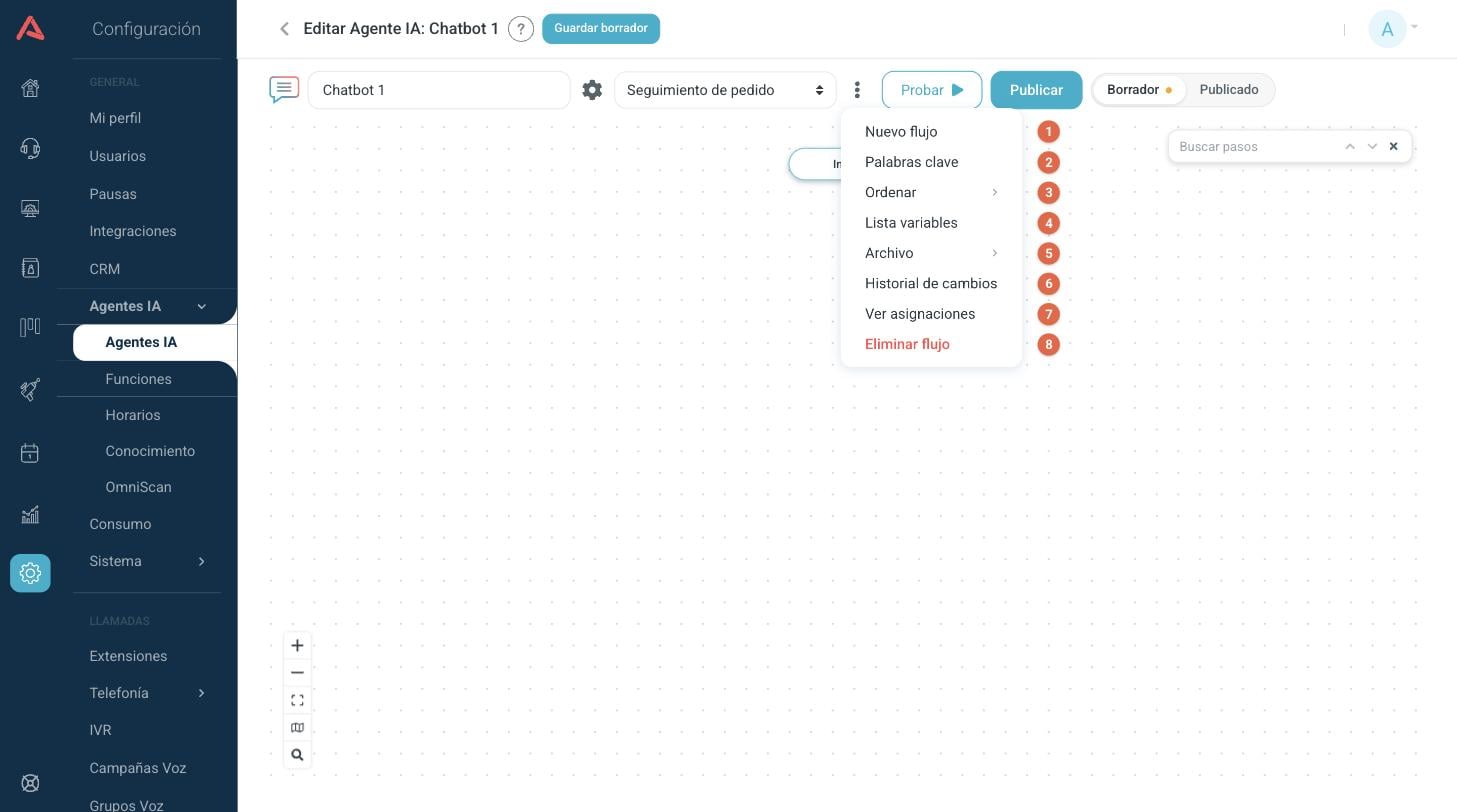
- 1 New flow: asks for a name and creates an empty flow with its own Start.
- 2 Keywords: shortcuts that work at any point in this flow.
- 3 Arrange: lays the tree out again, vertically or horizontally.
- 4 Variable list: everything the bot has available to use in its messages.
- 5 File: download the flow to a file, or upload one you downloaded before.
- 6 Change history: who touched what and when.
- 7 View assigned: which channels this agent is set on.
- 8 Delete flow: only for the flows you created yourself. The four that come with the agent cannot be deleted.
Uploading a flow from a file replaces the flow you have selected. If what you want is to add it, create a new flow first and upload it there.
Global keywords
Keywords are shortcuts: if the customer writes one of them at any moment in the flow, the conversation jumps to the step you decide, wherever it had got to. They are there for what people ask for out of order, like talking to a person or going back to the menu.
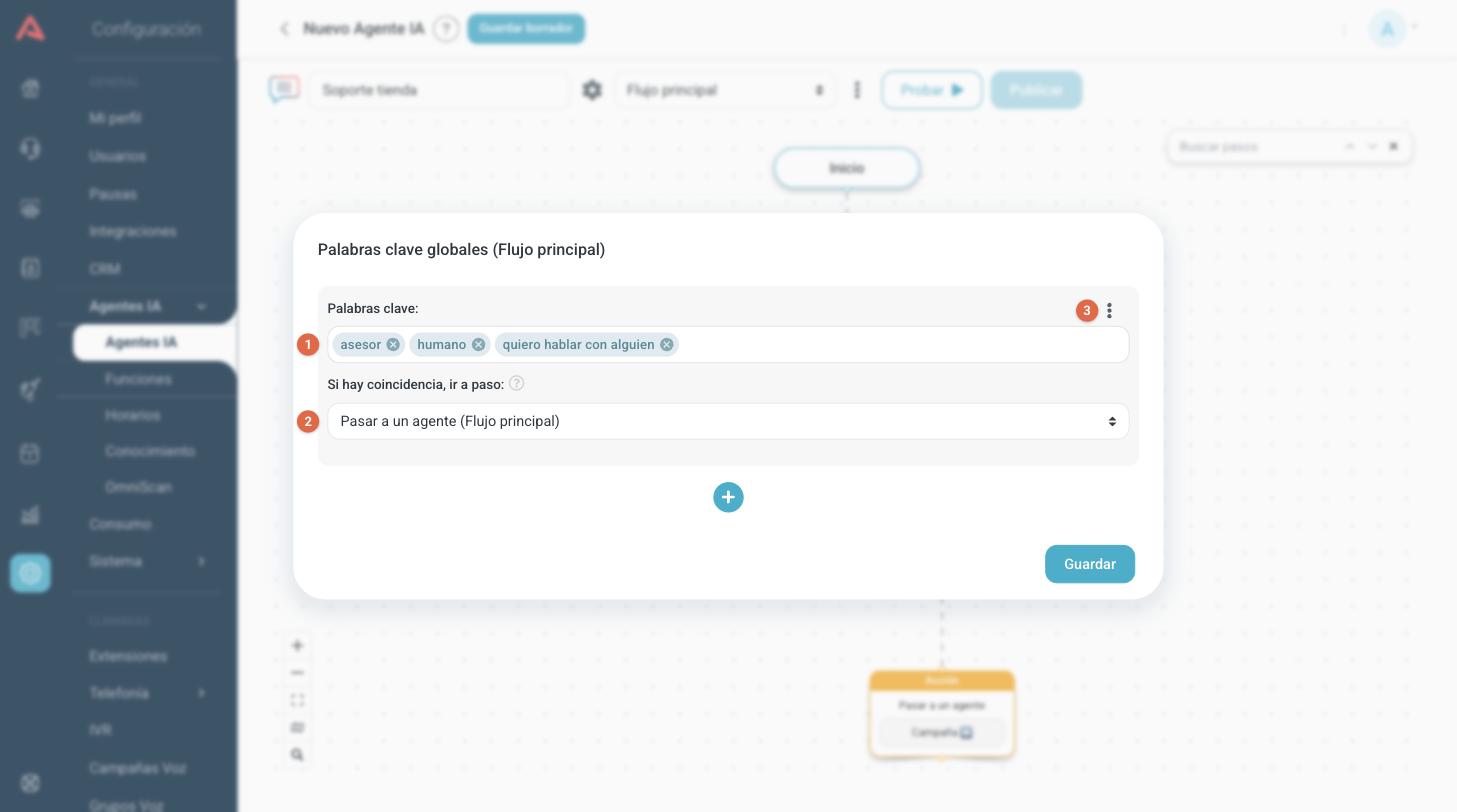
- 1 Write each word or phrase and press Enter. Each one stays as a tag you can remove with its (x).
- 2 Pick the step the conversation jumps to when there is a match. The list includes the steps of every flow in the agent, with the name of the flow in brackets.
- 3 From the (⋮) menu on each block you can delete that condition.
With the (+) you add more conditions, each one with its own group of words and its own destination. Keywords are per flow: the ones you define here apply to the flow you have selected.
Variable list
A variable is a value the bot knows and can drop inside a message. They are written in double braces and can be pasted into almost any text field in the flow.
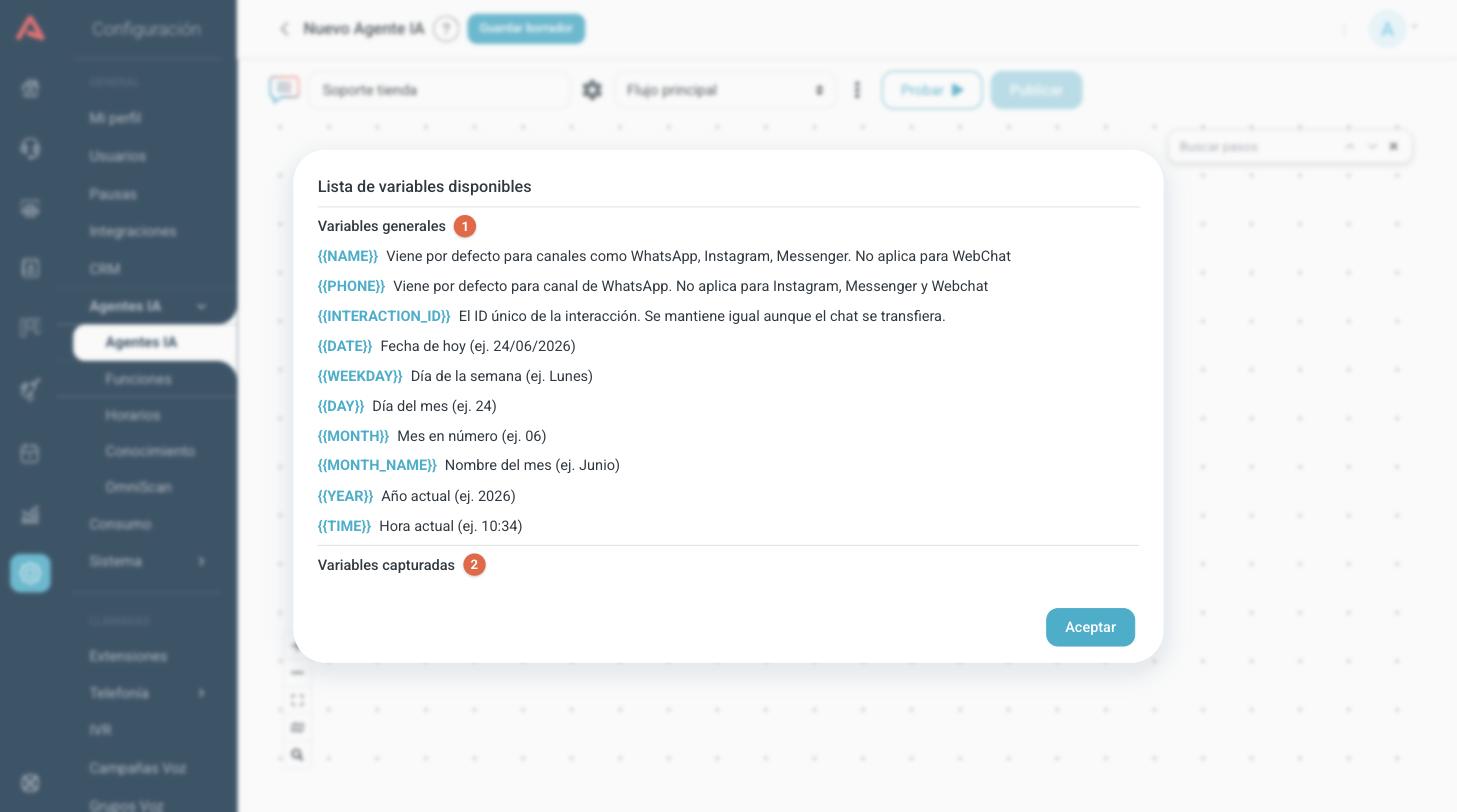
- 1 General variables: the ones Audara fills in by itself. The customer's name and phone number when the channel hands them over, the identifier of the conversation and the date and time in several shapes.
- 2 Captured variables: the ones your own flow creates with the capture steps and the queries. It starts empty and grows as you build.
Not every general variable arrives on every channel. WhatsApp hands over name and phone number, Instagram and Messenger only the name, and the Webchat neither of the two: the window says so field by field.
There are two separate groups that show up when your flow produces them. List variables hold a collection of records and can only be used in the steps that work with lists; file variables hold a file instead of a value and can only be picked in the steps that send files. Neither of the two can be inserted inside a message.
Draft and published
Every agent has two versions at the same time. The draft is where you work. The published one is what your customers are using right now. What you change reaches nobody until you publish it, so you can leave a flow half done and come back tomorrow without breaking anything.
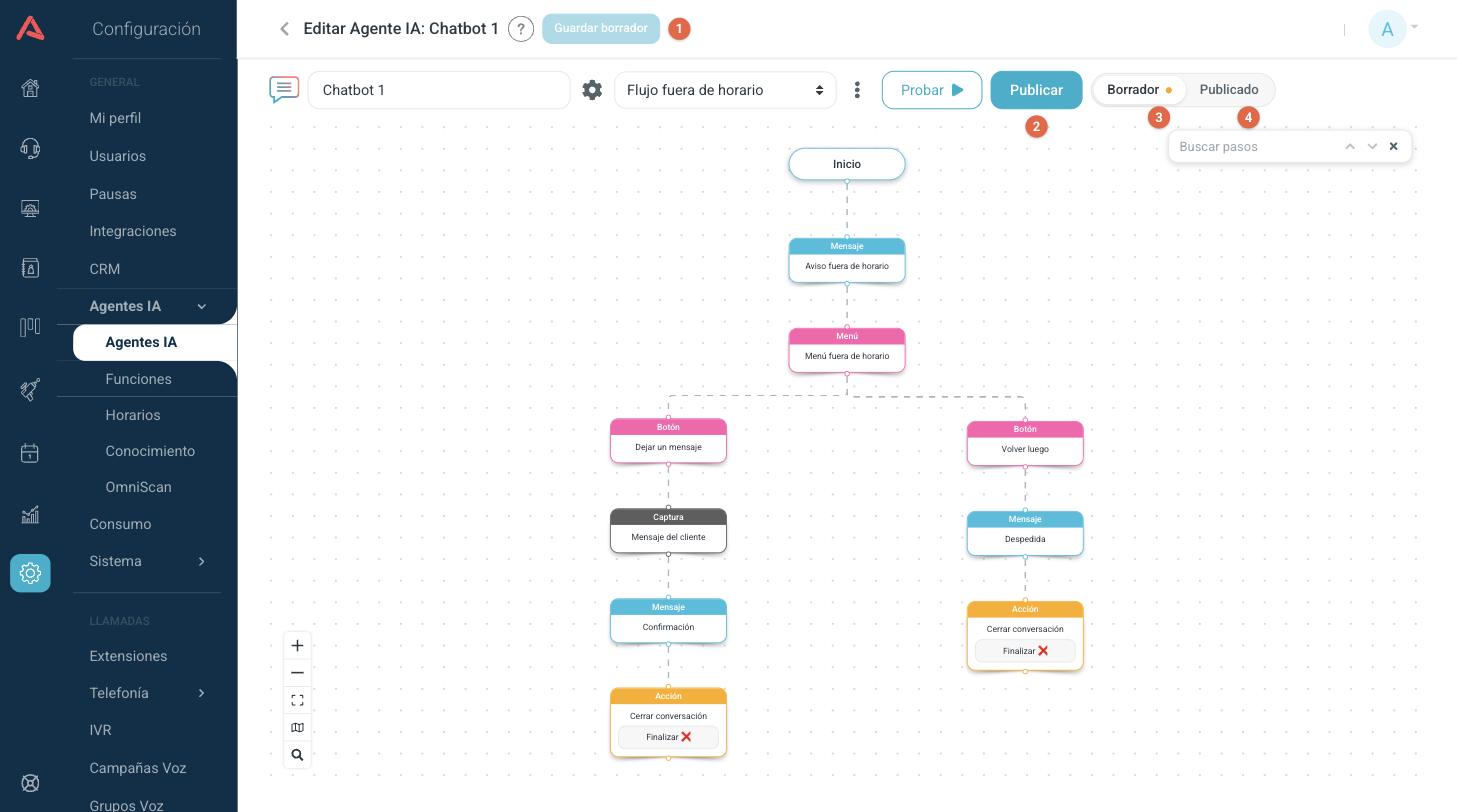
- 1 Save draft saves your work. None of this reaches your customers yet.
- 2 Publish opens the window where you choose what goes to the version that answers.
- 3 Draft is the view you edit in. The orange dot next to it warns that there are unpublished changes.
- 4 Published shows you the version that is answering right now.
Publishing
Publishing is not all or nothing: you choose flow by flow what goes live.
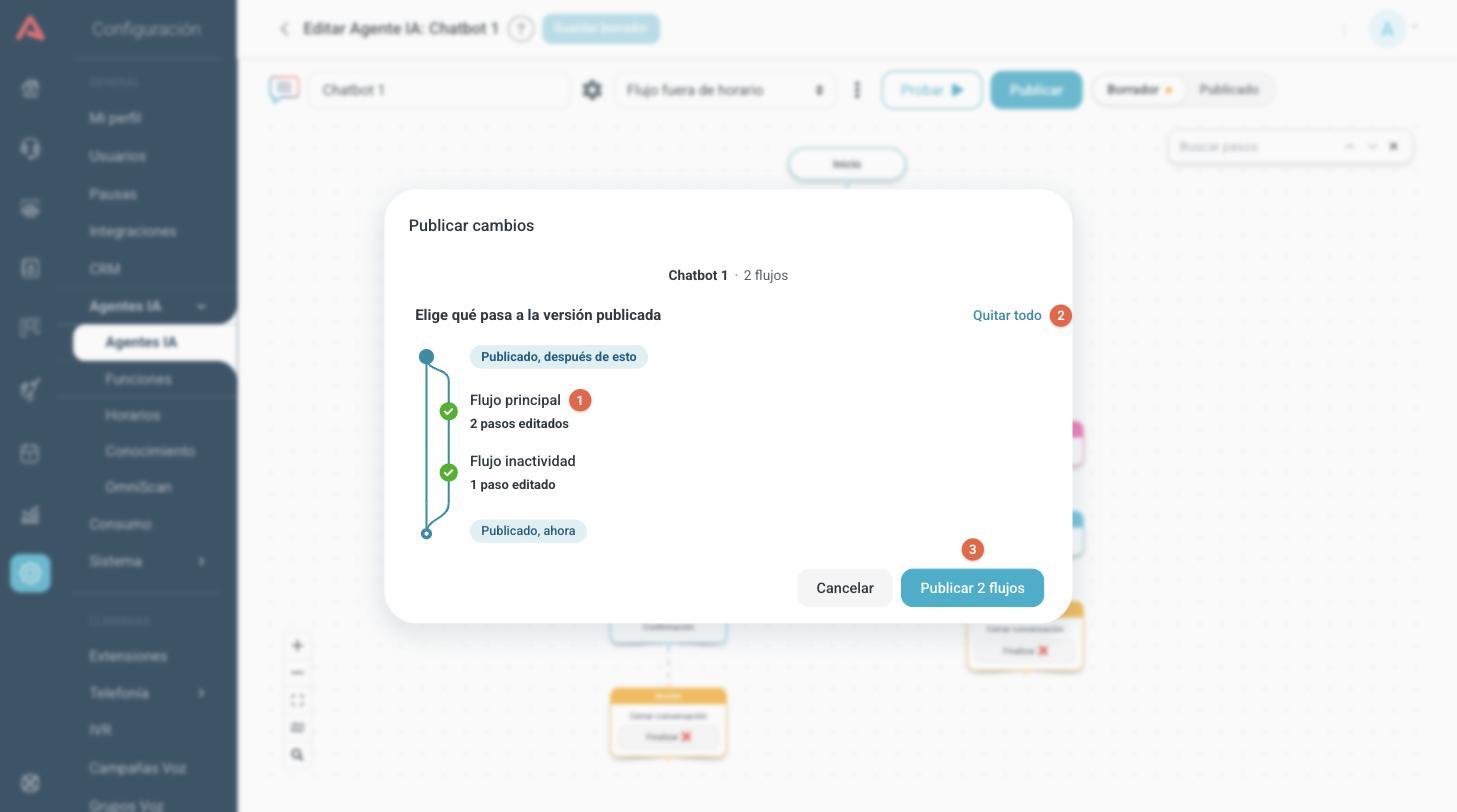
- 1 Each flow with changes appears with what happened to it: new, edited or deleted steps. Tick it or untick it with its checkbox.
- 2 Select all and Clear all so you do not have to go one by one.
- 3 The button says exactly how many flows are going to be published.
If you publish a flow that leads to steps in another flow you have not published yet, Audara warns you with the names before letting you carry on. That is the classic case of a bot left half way: read that warning instead of walking past it.
Looking at what is published
The Published tab lets you look at the version that is answering, without touching it.
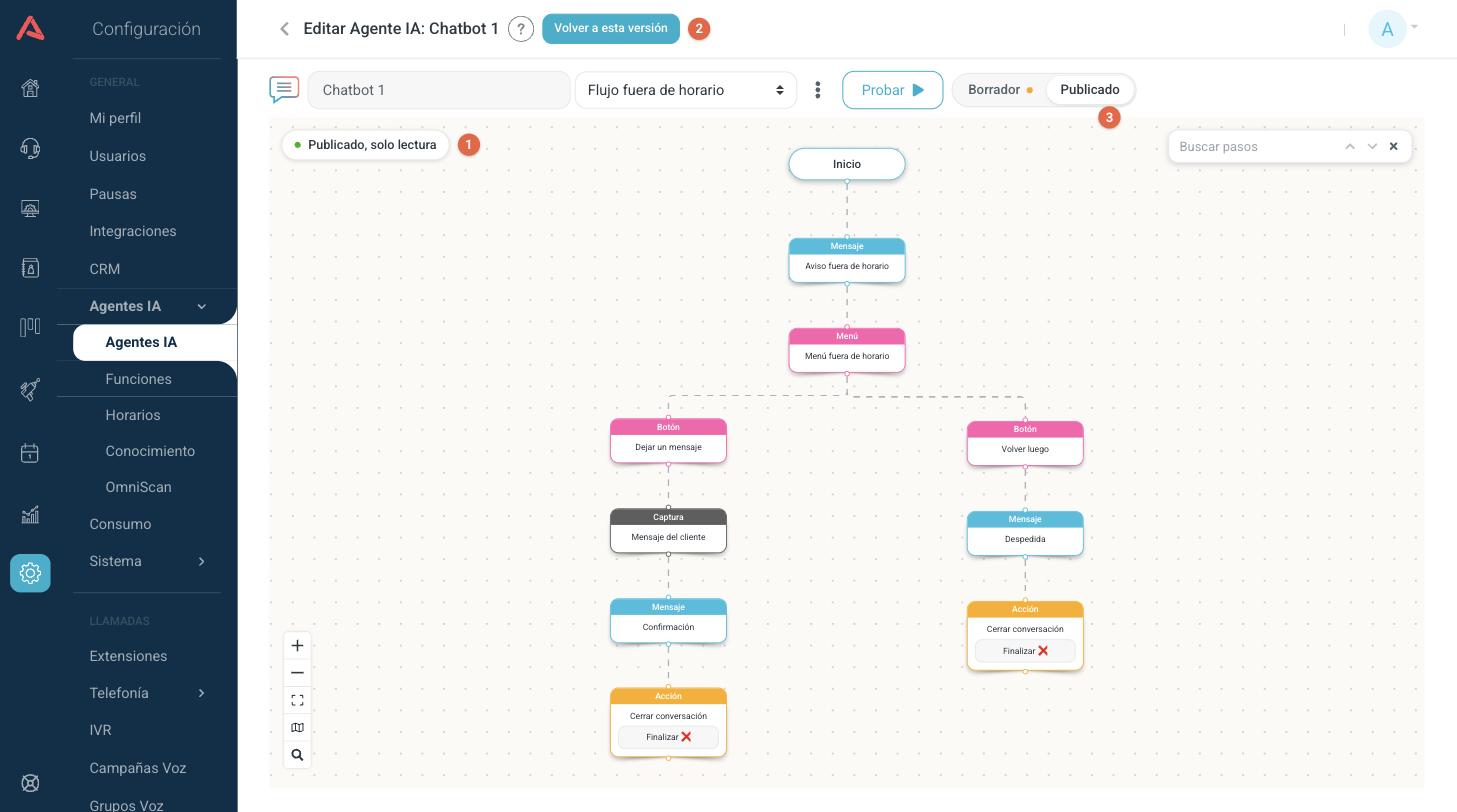
- 1 The Published, read only badge and the green frame remind you that what you are looking at cannot be edited.
- 2 Go back to this version throws your draft away and leaves it the same as what is published.
- 3 Go back to Draft to carry on editing.
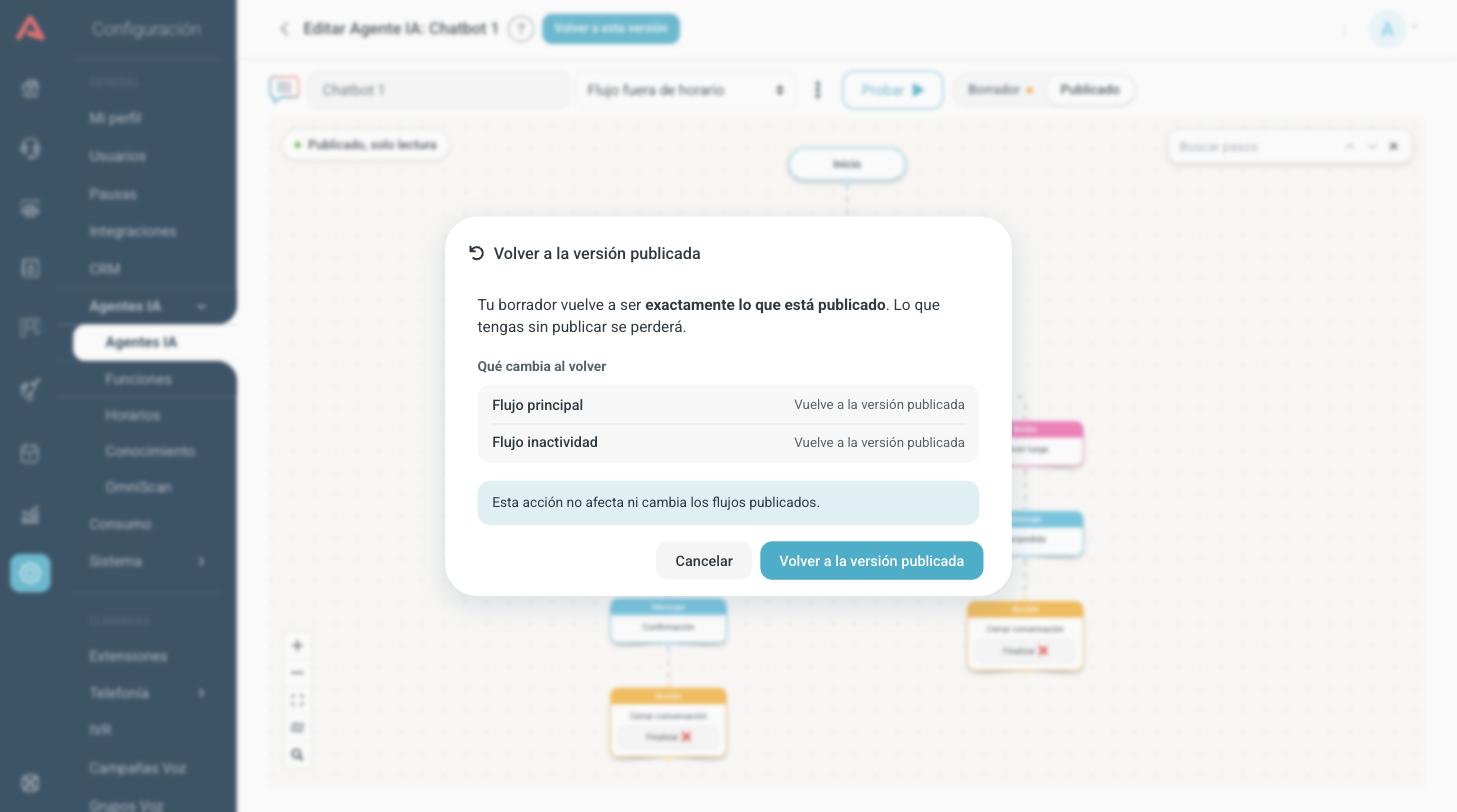
Before throwing it away, Audara shows you what changes flow by flow and warns you that anything you have not published will be lost. This action does not touch the published version: it only takes your draft back to that point.
Testing the bot
The Test button opens a real conversation against your bot, without any customer finding out. It lets you choose between Test from this flow, which starts in the flow you have open, or Test from main flow, which does the whole run the way a customer would.
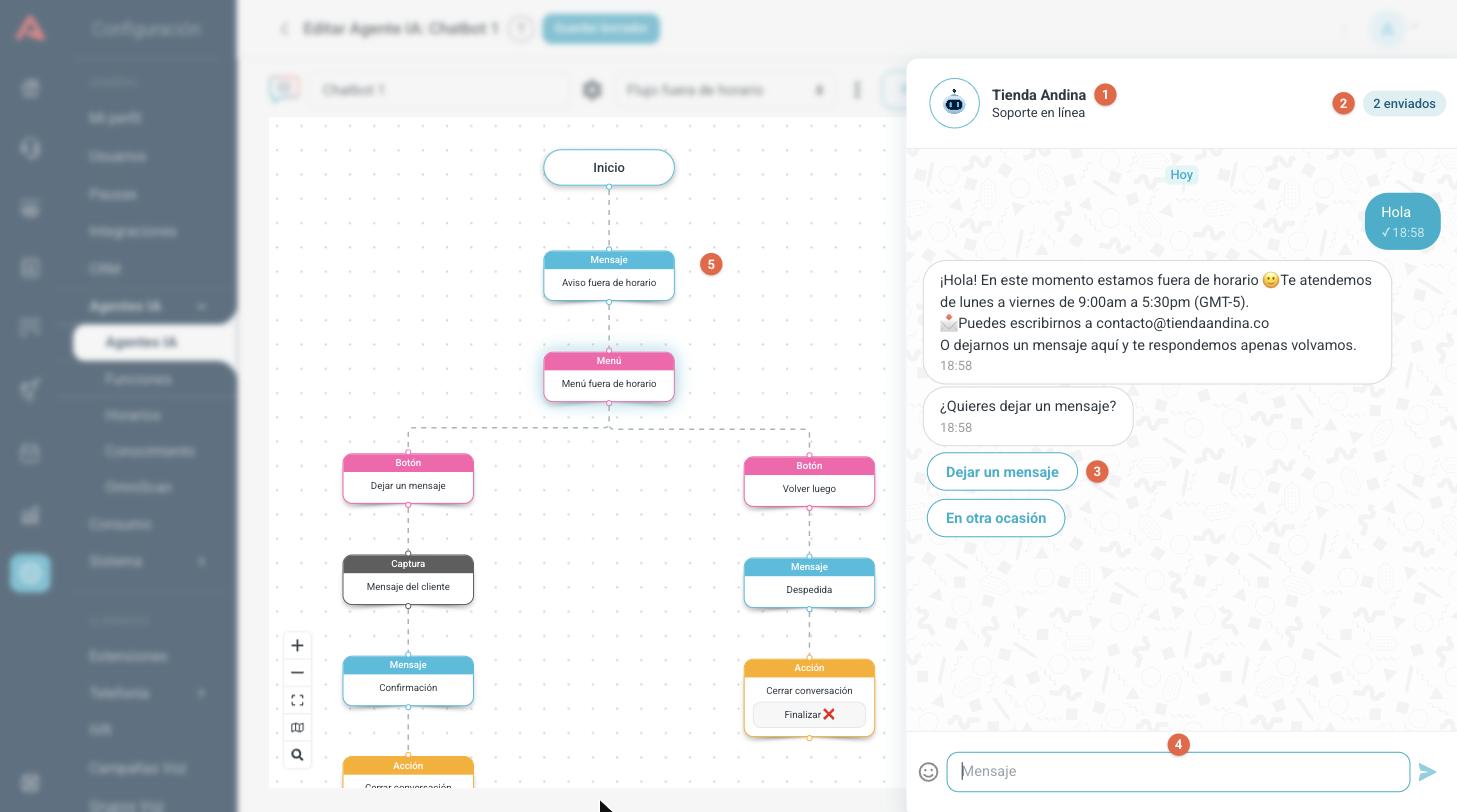
- 1 The name and the subtitle you set in the general settings, exactly as the customer sees them.
- 2 How many messages the bot has sent in this test.
- 3 The menu buttons are answered just as they are on the real channel.
- 4 Write here to answer the bot as if you were the customer.
- 5 On the canvas, the steps the conversation goes through light up one after another. It is the quickest way to see where the bot went when it did not do what you expected.
The test runs what you are looking at: if you are on the Draft tab, it tests your unpublished changes; if you are on Published, it tests what your customers are using.
The test is a real conversation. If the flow reaches a step that hands the chat over to a campaign, that conversation goes into the queue and can ring an agent. Be careful when you test the paths that end in a person.
Change history and working as a team
Several people can open the same agent. If somebody else is editing it, a notice appears at the top with their name.
If that person saves before you do, Audara does not paint over their work in silence: it tells you who saved and when, and lets you choose between reloading and bringing in their version, saving over what they did, or closing the notice and talking to them before deciding.
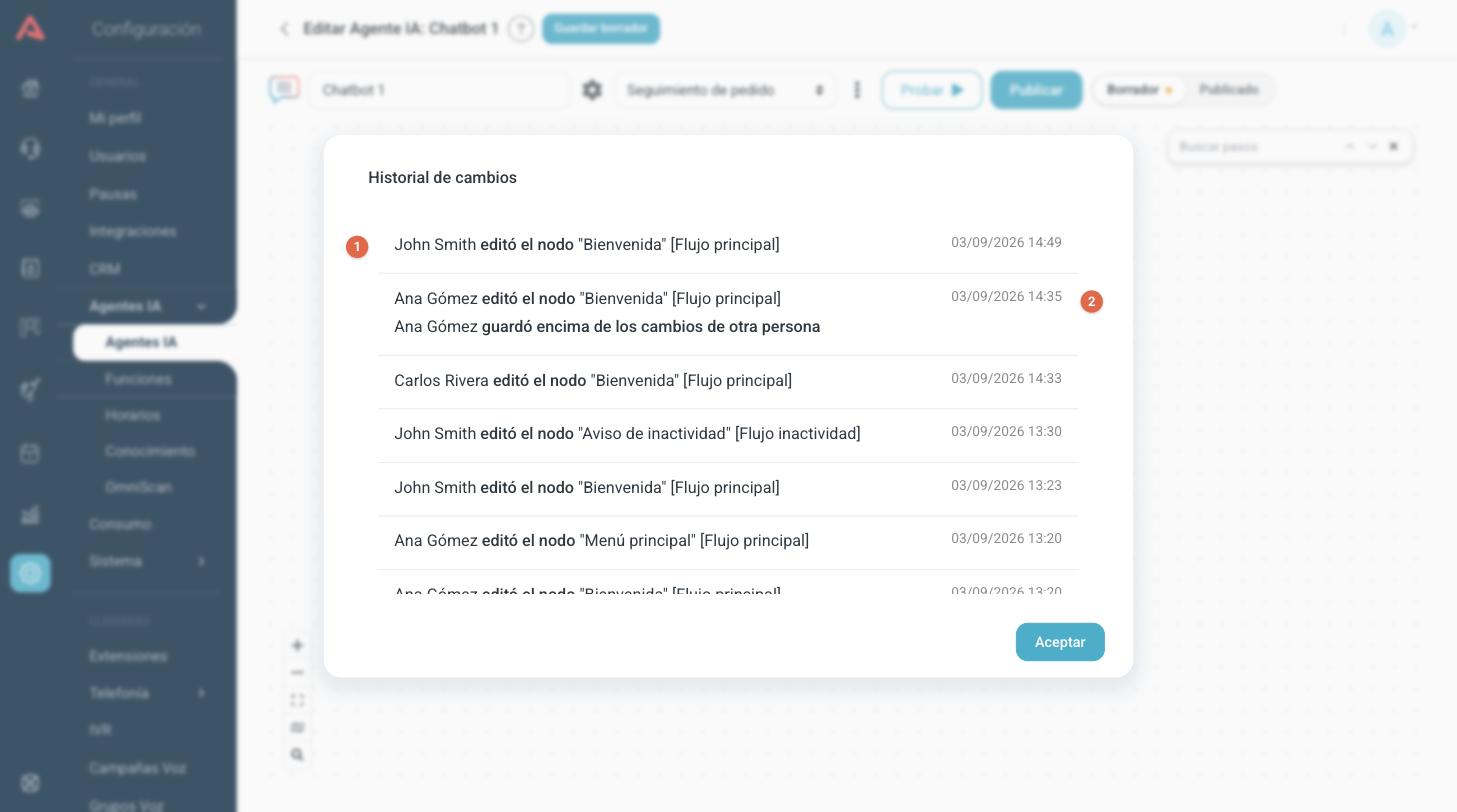
- 1 Who did what: creating, editing, renaming or deleting a step or a flow, publishing and going back to the published version.
- 2 The date and time of each movement.
When somebody saves over another person's work, the history writes it down on a line of its own.
Putting it to work
A published agent is still not answering anybody: what is missing is telling a channel to use it. That is done from the channel, not from here. Under Setup > Chat channels you open the channel you want it to answer on (WhatsApp, Webchat, Instagram, Messenger or Telegram) and pick this agent there.
To find out where an agent ended up, use View assigned in the flow menu.
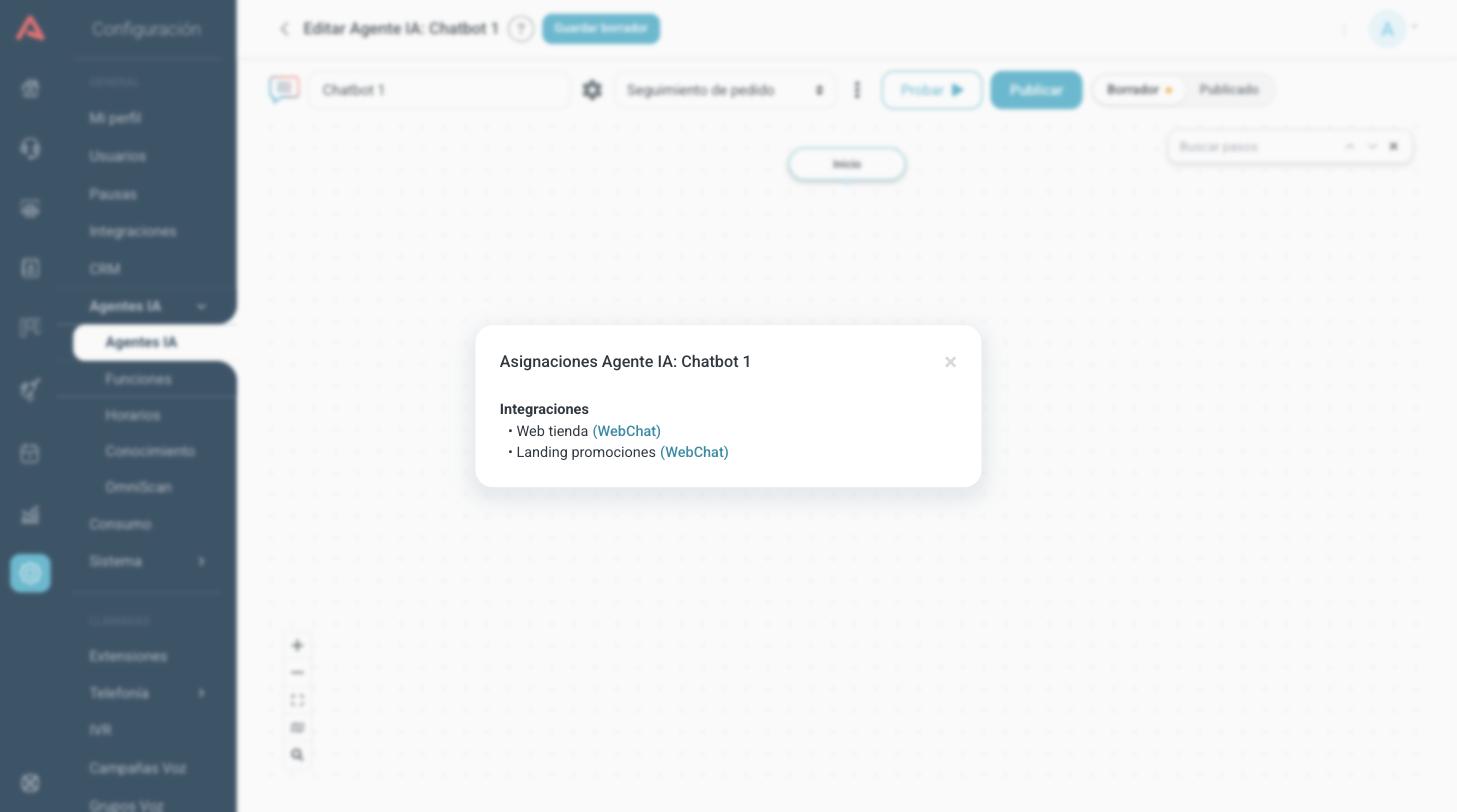
The window lists the integrations and the IVRs where this agent is configured, with the channel of each one. If it comes out empty, the agent is not answering anywhere yet.
Before turning off or deleting an agent, check its assignments. A channel pointing at an agent that is no longer there stops answering.