Voicebot
The agent that answers the phone
This article closes the Chatbot series. The first one, Chatbot, explains the module, the canvas, the flows, publishing and testing. The second, Chatbot: the steps in a flow, is the catalogue of every step. The third, Smart Agent, explains the step that holds a conversation using artificial intelligence. All of that applies to a voicebot just the same, so what you will find here is only what changes when the conversation is a phone call.
What a voicebot is
A voicebot is an agent that answers calls. It picks up, listens to what the caller says, replies in a synthesised voice and does everything a chatbot does: query systems, capture data, resolve things with artificial intelligence or pass the call to an adviser.
It is built in the same editor as a chatbot, with the same canvas and almost the same steps. The differences all come from the channel:
- There is no screen. Buttons and dropdown lists do not exist: the customer answers by speaking.
- Whatever the bot writes is turned into speech, so the text is written for the ear.
- Silence is information. A chat can sit still for half an hour; a silent call has to be dealt with.
- The call arrives through an IVR, not through a messaging channel.
Creating a voicebot
Go to AI Agents in the main menu and press the (+) button. The agent type window lets you choose between Chatbot, Voicebot and Automation. Pick Voicebot.
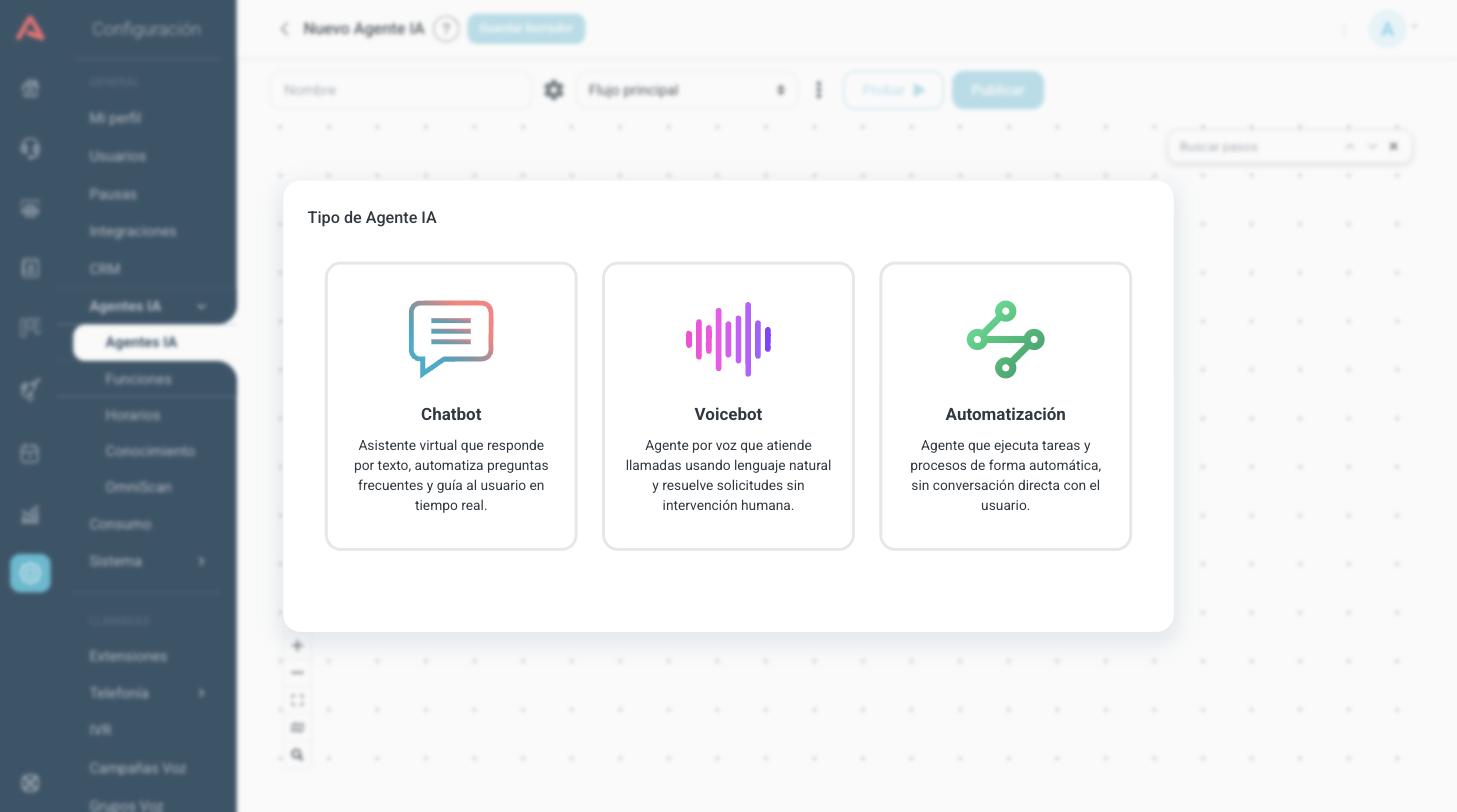
The agent type is set once, when you create it. If you got it wrong, create another one: there is no way to turn a chatbot into a voicebot or the other way round.
From there on the editor is the one in the Chatbot article: the name at the top left, the settings cog, the flow selector, the more options menu (⋮), and the Test, Save draft and Publish buttons. The sound wave icon next to the name is what tells you, at a glance, that you are in a voicebot.
General settings
The cog opens the General settings. In a voicebot this window brings four blocks of its own: Time conditions, Text-to-speech (TTS), Artificial intelligence and Limit.
Times and schedule
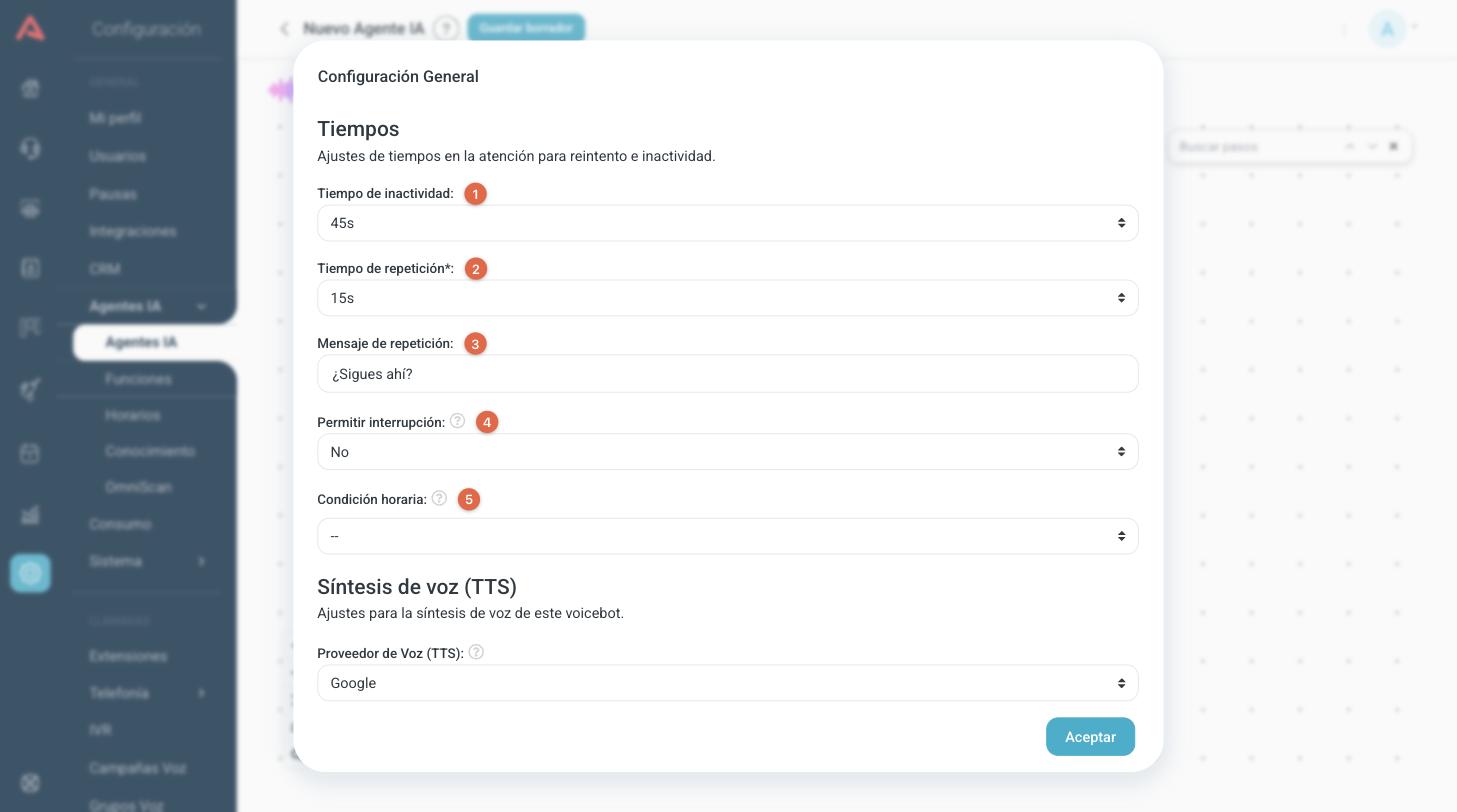
- 1 Inactivity time
- How many seconds of silence it waits before treating the call as inactive and going into the inactivity flow. You choose between 15, 30, 45 and 60 seconds. The default is 45.
- 2 Repeat time*
- How many seconds of silence it waits before saying the last thing it said again. You choose between 15, 20, 25 and 30 seconds, or No repetition. It has to be lower than the inactivity time, or saving is blocked with a warning.
- 3 Repeat message
- A short phrase it says before repeating, along the lines of Are you still there?. It is optional, and the field is disabled if you chose No repetition.
- 4 Allow interruption
- Lets the caller talk over the bot and cut it off. With Yes the conversation feels more natural; with No the bot always finishes its sentence. It comes set to No.
- 5 Time condition
- The hours this bot answers in, taken from Setup > AI Agents > Schedules. Outside those hours the call goes into the Off hours flow instead of the main one. If you leave it empty, the bot always answers.
Voice and artificial intelligence
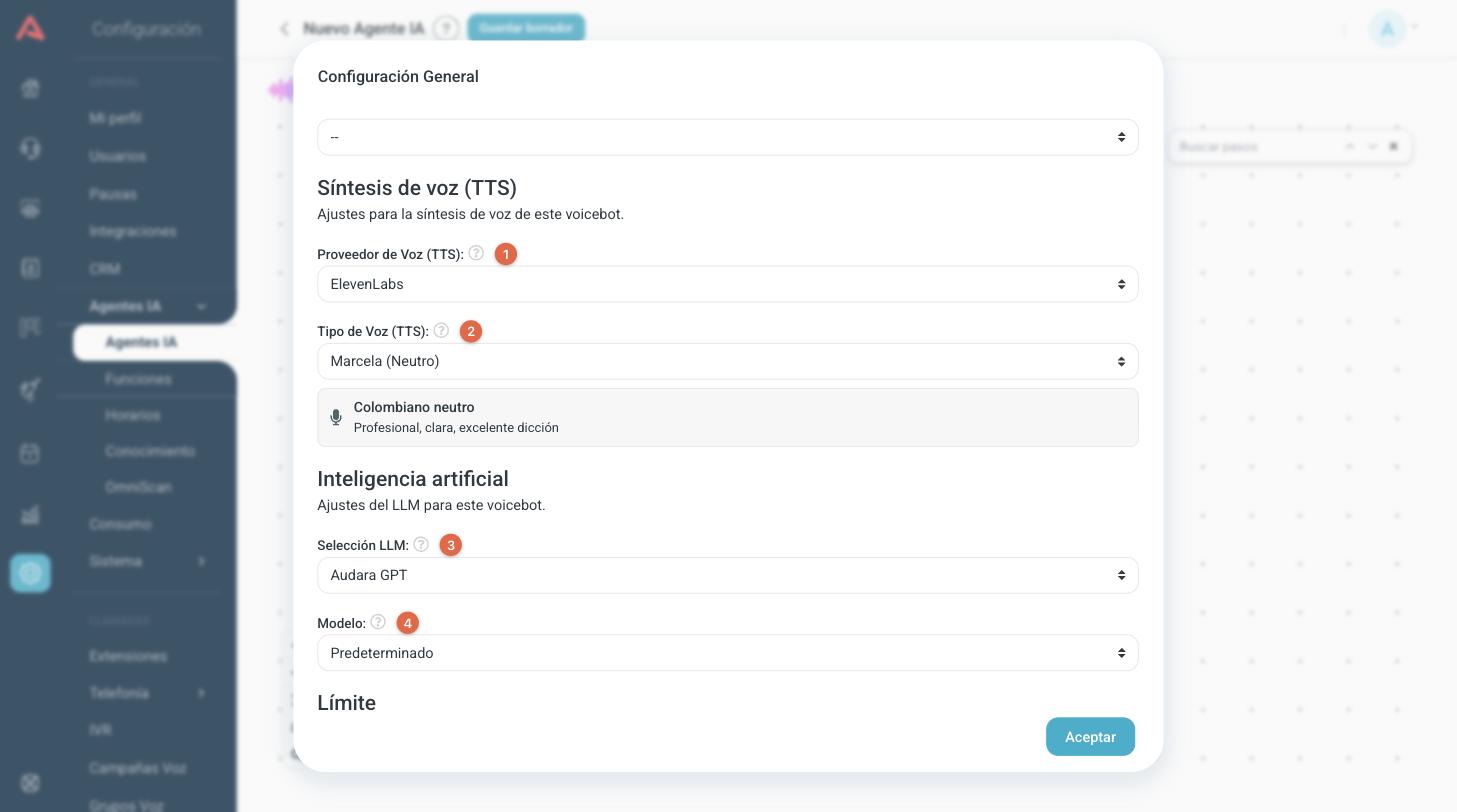
- 1 Voice provider (TTS)
- The provider that turns the text into audio. Each one brings its own catalogue of voices, so changing it reloads the list underneath. Which providers are available depends on what your operation has enabled.
- 2 Voice type (TTS)
- The voice the bot speaks in, grouped by language. When you pick one, if the catalogue carries the information, a card appears underneath with its accent and a short description of the style.
- 3 Select LLM
- The artificial intelligence integration this bot uses, out of the ones configured under Setup > Integrations. You need it if the flow has Smart Agent or ChatGPT steps.
- 4 Model
- Which model from that integration to use. With Default it uses whichever one the integration has configured.
The voice belongs to the whole bot, not to each message. If you need two different voices, that is two voicebots.
Simultaneous voicebots limit
Your operation has a cap on how many calls the voicebots can handle at the same time. When a call comes in and the cap is already taken, the bot does not answer it, and this block decides what that person hears.
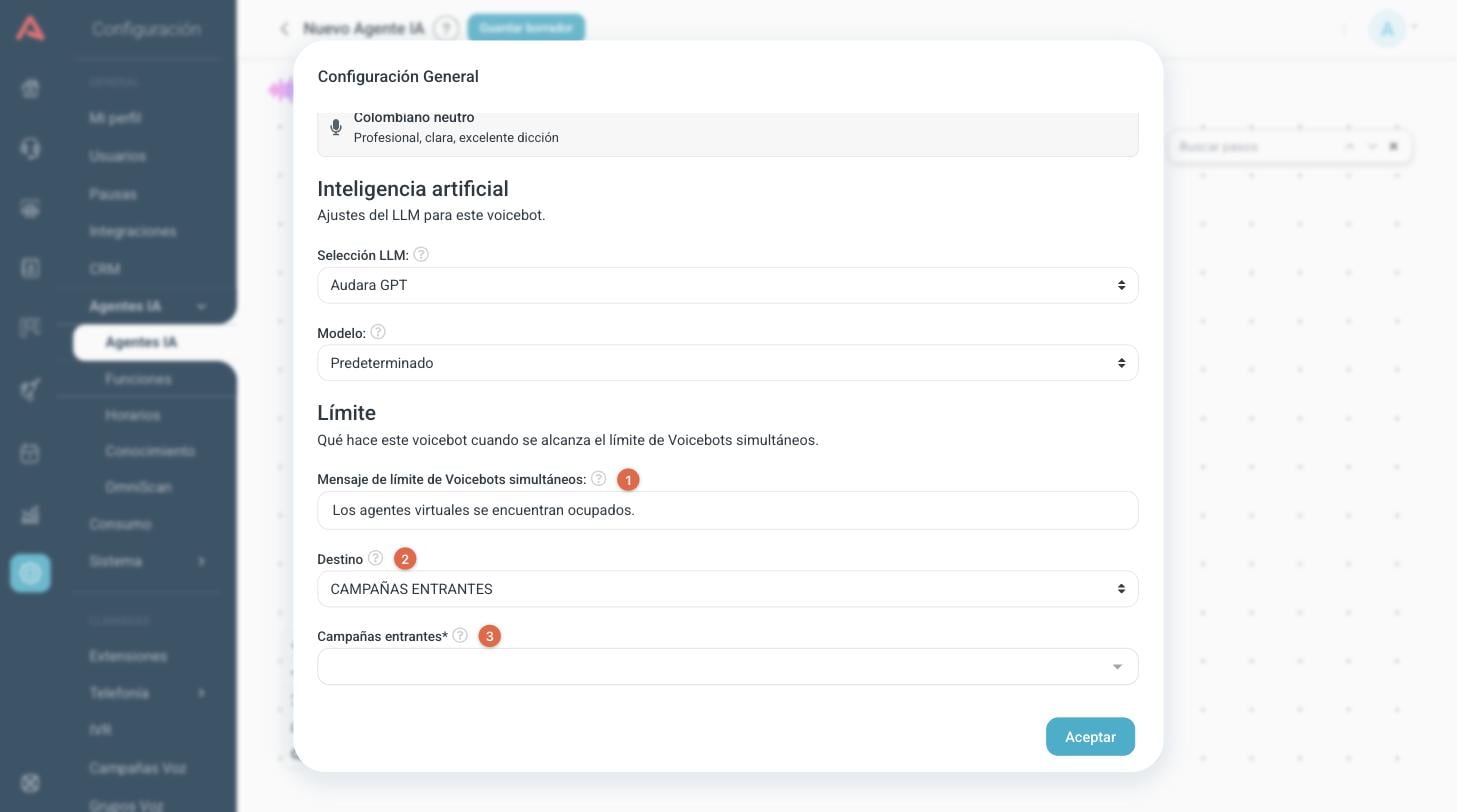
- 1 Simultaneous Voicebots limit message
- What is played before the call is sent away. It comes with a default text. Leave it empty and nothing is played, which is different from clearing it and leaving the factory text.
- 2 Simultaneous Voicebots limit destination
- Where the call is transferred to after the message: an extension, a voicemail, a conference, another IVR or an inbound campaign. It is optional.
- 3 The second field
- Changes with the destination you picked, and that is where you choose which one in particular. If you leave the destination empty, the call ends after the message.
These two fields are read from the published version of the bot. If you change them on a bot that is already in production, you have to publish it again for them to start applying.
What changes in the steps of the flow
The (+) connector menu of a voicebot is almost the same as a chatbot's. What changes is whatever makes no sense without a screen.
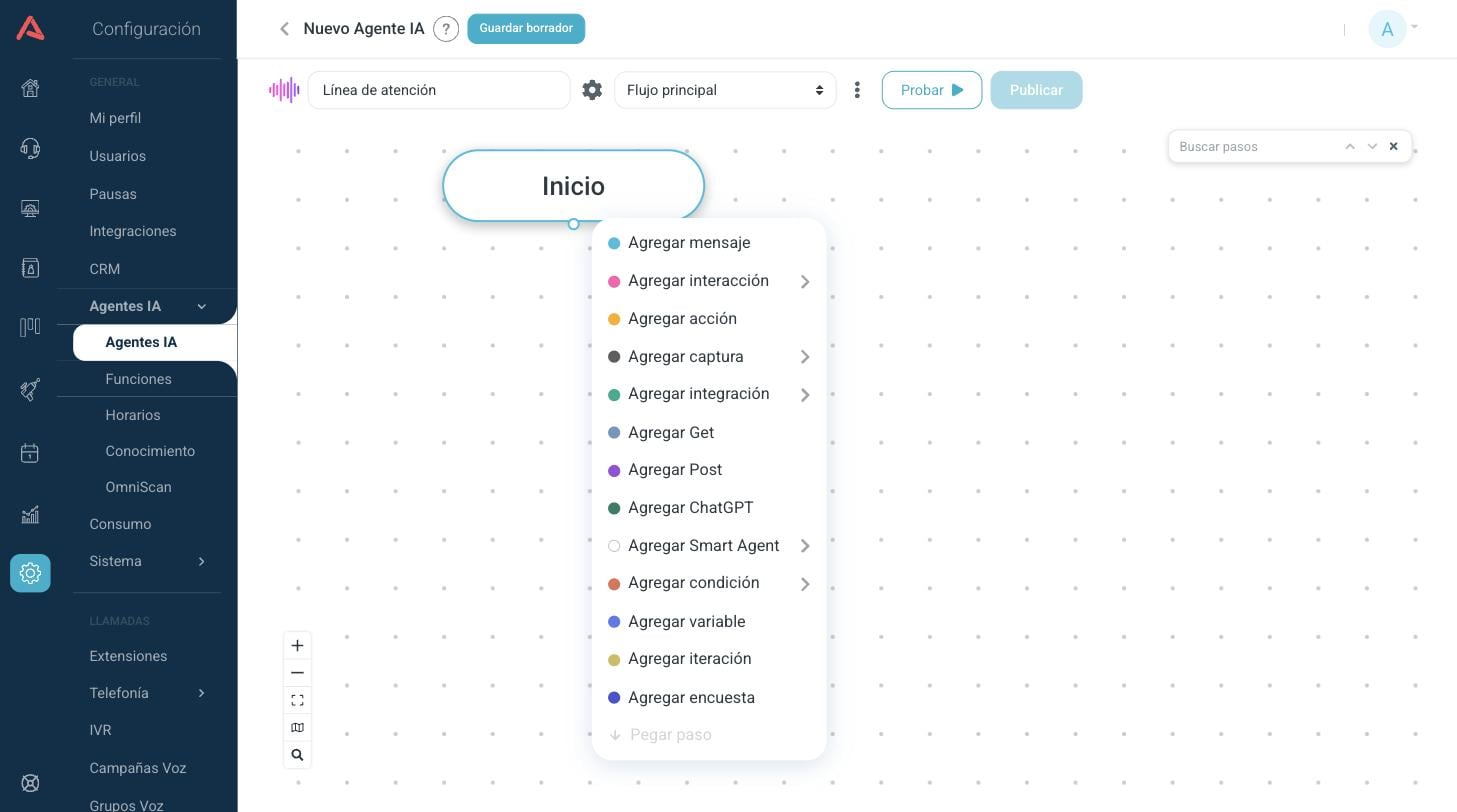
Add message is a single option, with no submenu: in a voicebot every message is spoken text. The file message and the link button message do not exist.
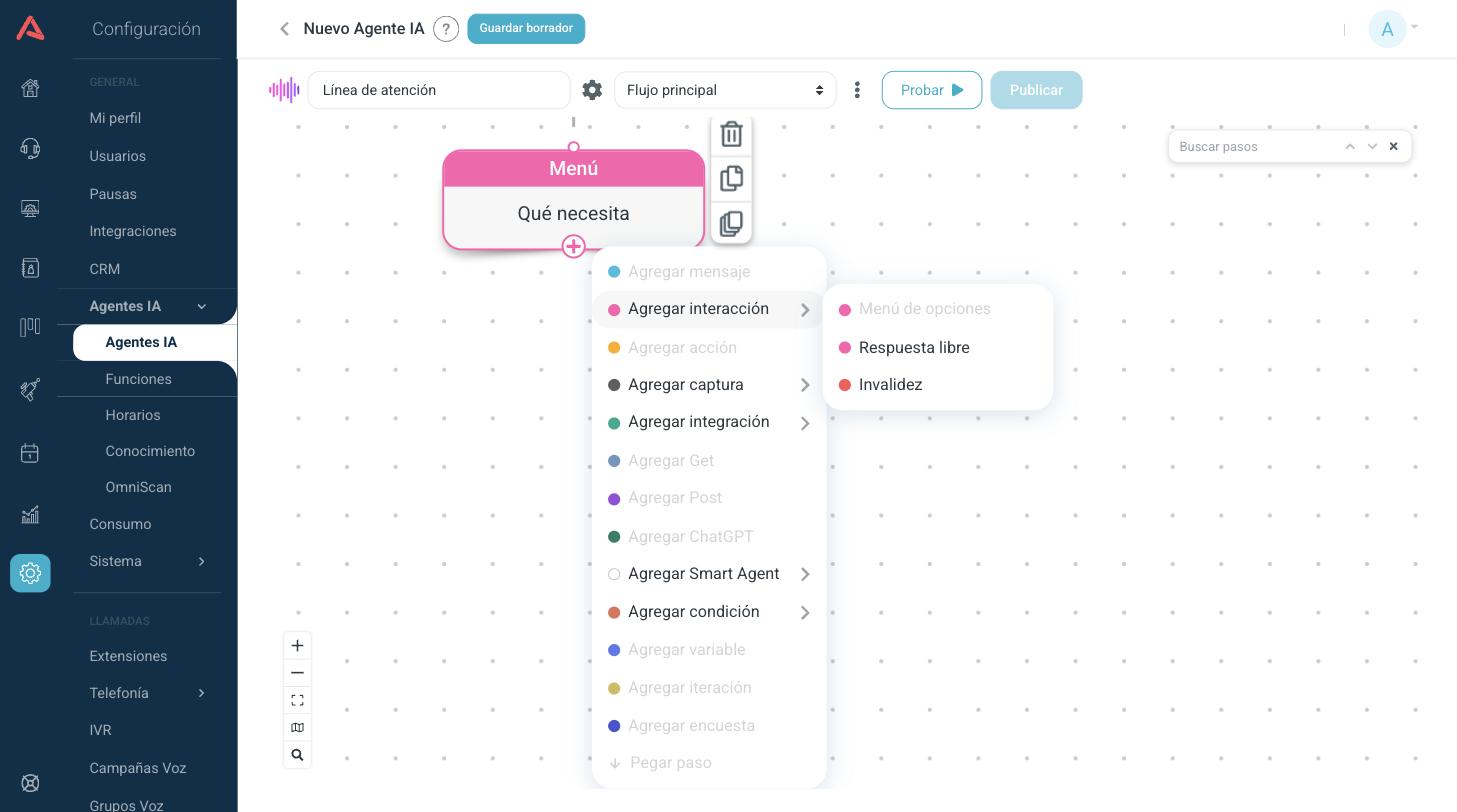
Inside Add interaction you keep the Menu, the Open response and the Invalid. The Button and the List option go away, because they are chat controls.
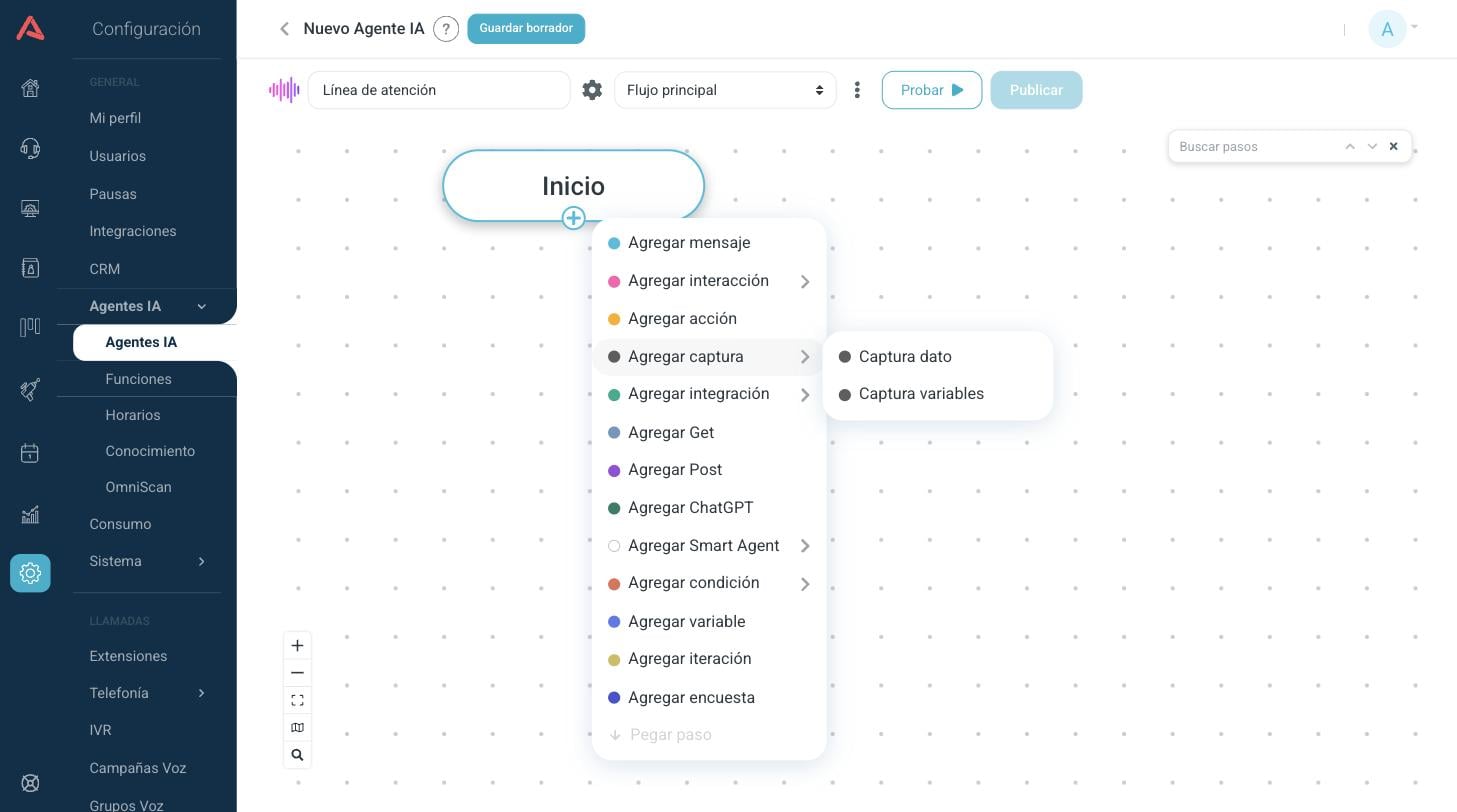
Inside Add capture there is the usual Capture and one option that only exists in voicebots, Capture variables, explained further down. The file capture and the WhatsApp form are not there.
In the Capture step, Capture type only offers Open answer and Options. The third one, Buttons, does not appear.
Everything else is the same: actions, REST and MCP integrations, Get, Post, ChatGPT, the Smart Agent trio, conditions, variables, iteration and survey. The full catalogue is in Chatbot: the steps in a flow.
How the caller chooses
This is the difference that confuses people most at the start. In a chatbot, a Menu splits its paths with Buttons or List options: the customer taps one and the flow knows which. In a voicebot there is nothing to tap, so the paths of a Menu are Open response steps, and each one carries the words that trigger it.
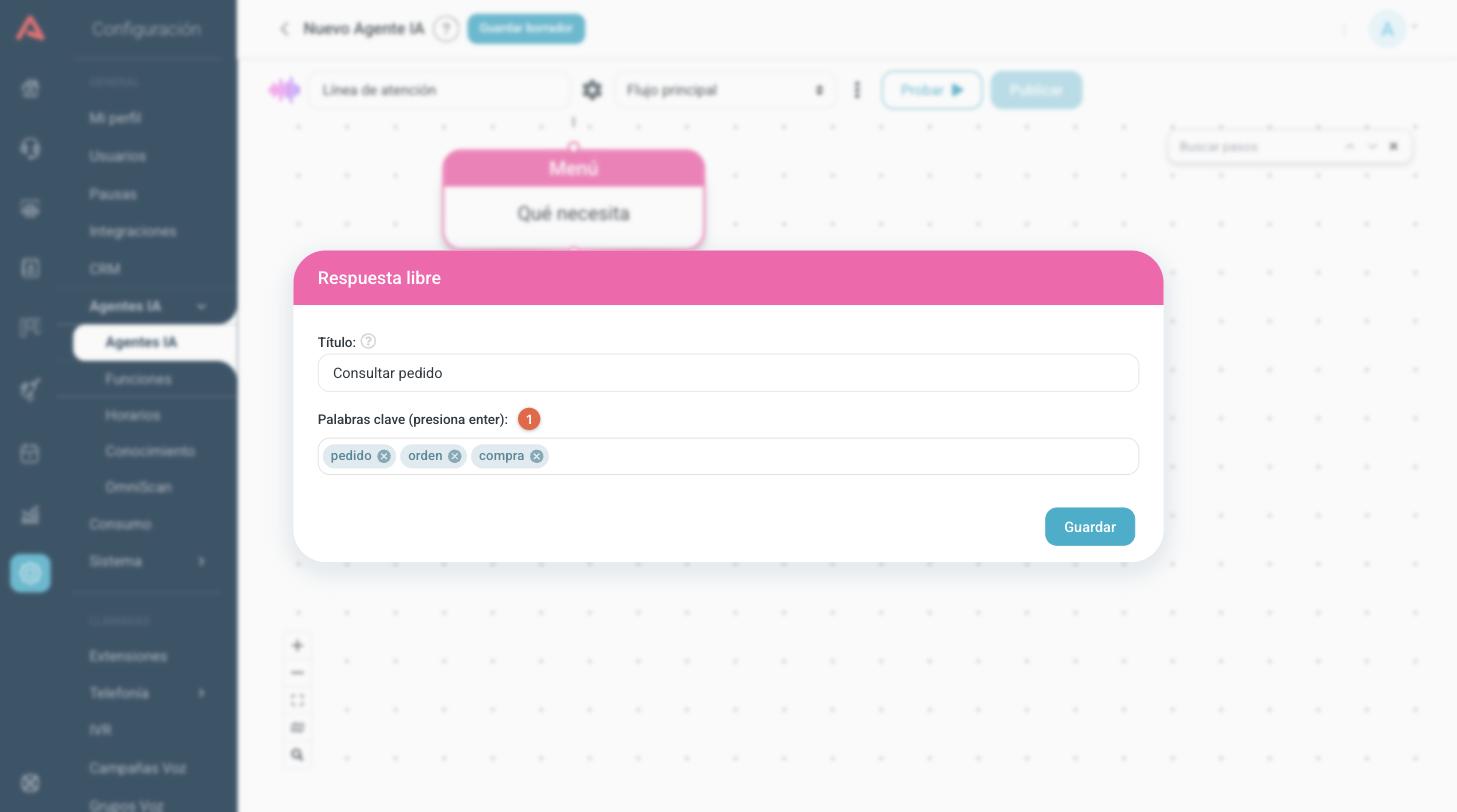
- Title
- The name you see on the canvas. Give it the name of the intent, not the name of the word.
- 1 Keywords
- Write one and press Enter to turn it into a tag. The bot compares what the person said against these words: first it looks for an exact match and then for one contained in the sentence. Accents and capitals do not matter.
If none of them match, the bot looks at the keywords of the flow (the ones in the ⋮ menu, which apply at any point in the conversation). If those do not match either, it goes through the Invalid step if the menu has one hanging off it; if there is none, it plays the menu's own Invalid answer message and asks again.
Put several words per path, and in the customer's language rather than yours: order, purchase, delivery. And avoid two paths sharing a word, because whichever comes first in the flow wins.
When there are a lot of options, or people say them in a thousand different ways, a Smart Agent works better than a keyword menu: it understands the whole sentence instead of hunting for matches. The Smart Agent article explains it.
How it sounds: writing for the ear
Everything the bot says goes through the speech engine. The message editor of a voicebot is built for that.
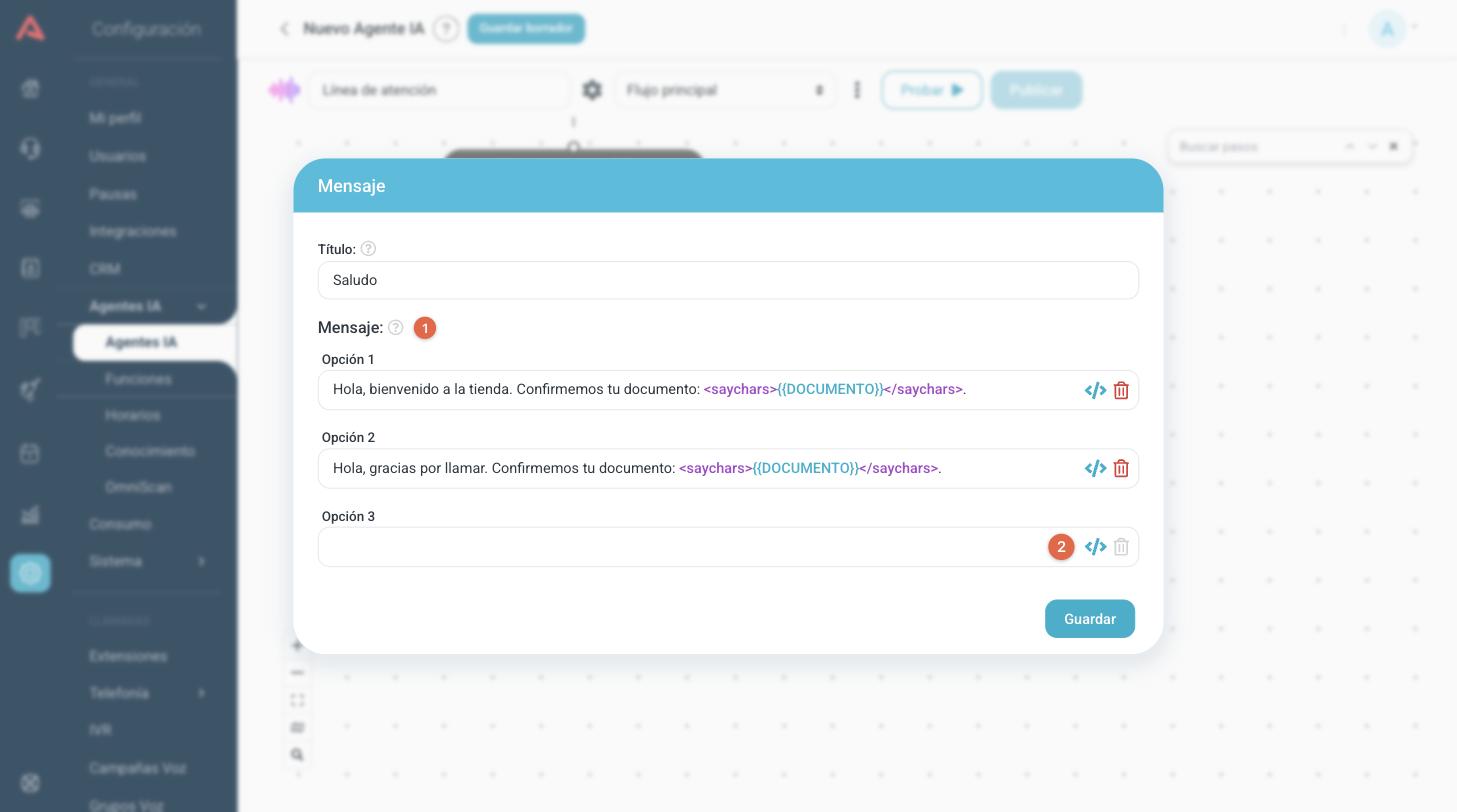
- 1 Message: Option 1, 2 and 3
- You can write up to three wordings of the same message. The bot picks one at random each time it goes through the step, so the call does not sound recorded. Filling in one is enough.
- 2 The </> icon
- Opens the list of variables so you can insert them into the text. A voicebot has no emoji icon: an emoji cannot be pronounced.
Tags
The editor highlights anything between < > in colour so you can see straight away that it is a tag and not text that is going to be read out loud. There are two kinds:
- SSML tags
- The standard speech synthesis tags, for pauses, emphasis and intonation. They have their own published article, Etiquetas SSML, and you open it from the editor's (⋮) menu with the SSML tags option.
<saychars>- A tag of Audara's own: it reads the contents out character by character.
<saychars>1234</saychars>is heard as one, two, three, four instead of one thousand two hundred and thirty four. It is there for ID numbers, plates, codes and order numbers, and it works with any voice provider.
Not every voice provider interprets SSML. With Google the tags are applied; with other providers they may be ignored or stripped out before speaking, and the message is heard just the same but flat. <saychars> is the exception: it is resolved before the text is sent to the provider, so it always works. If you are going to use SSML, try it on a real call before publishing it.
Short sentences, one idea per sentence. No numbered lists and no brackets: they sound odd. Write figures the way they are said, and use <saychars> for anything that is a code rather than a quantity. If the flow has a Smart Agent, tell it in the prompt to answer in one or two sentences, because by default the model writes to be read, not to be heard.
The variables of a voicebot
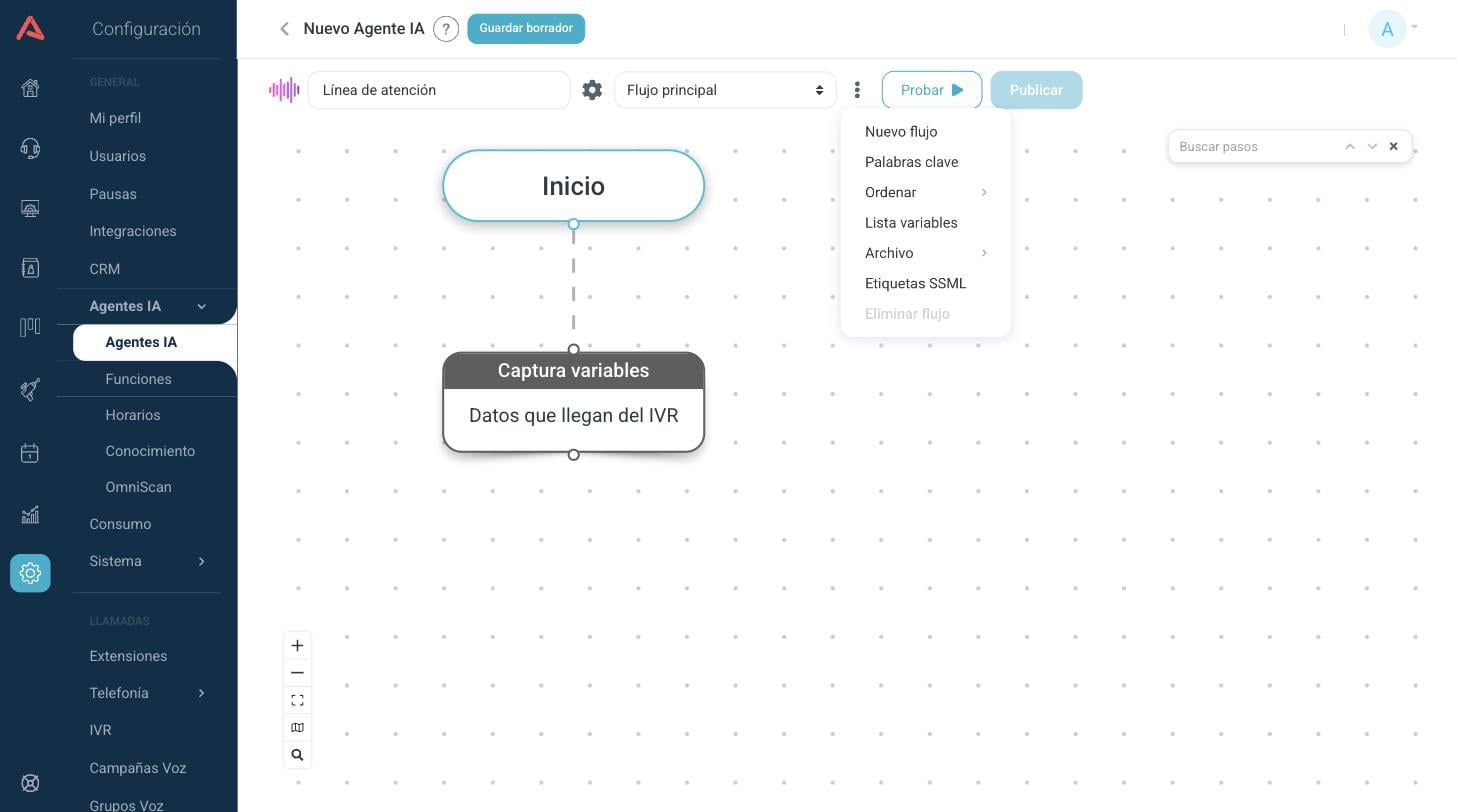
The variable list opens from the editor's (⋮) menu, under Variable list, and in a voicebot it has three blocks.
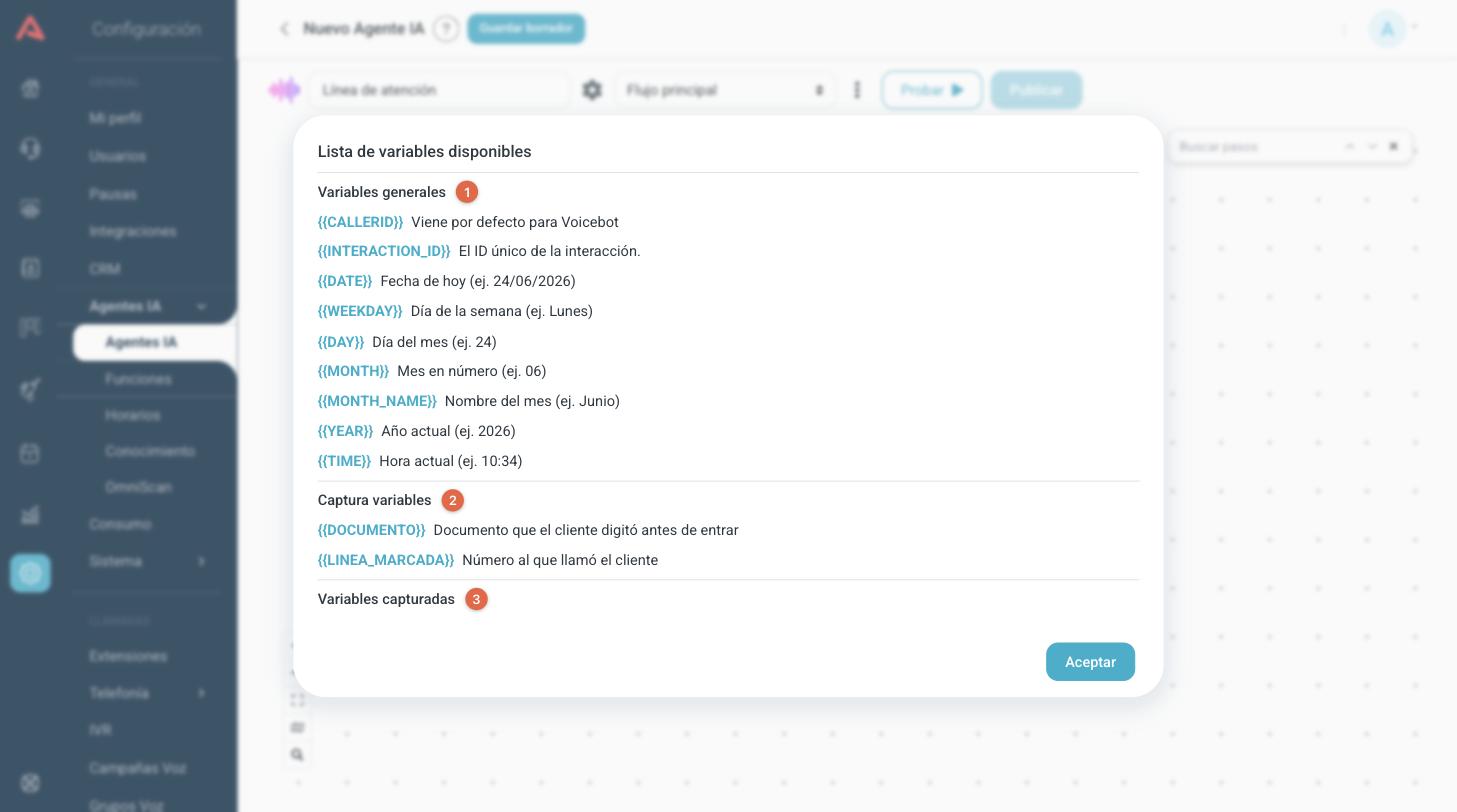
- 1 General variables
{{CALLERID}}is the number they called from and{{INTERACTION_ID}}the identifier of the interaction, the same one that shows up in the reports. The rest are date and time, and they are resolved on the spot.- 2 Capture variables
- The ones the bot receives from the IVR when the call starts. They only appear here if the flow has a Capture variables step.
- 3 Captured variables
- The ones the flow fills in as it goes: captures, queries, integrations and functions.
The Capture variables step
This step does not ask anybody anything: it declares what data the IVR is going to hand the bot when the call comes in. It is there so that, for instance, the bot already knows the ID number the person keyed into the previous menu, or which line they called.
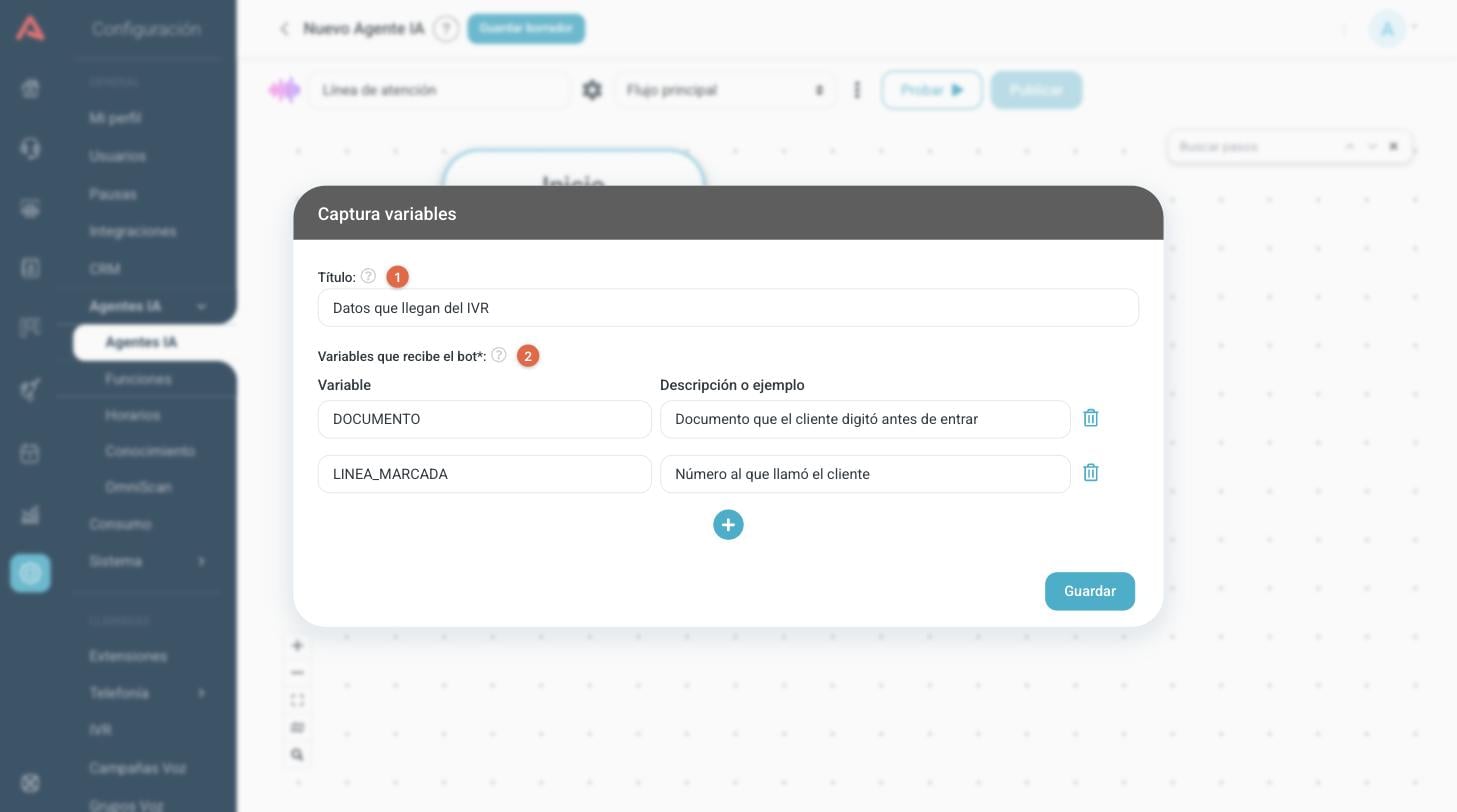
- 1 Title
- The name you see on the canvas.
- 2 Variables the bot receives*
- One row per value. Variable holds the name, which is written in capitals only, with no spaces and no accents. Description or example holds what it is for: that text is what whoever builds the IVR sees afterwards, so write it with that person in mind. Up to fifteen fit.
There can only be one Capture variables step per bot, and it hangs directly off the Start of the main flow. The menu will not let you put it anywhere else. The values are already there before the first step, so that spot is the one that makes it obvious where they came from.
Passing the call somewhere else
The action that hands the call over is called Goto and only exists in voicebots. You add it with Add action and choose it in the Action field.
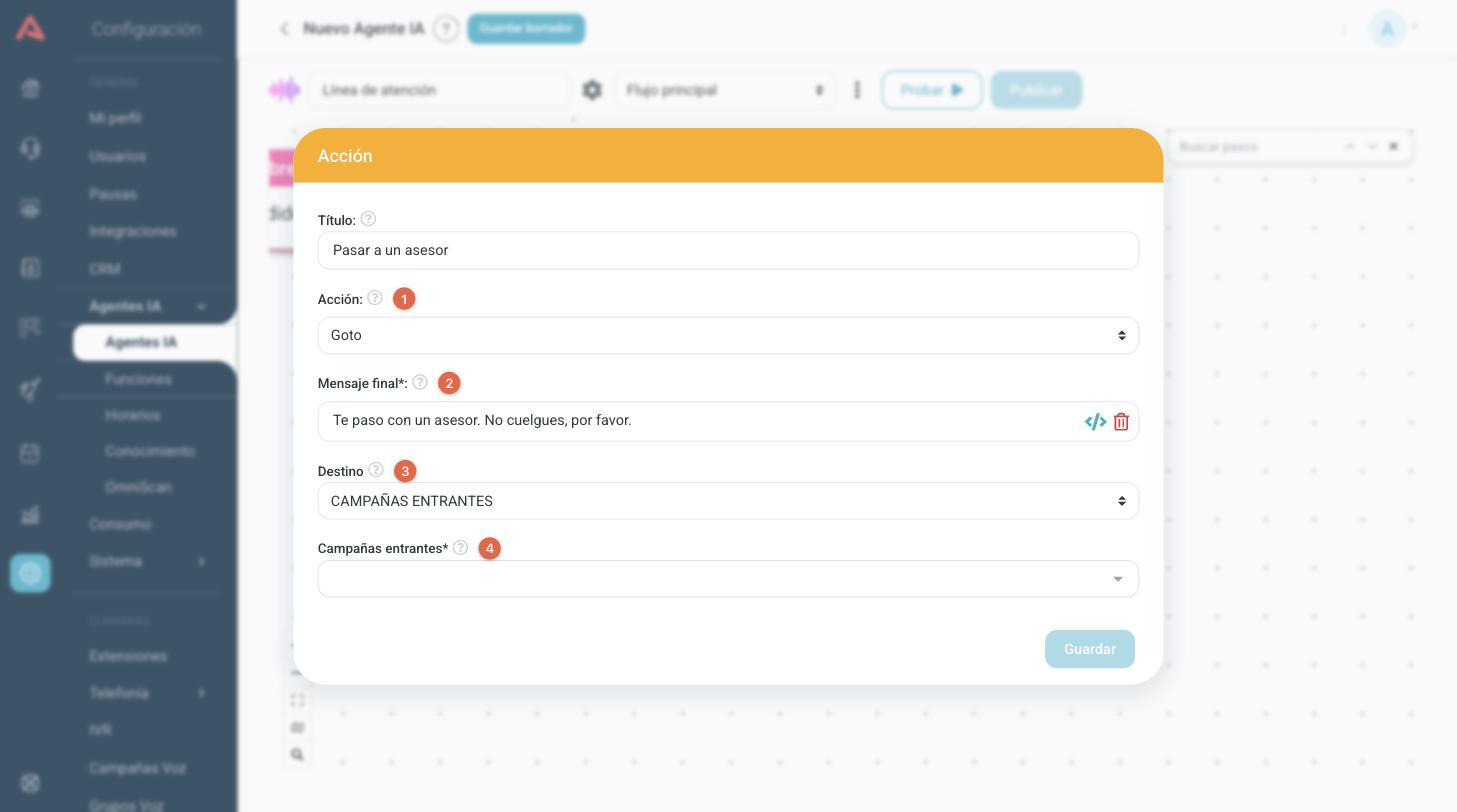
- 1 Action
- Pick Goto. The same list holds Flow (jump to another step of the same bot), AI Agent (hand the conversation to another agent), the email, WhatsApp and Telegram sends, OTP authentication and Finalize. The Chat campaign action, which hands the chat to a queue of agents, does not exist in voicebots: to pass to a human over the phone you use Goto.
- 2 Final message*
- The last thing the bot says before letting the call go. It is required, and it is worth having it say what is about to happen so nobody hangs up thinking they were cut off.
- 3 Destination
- What kind of destination: an extension, a voicemail, a conference, another IVR or an inbound campaign.
- 4 The second field
- Changes with the destination you picked, and that is where you choose which one in particular.
After a Goto the conversation with the bot is over: the call is in the hands of the switchboard. Anything you hang underneath will not run.
Silence, repetition and inactivity
When the bot finishes speaking and waits for an answer, it starts two clocks with the times from the general settings.
The short clock: repeating
When the repeat time is up with nobody having spoken, the bot says the repeat message if you configured one, and says the last thing it said again, word for word. It is not a new message: it is the same question over again, with an Are you still there? in front of it. That is why the repeat message is written short and as a lead-in, not as a full sentence.
The long clock: inactivity
When the inactivity time is up, the bot stops waiting and goes to the inactivity flow, which you build from the flow selector just like the main one. Out of the box that flow comes with an action that ends the call.
Inside it you have an action that exists in no other flow:
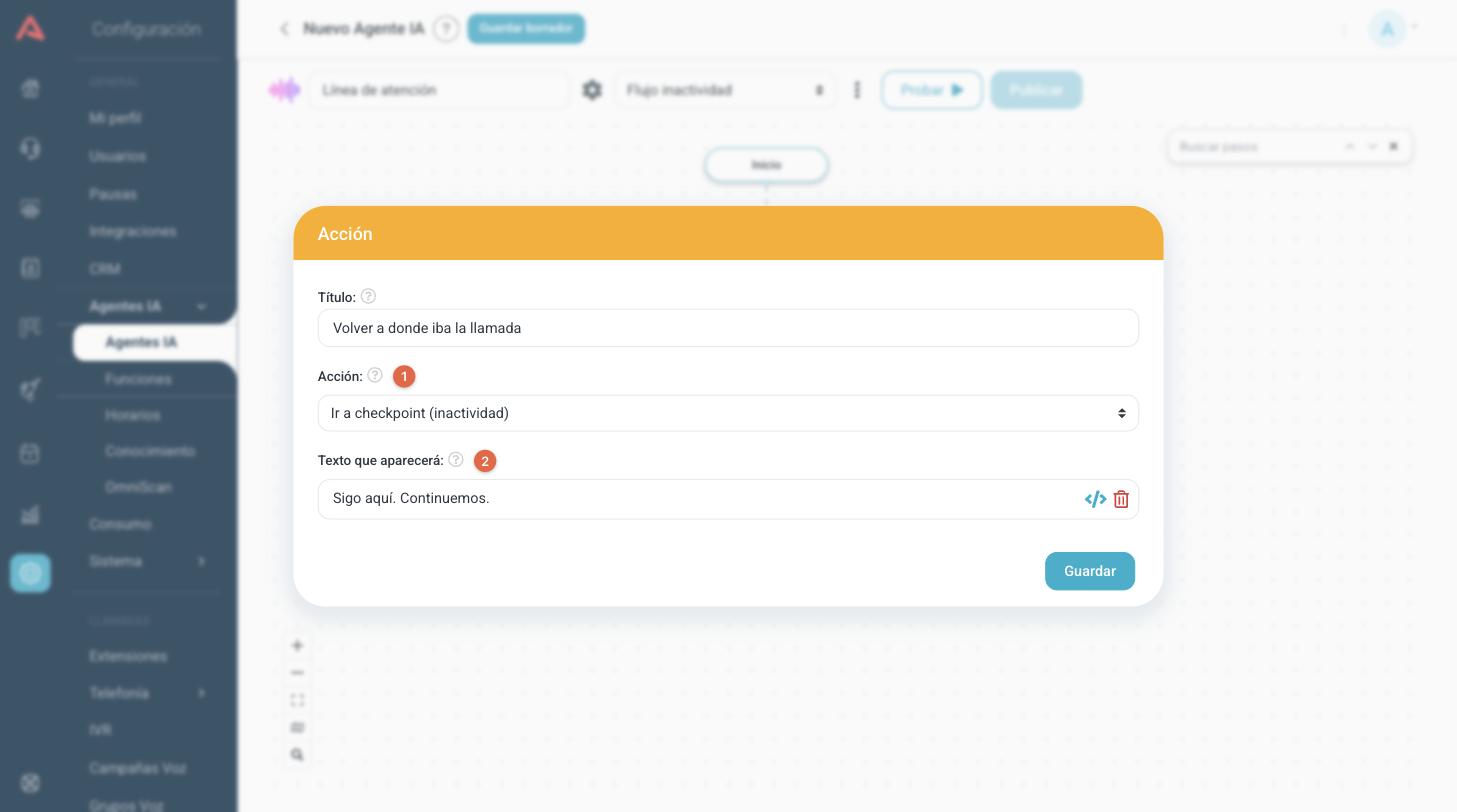
- 1 Action: Go to checkpoint (inactivity)
- Puts the conversation back at the exact step it was on before the silence. With this, the inactivity flow becomes a rescue instead of a goodbye: the bot says it is still there and picks up the question it had left hanging.
- 2 Text to be said
- What it says before going back.
The bot does not stay in that loop forever. After three inactivities in a row without the person saying anything, the call ends by itself. The counter resets as soon as somebody speaks.
Connecting the voicebot to a number
A published voicebot is still not answering anything. The call reaches it through an IVR, which is what has an extension and what the inbound routes point at.
Go to Setup > IVR and create a new one with the (+) button, or open one that already exists. Under Type pick Voicebot: that changes the list of applications you can use in the steps.
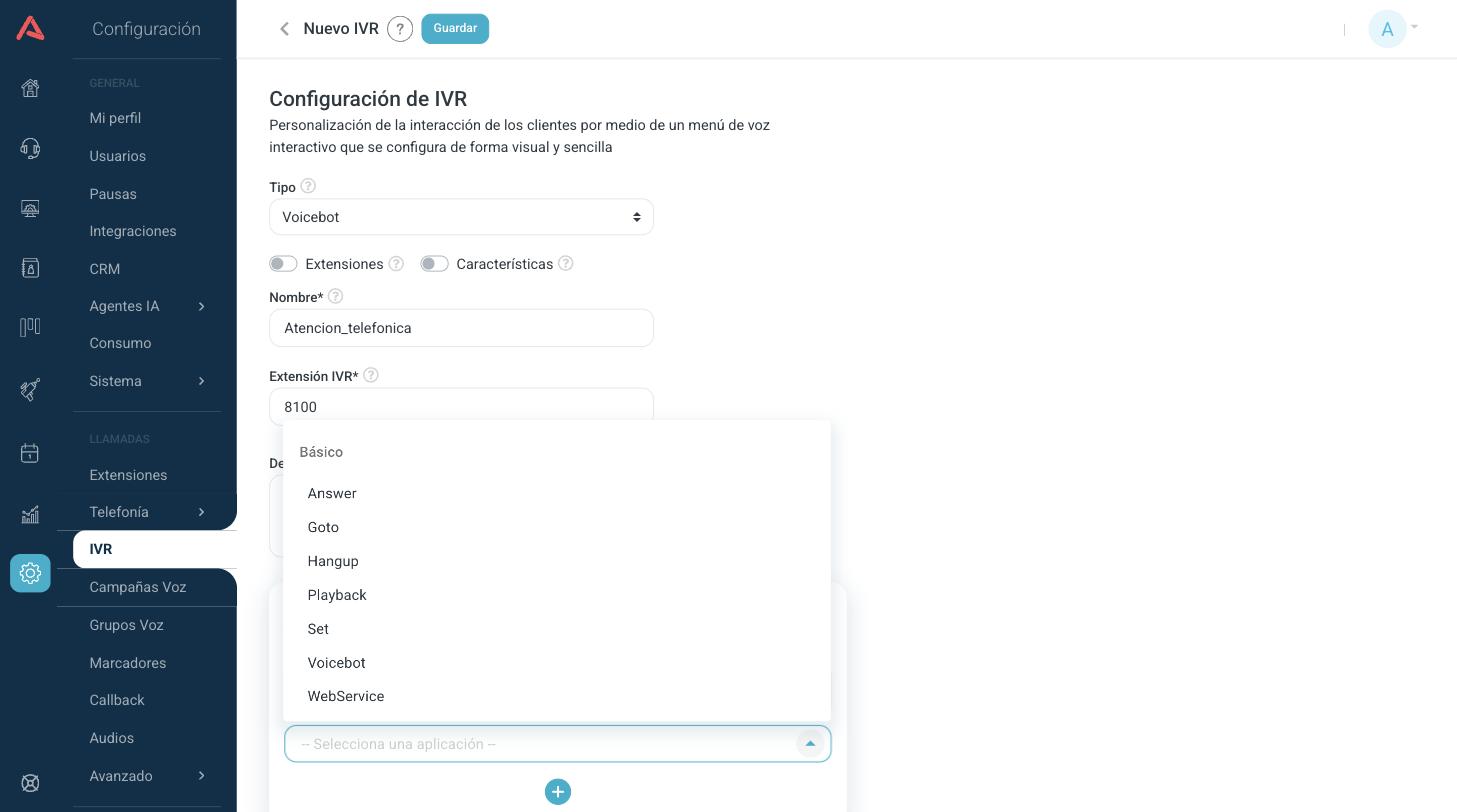
A voicebot IVR is usually short: Answer to pick the call up and Voicebot to hand it to the bot. Set is there to leave a value in a variable before going in, and Playback, Goto, Hangup and WebService for whatever else is needed around it.
Add a step with the (+), choose Voicebot and open it with Edit from the step's three dot menu.
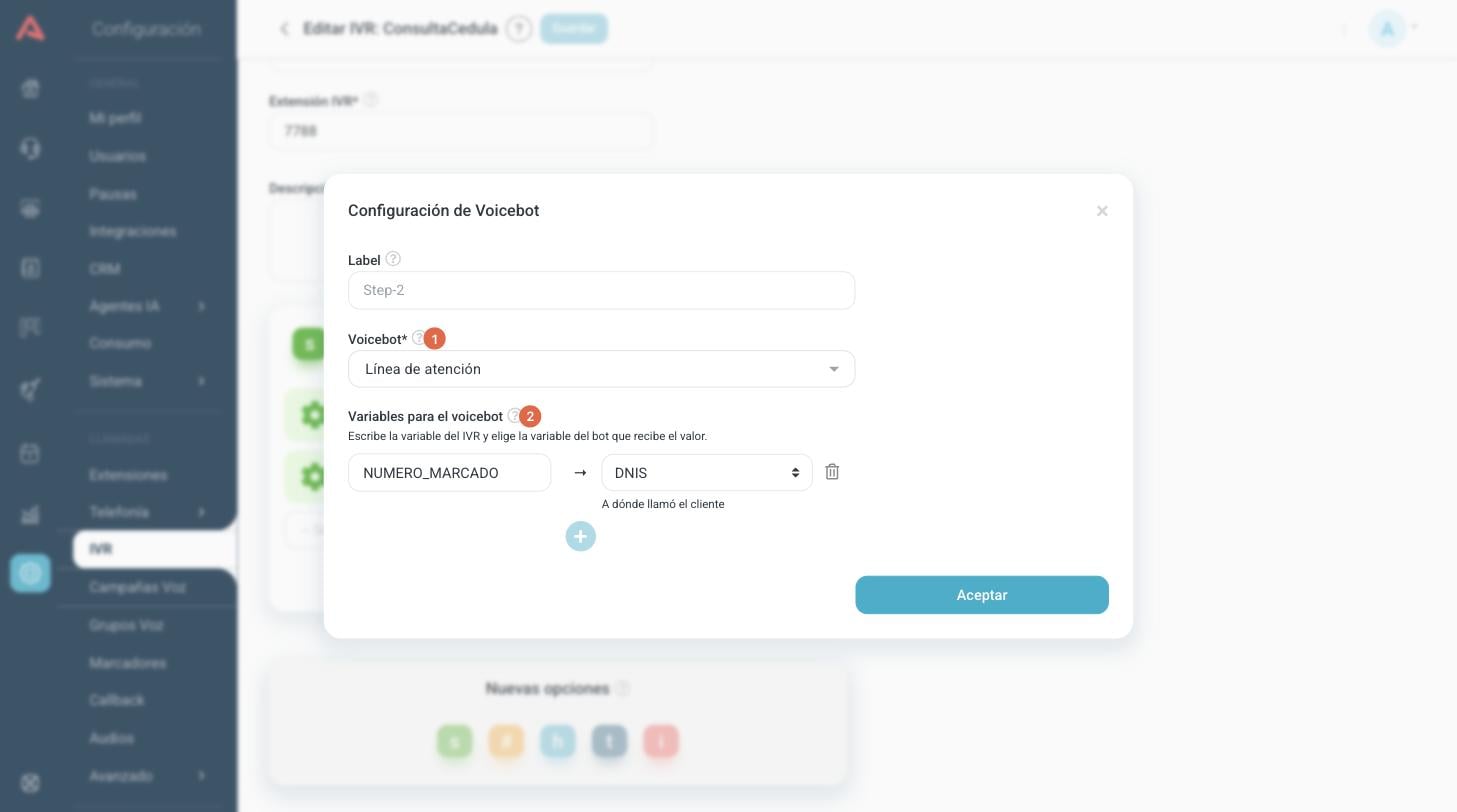
- 1 Voicebot*
- Which of your voicebots answers. The list holds every agent of type Voicebot.
- 2 Variables for the voicebot
- Only appears if the bot you picked declares variables with a Capture variables step. Each row connects a variable of the IVR, on the left, with a variable of the bot, on the right. Underneath the one you pick you can read the description written by whoever built the bot, so you know what is expected there.
If the bot declares nothing, instead of the rows you will see a notice telling you exactly that: add the Capture variables step to the bot's main flow and come back.
On the left goes the name of the IVR variable, with no braces and no dollar signs: the system puts those in itself. And watch out, capitals do matter there, because they are switchboard variables.
Finding out what number a bot answers on
From the voicebot editor, in the (⋮) menu, the View assigned option tells you which IVR it is mounted on and what number dials it.
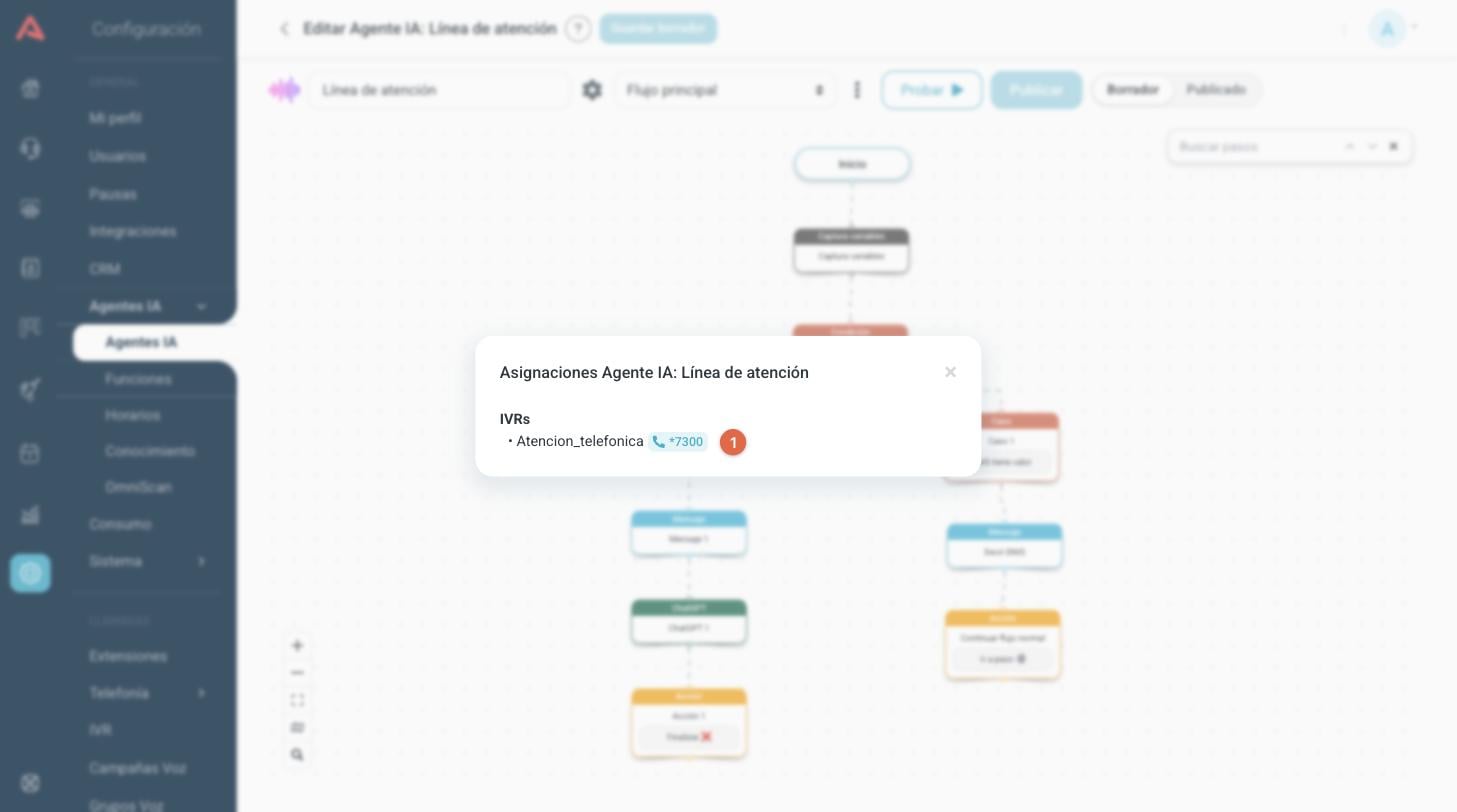
The 1 badge with the phone icon is the number. If you have the browser softphone switched on, clicking it dials that extension and puts you through to the bot.
Testing and publishing
Publishing a voicebot works just like publishing a chatbot: Save draft saves your changes without putting them on air, and Publish sets them answering calls. The Chatbot article explains the draft and published pair, the change history and how to roll back.
The Test button opens a written conversation panel that runs the flow you are looking at, without publishing anything.
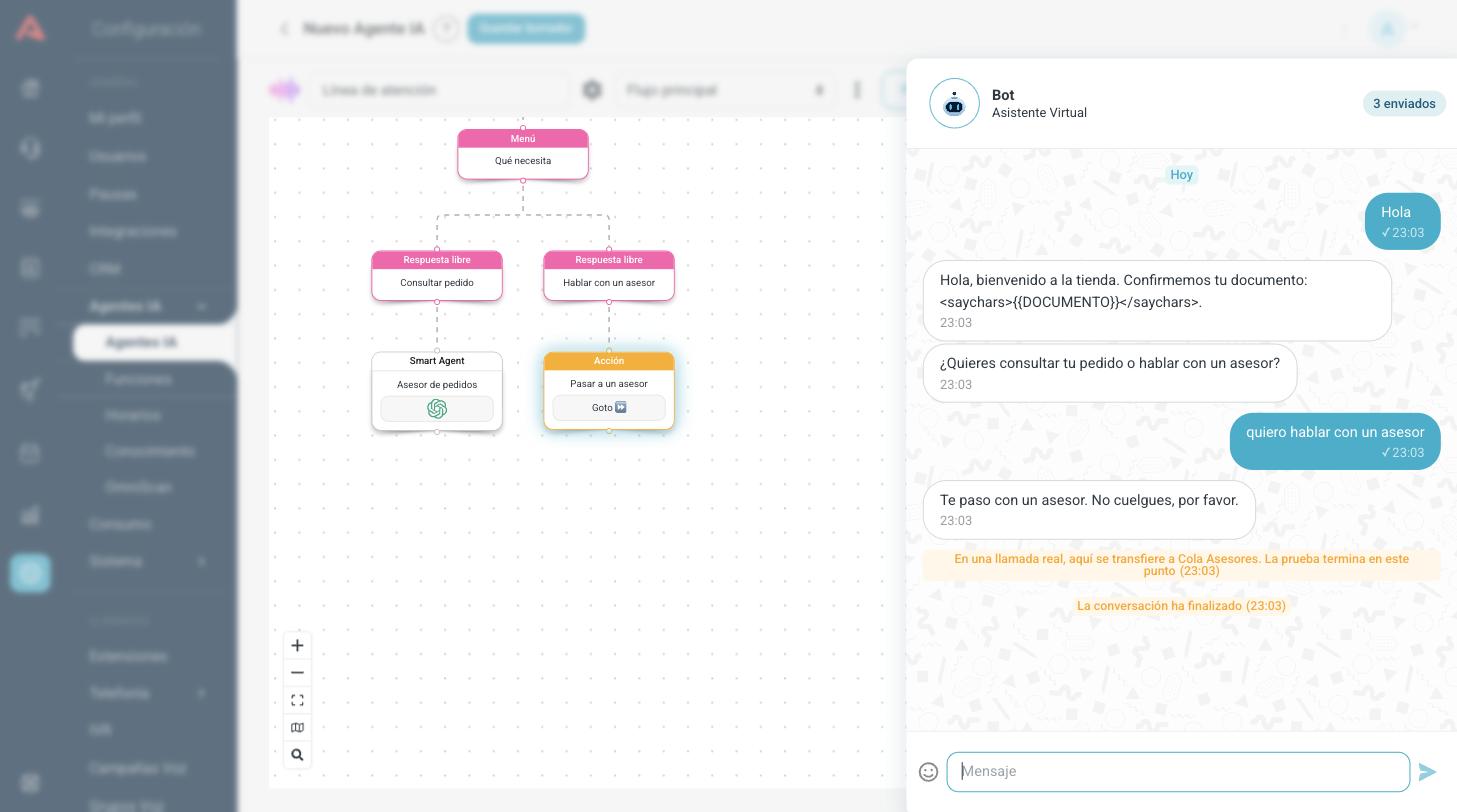
Because it is a written test and not a call, there are three things that look different from what will really happen, and they are worth being clear about:
- There is no voice. You read the text exactly as you are going to hand it to the engine, with its tags on show. If you wrote
<saychars>or SSML, here you see them written out; on the call they turn into sound. - There is no IVR, so the Capture variables values arrive empty. Any step that depends on them has to be tried with a real call.
- A Goto does not transfer. Instead, the panel writes out what destination it would transfer to on a real call and ends the test there.
Use the panel to check the paths, the keywords and the queries, and leave everything to do with the voice for a real call: how the numbers sound, whether the pauses came out right and whether the silence times are comfortable.
Good practice
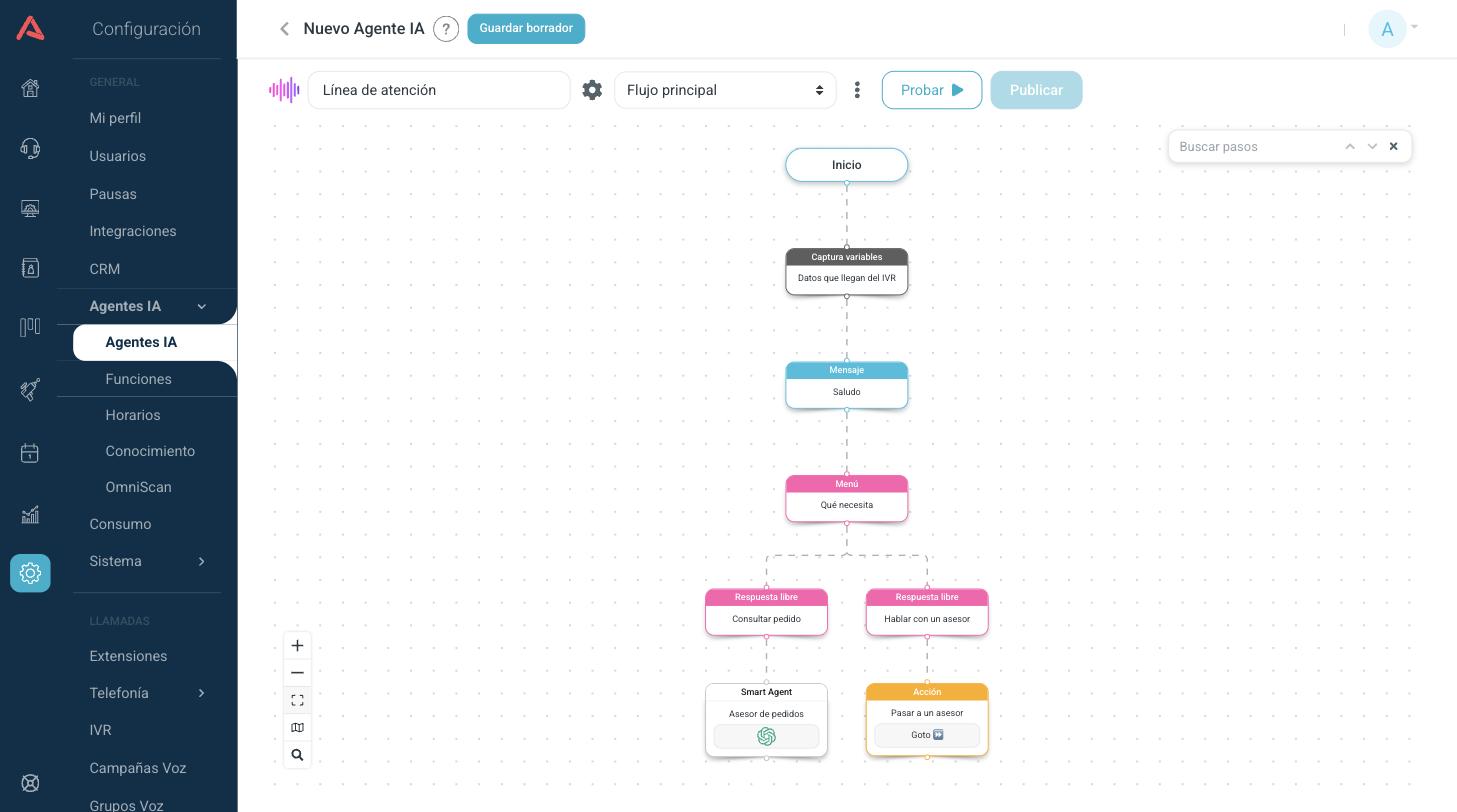
The flow above reads like this: the bot receives from the IVR the data the switchboard already had, says hello, asks what the caller needs, and from there two paths come out. Whoever says order goes to a Smart Agent that resolves the query; whoever says adviser goes to an action that transfers the call. That is the most common way to build a voicebot: a short menu at the top and, hanging off each path, either artificial intelligence or a transfer.
- Read it out loud before publishing
- It is the cheapest test there is. If it is hard for you to say, it will be hard for the customer to hear.
- Always start by knowing who is calling
- If the IVR already has the ID number or the number dialled, pass it to the bot with Capture variables. Asking again for what the switchboard already knows is the most annoying thing on a call.
- Comfortable times
- A low repeat time, between 15 and 20 seconds, and a more generous inactivity time. Speaking takes longer than typing, and a person hunting for a number in their wallet takes a while.
- The inactivity flow rescues, it does not say goodbye
- With the Go to checkpoint (inactivity) action the bot picks up where it was instead of hanging up. Hanging up at the first silence is the most frequent complaint.
- Always a way out to a human
- An Open response path with words like adviser, person or human, and a Goto underneath. Nobody should end up trapped talking to a bot.
- Test the voice, not just the flow
- Dial the IVR number from View assigned and listen to a whole call. The mistakes of a voicebot are heard, not read.