Automation
The agent that works alone, without talking to anybody
The AI Agents module builds three types of agent. Two of them hold conversations: the Chatbot in text and the Voicebot over the phone. The third, the Automation, talks to nobody. This article covers only what belongs to that third type. The editor, the canvas, the steps and publishing all work the same as in the others, and that is explained in Chatbot and in Chatbot: the steps in a flow.
What an automation is
An automation is an agent that runs a process on its own. Something triggers it, it runs its flow from beginning to end and finishes. There is nobody on the other side: no open chat, no call, no person waiting for an answer.
Out of that comes the difference that takes the longest to sink in: an automation has no Message step. It is not hidden, it simply does not exist in its menu. If you need somebody to find something out, you send it with an email, WhatsApp or Telegram action, which are available.
It is there for the work somebody does by hand today at a certain hour: pulling a report every morning and emailing it, loading a message campaign with the contacts that meet a condition, raising the alarm when a trunk goes down, or receiving a notice from another system and doing something with it.
You will find them in the same list as the other agents, with their green icon. If you have a lot of them, filter by type.
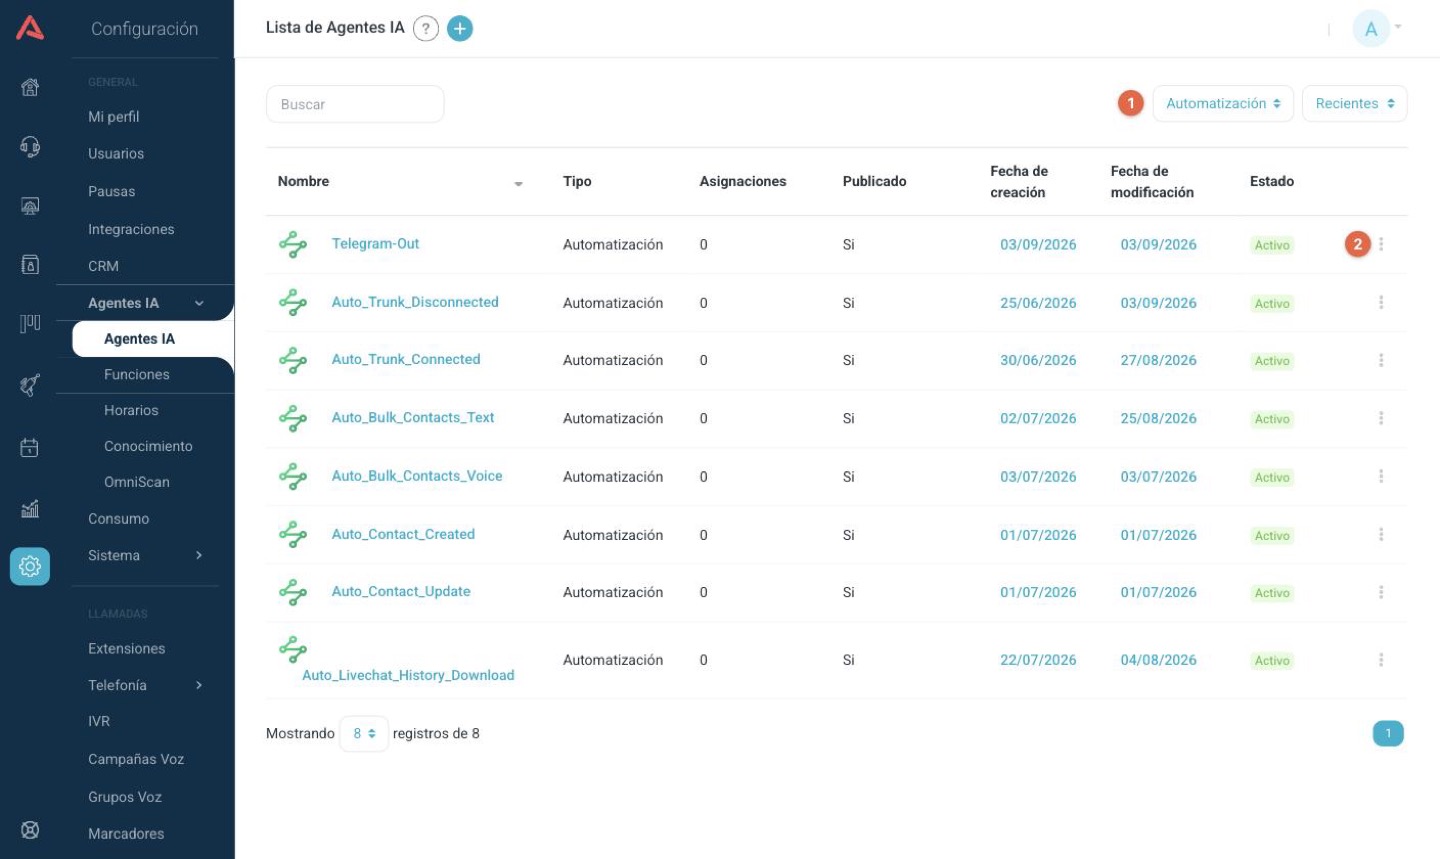
Creating an automation
Go to AI Agents in the main menu and press (+). In the type window pick Automation.
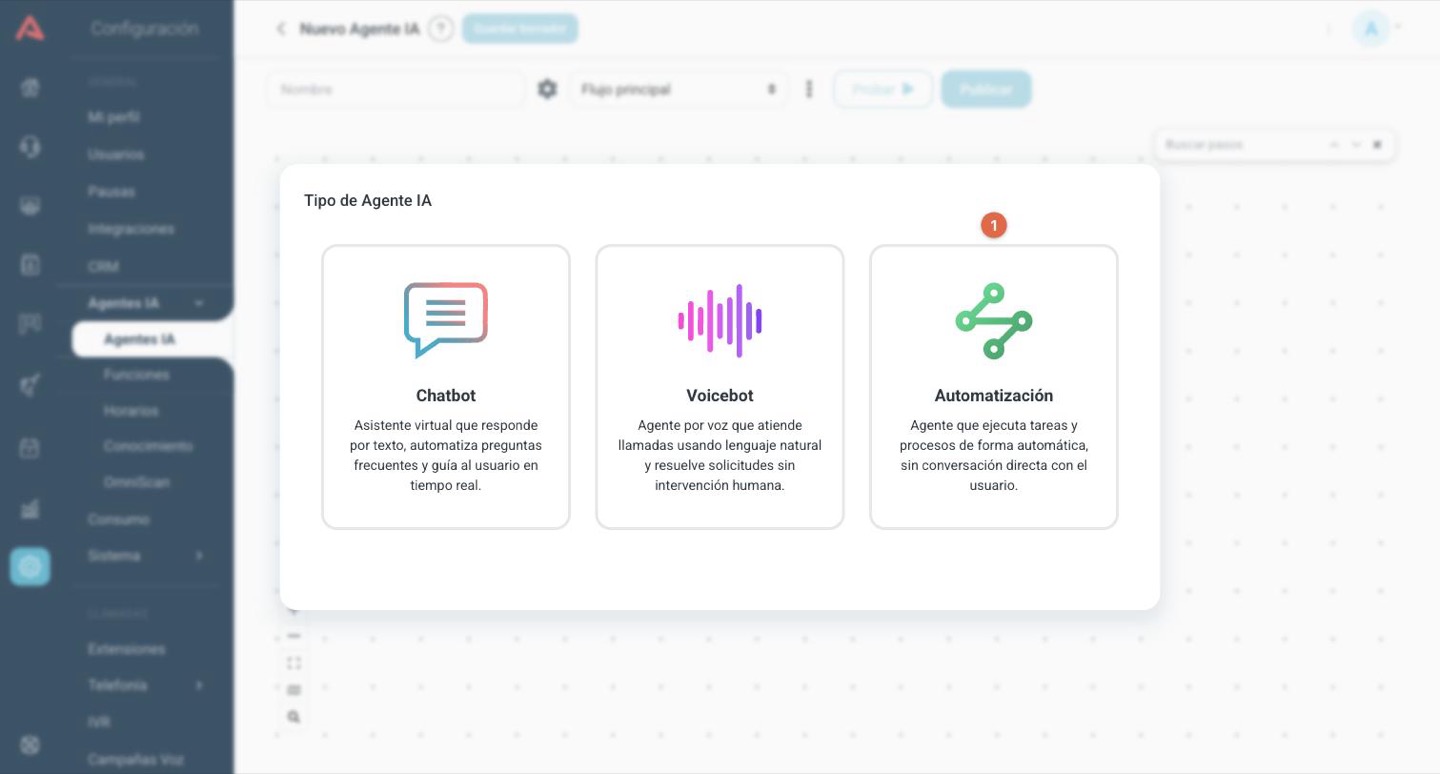
The moment you pick the type, the trigger settings window opens by itself, because an automation with no trigger cannot run. You can close it and build the flow first: it opens again every time you come in, until you pick one.
What you are left with is the canvas, with two visible differences from a chatbot.
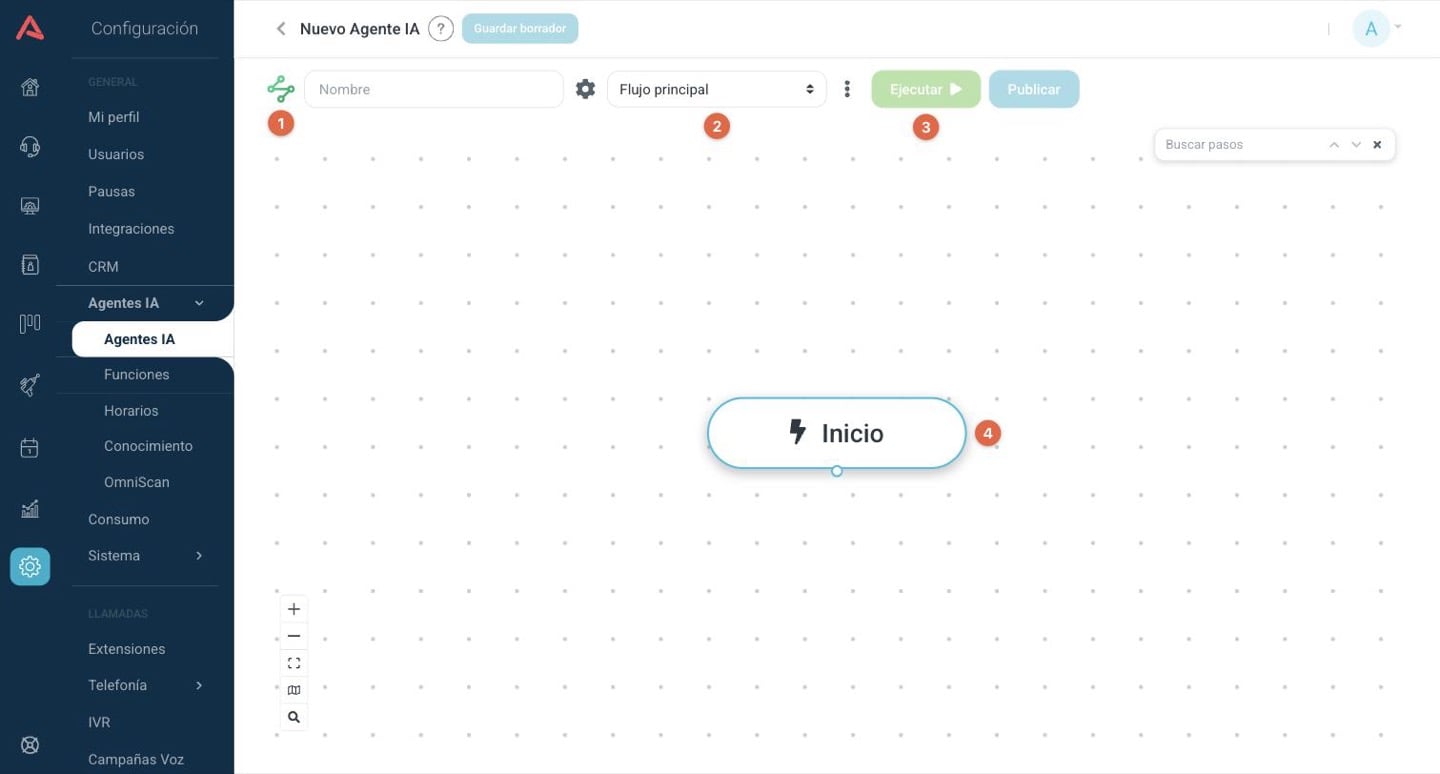
One flow only. A chatbot comes with four flows out of the box: main, inactivity, off hours and survey. An automation comes with only the Main flow, because the other three exist to handle a person who does not answer or who arrives outside working hours, and here there is no person. You can create extra flows from the canvas menu and jump to them with an action of type Flow, but the automation always starts on the main one.
The four triggers
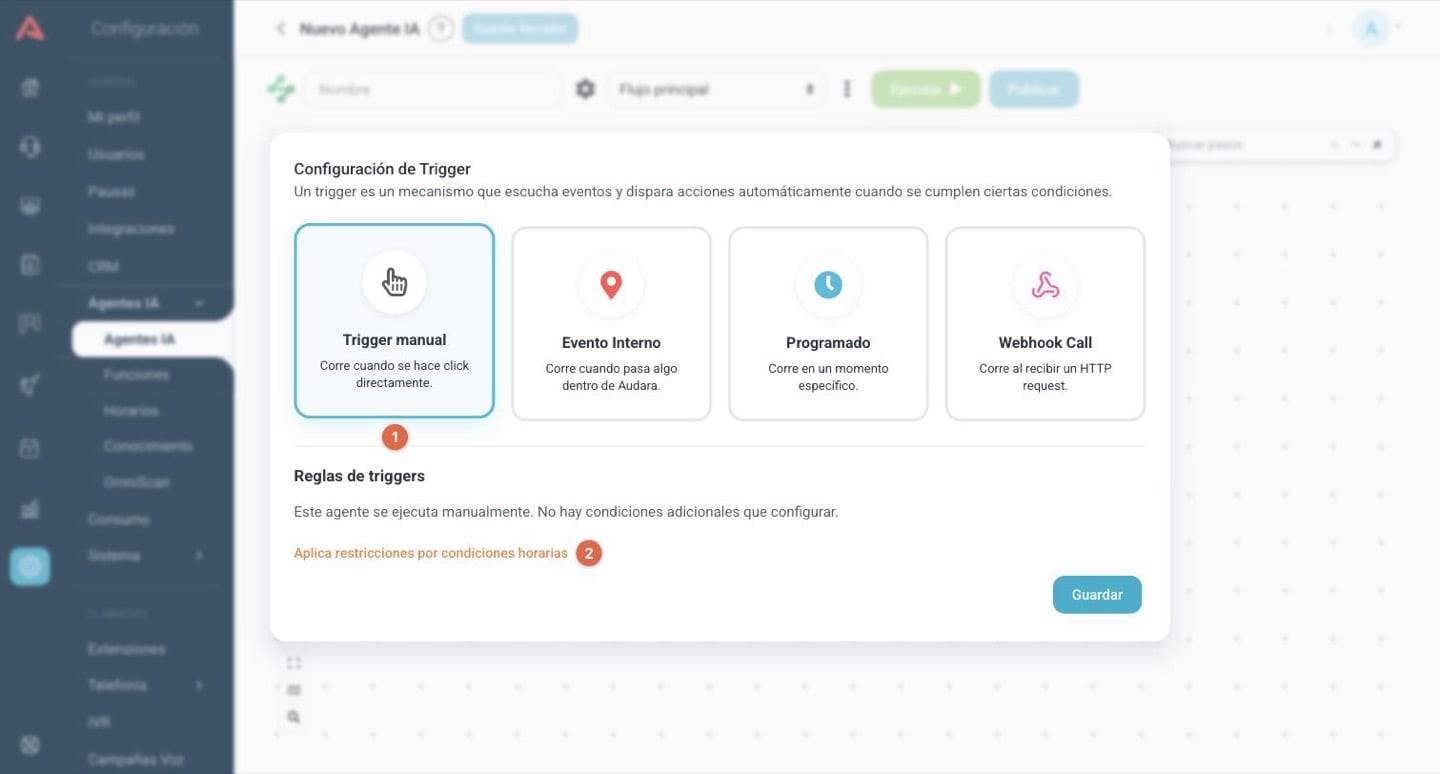
The trigger is what makes the automation run. It is configured on the Start node and there are four types.
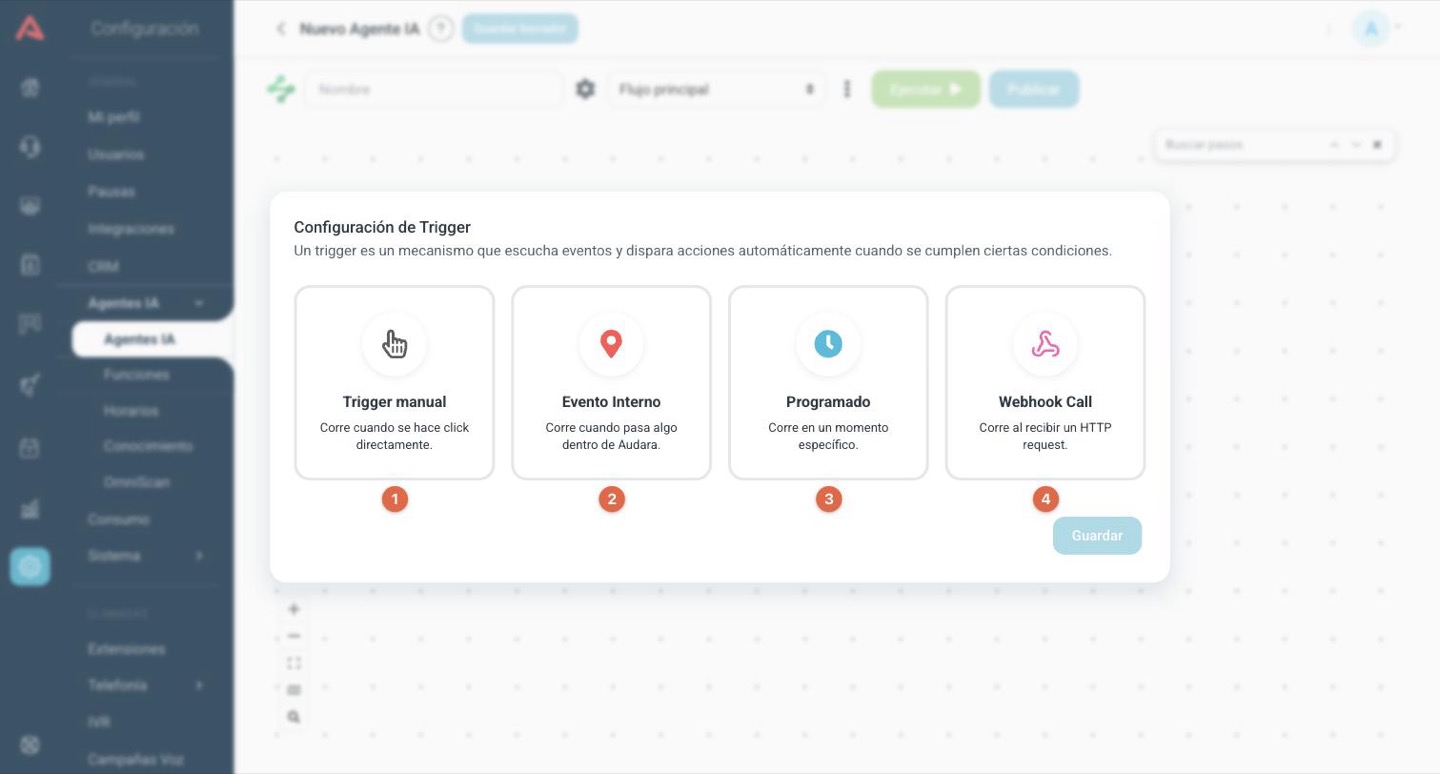
Underneath the cards, the line Apply restrictions by schedule conditions reminds you of something that holds for all four types: if the agent has a schedule configured, it does not run outside it. The attempt is recorded all the same, with the status Off schedule.
Manual
There is nothing to configure. The automation runs when you press Run automation in the editor bar.
Internal Event
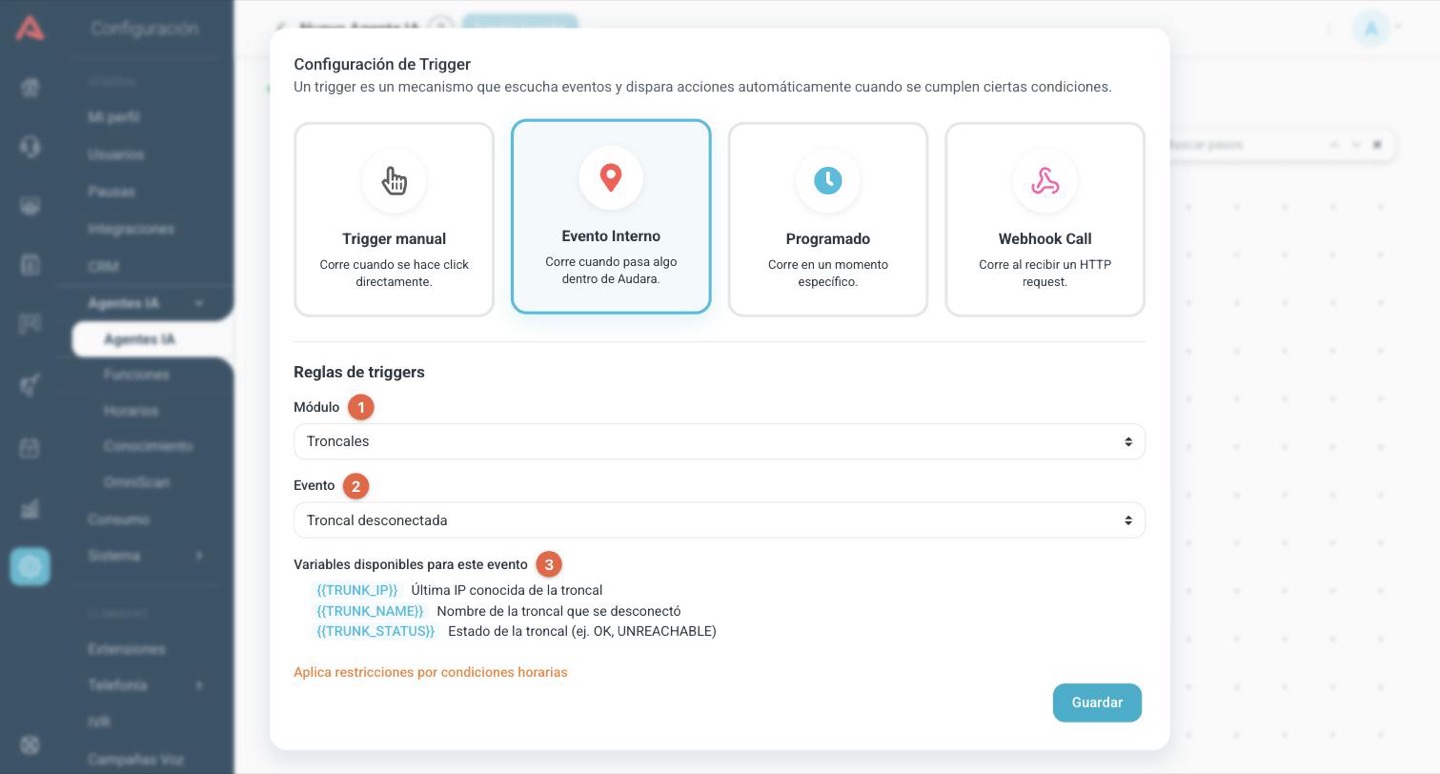
It runs when something happens inside Audara. You pick a Module and, inside it, an Event. Today there are two modules.
Trunks gives you two events, Trunk disconnected and Trunk connected, which fire when a trunk goes from connected to down, or the other way round. Each one exposes three variables with the name, the status and the last known IP of the trunk.
CRM gives you two more, Contact created and Field value changed. Both are tied to a particular CRM and let you choose which fields of the contact you want to receive as variables, so you are not dragging thirty along that you will never use. The prefix is put in front of each of their names.
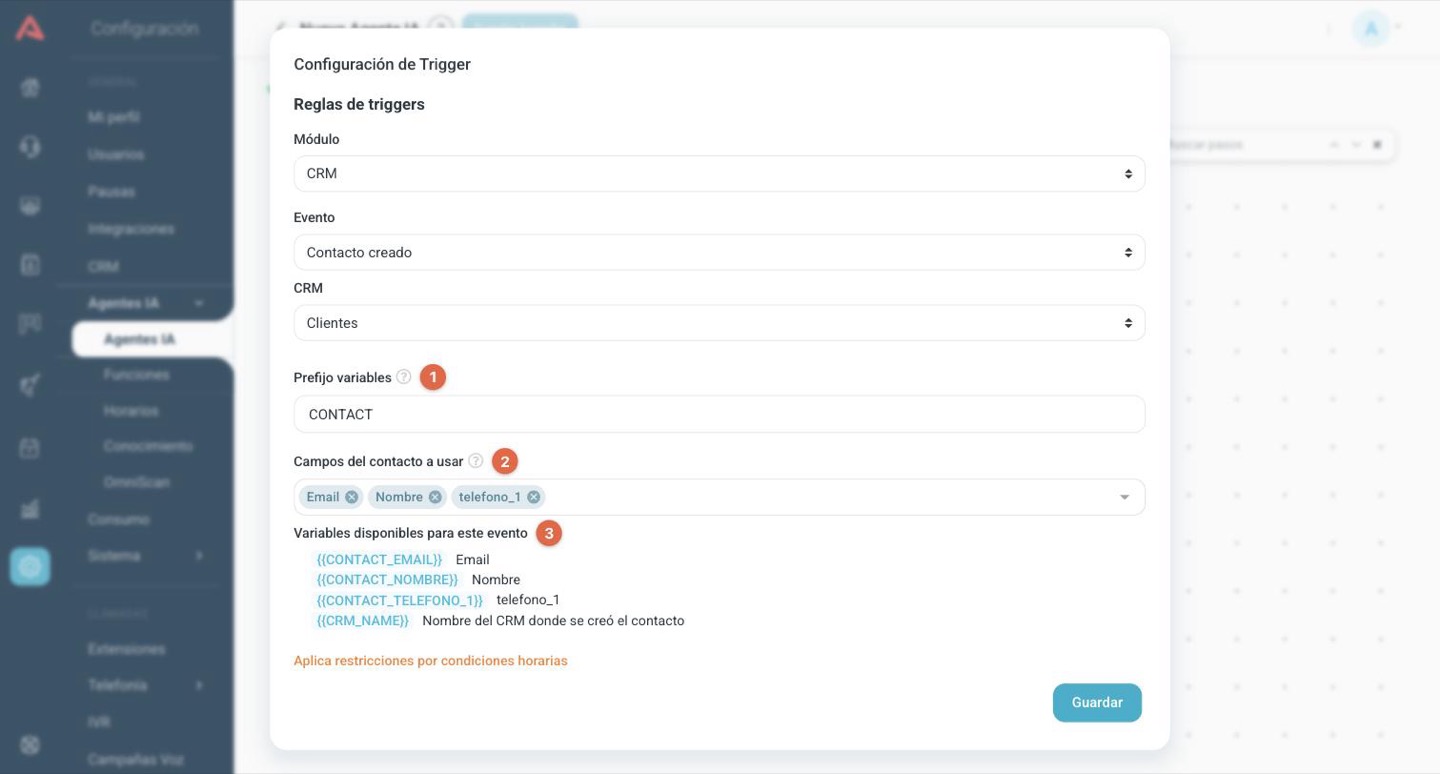
{{CONTACT_NOMBRE}}On Field value changed you also pick which field to watch and which values fire it. Only selection fields are offered, because those are the ones with a known list of values. If you pick no values, it fires on any new value. That event adds two variables of its own, {{FIELD_VALUE}} and {{FIELD_PREVIOUS_VALUE}}.
CRM events do not fire on bulk operations. A contact created one at a time fires Contact created, whether it comes from the panel, from a chatbot or from a callback. An import of contacts does not fire it. Same with Field value changed: an edit made contact by contact fires it, a bulk edit does not. It is on purpose, so that loading a file of ten thousand contacts does not launch ten thousand automations.
Scheduled
It runs at a set time. You pick the Frequency and, depending on which one it is, it asks you for the rest: every how many hours and what time it starts from, the time of day, the days of the week, or the day of the month.
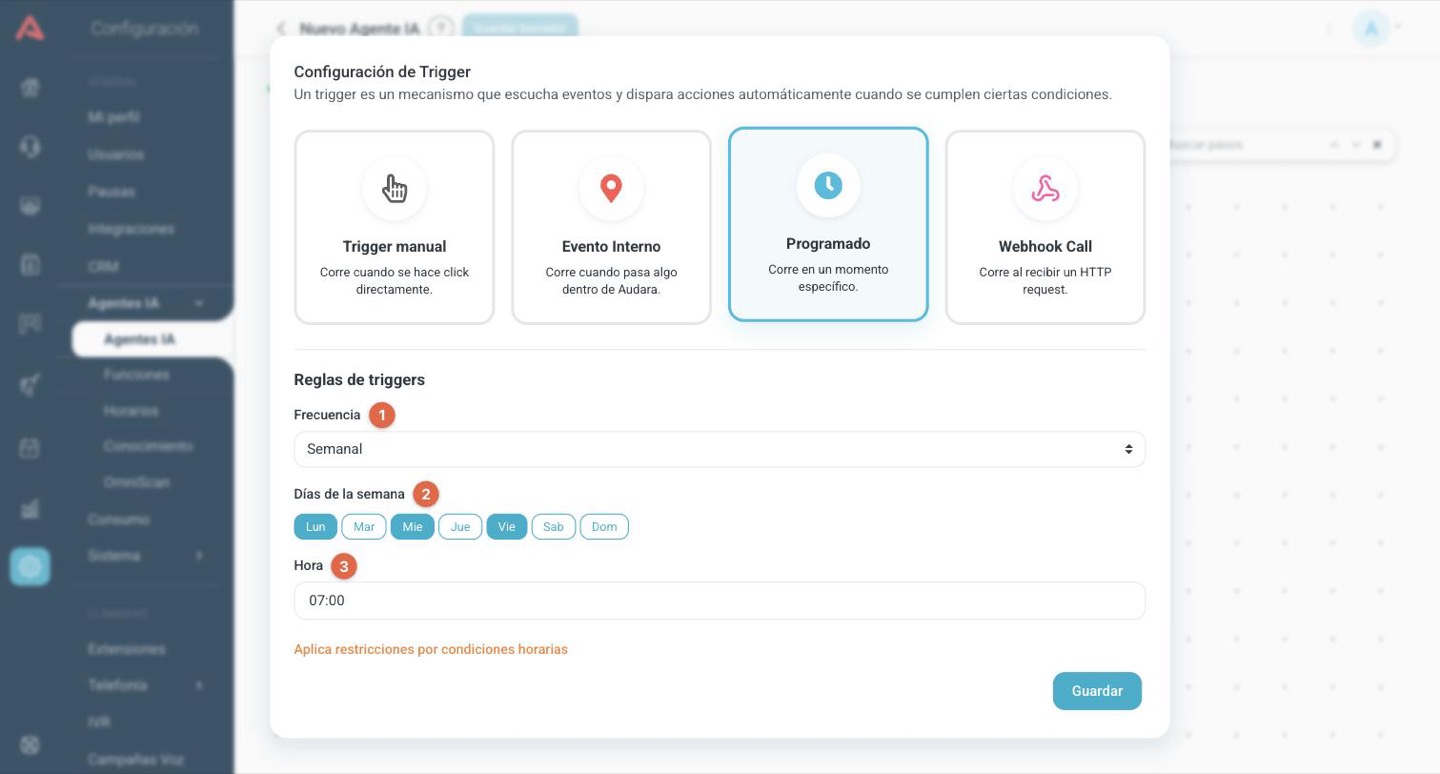
The time is the server's. If you pick a monthly frequency and day 31, it does not run in the months that have no 31st.
Webhook Call
It runs when another system sends it a request. Audara gives you a public URL belonging to that automation, and whoever has that address can trigger it with a POST with a JSON body.
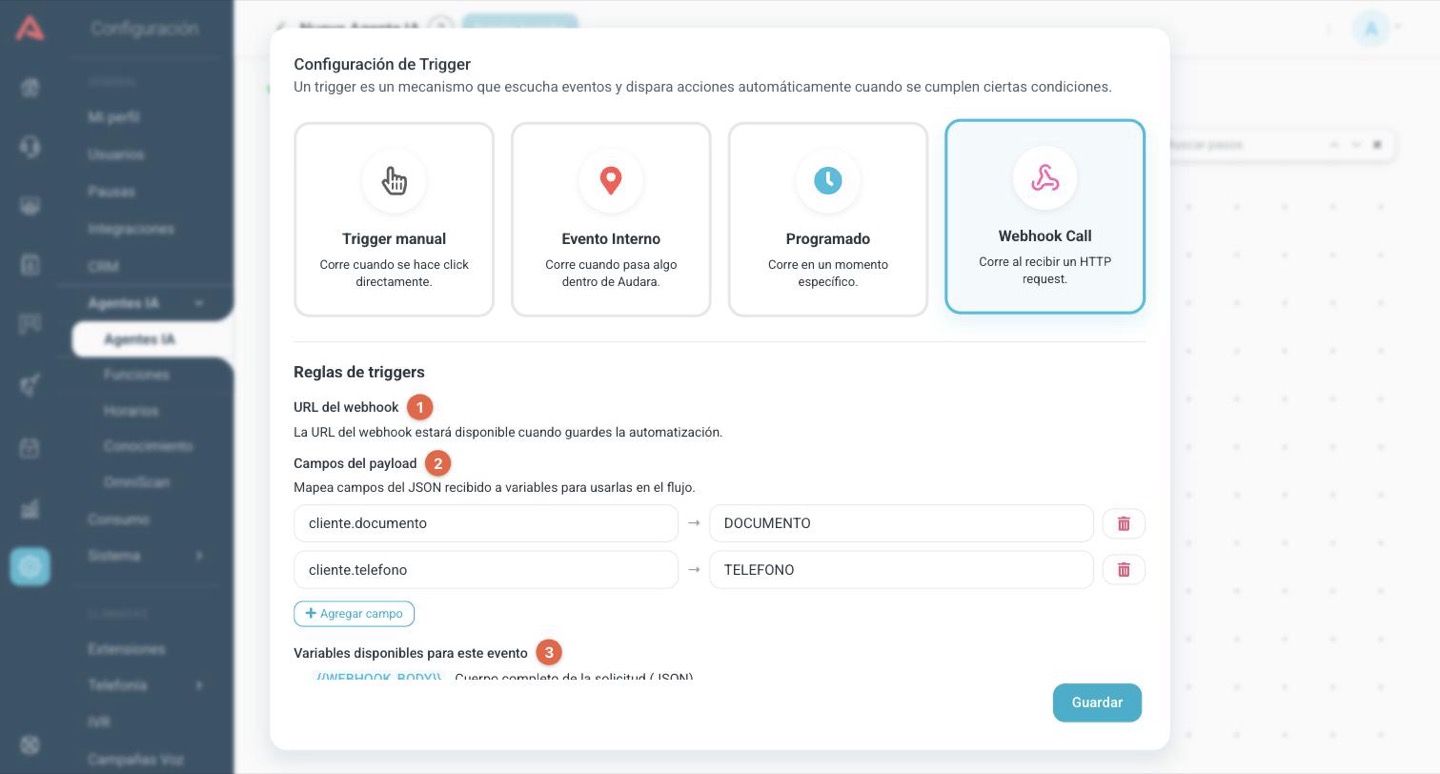
- Webhook URL
- The address the other system sends the request to. It carries a token belonging to this automation: whoever has it can trigger it, so treat it like a password. The copy button puts it on the clipboard and the regenerate one creates a new token, which makes the previous address stop working.
- Payload fields
- Each row takes a path inside the JSON that arrives and stores it in a variable. If the body carries
{"customer": {"id": "123"}}, the pathcustomer.idleaves the 123 in whichever variable you name. - Capture a test request
- Available once the automation is saved. You press Capture request, send a real request from the other system and Audara shows you the JSON that arrived so you can build the mapping by clicking the keys, instead of writing the paths blind. That test request does not run the flow. You can also paste a sample by hand.
Even if you map no fields at all, the flow always has {{WEBHOOK_BODY}} with the whole body and {{WEBHOOK_QUERY}} with the parameters from the URL. The mapping is a convenience so you do not have to dig the value out of the whole JSON.
The variables the trigger brings
Whatever the trigger is, what it brings becomes available as a variable throughout the flow. You see them in the canvas menu, under Variable list, alongside the date and time ones every agent carries.
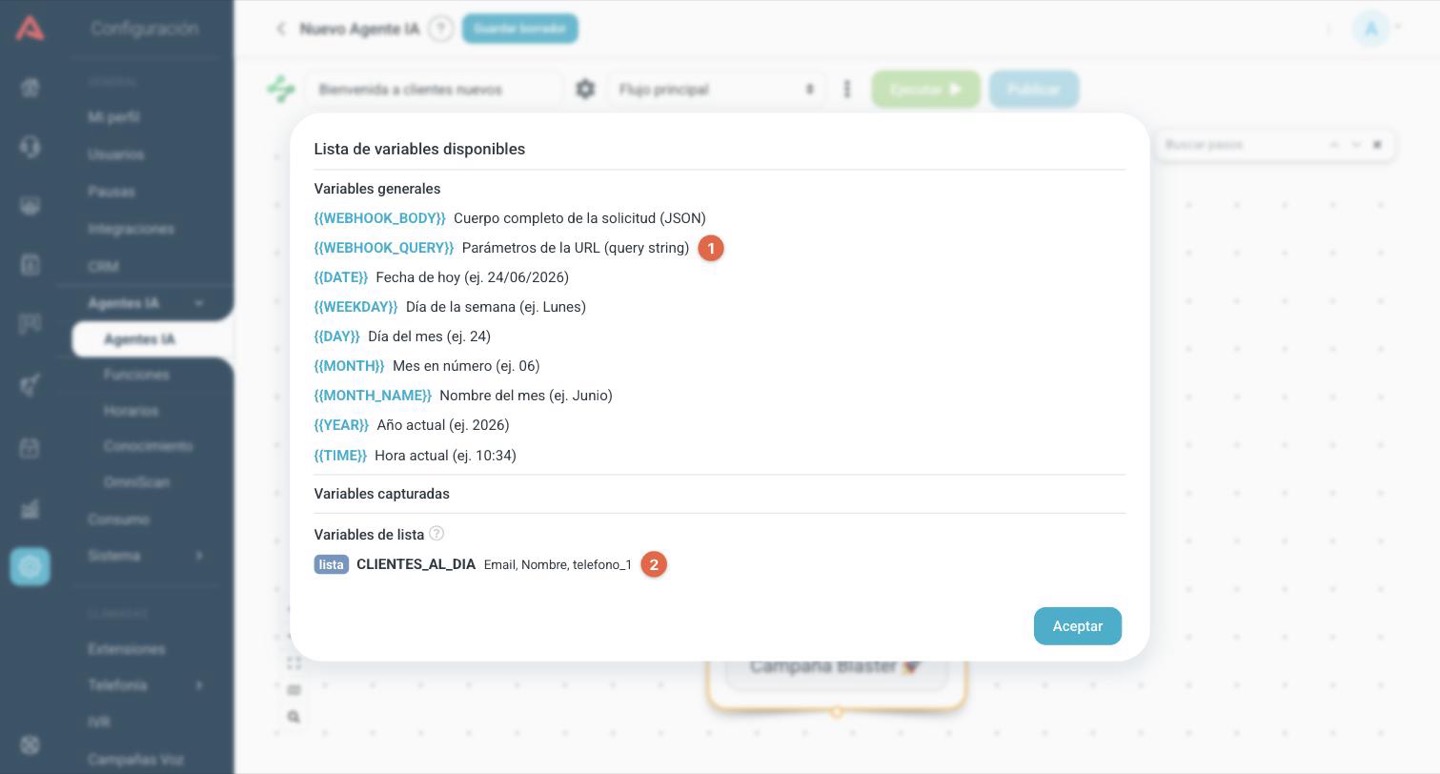
A list variable is not an ordinary variable. It holds many records, not one value, so it cannot be inserted into a text or compared in a condition. Only the steps that know how to work with lists read it, which today means the Blaster campaign action. They are told apart by the list tag.
Which steps it has and which it does not
The canvas menu of an automation is shorter than a chatbot's, and the reason is always the same: there is nobody to talk to.
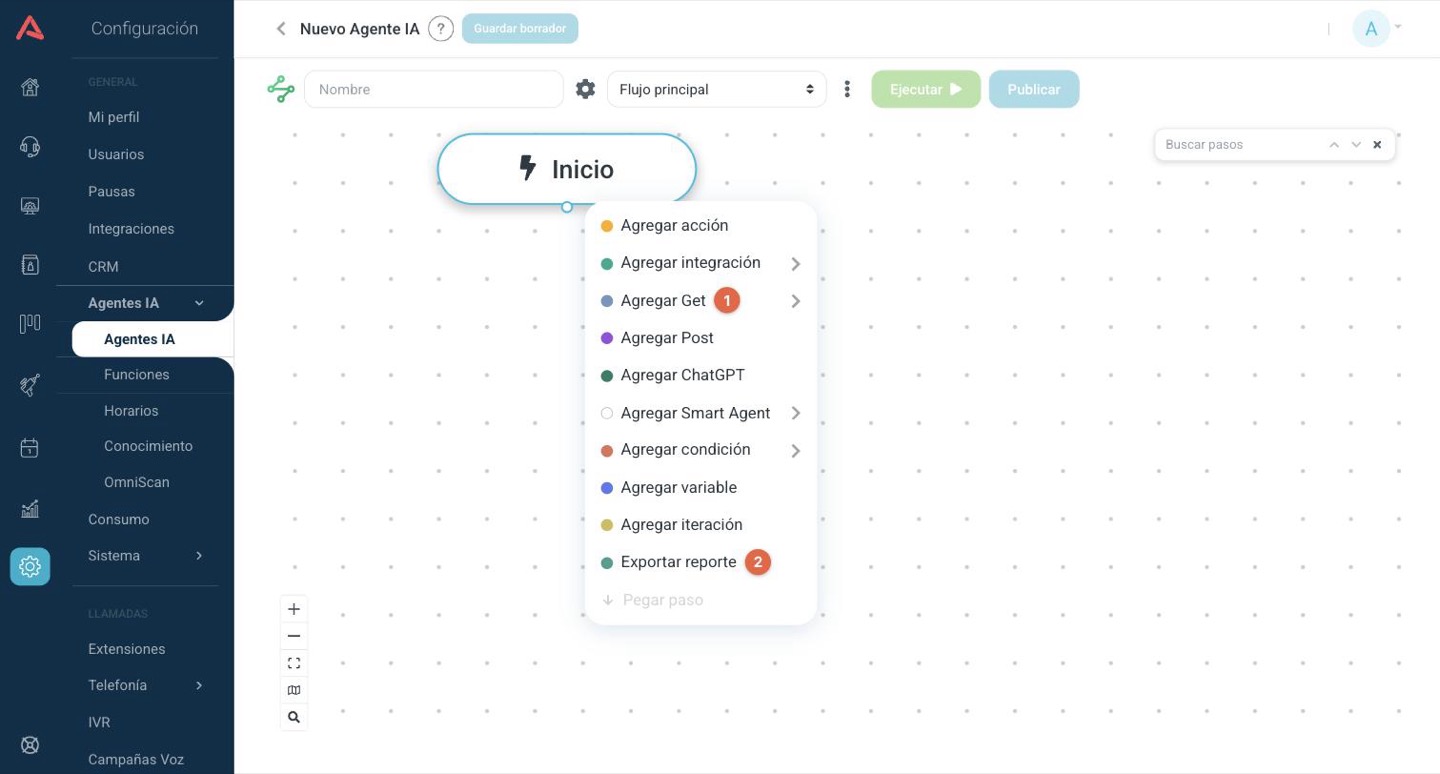
What is not there, compared with a chatbot:
- Message, in any of its forms.
- Interaction as a whole: menu, buttons, list options, open response and invalid.
- Capture as a whole: data capture, file capture and WhatsApp form.
- Survey.
- The global keywords in the canvas menu, because there is nobody typing words.
What is there and works exactly as it does in a chatbot: Action, Integration (REST API and MCP), Post, ChatGPT, Smart Agent with its functions, Condition, Variable and Iteration. They are all explained in Chatbot: the steps in a flow.
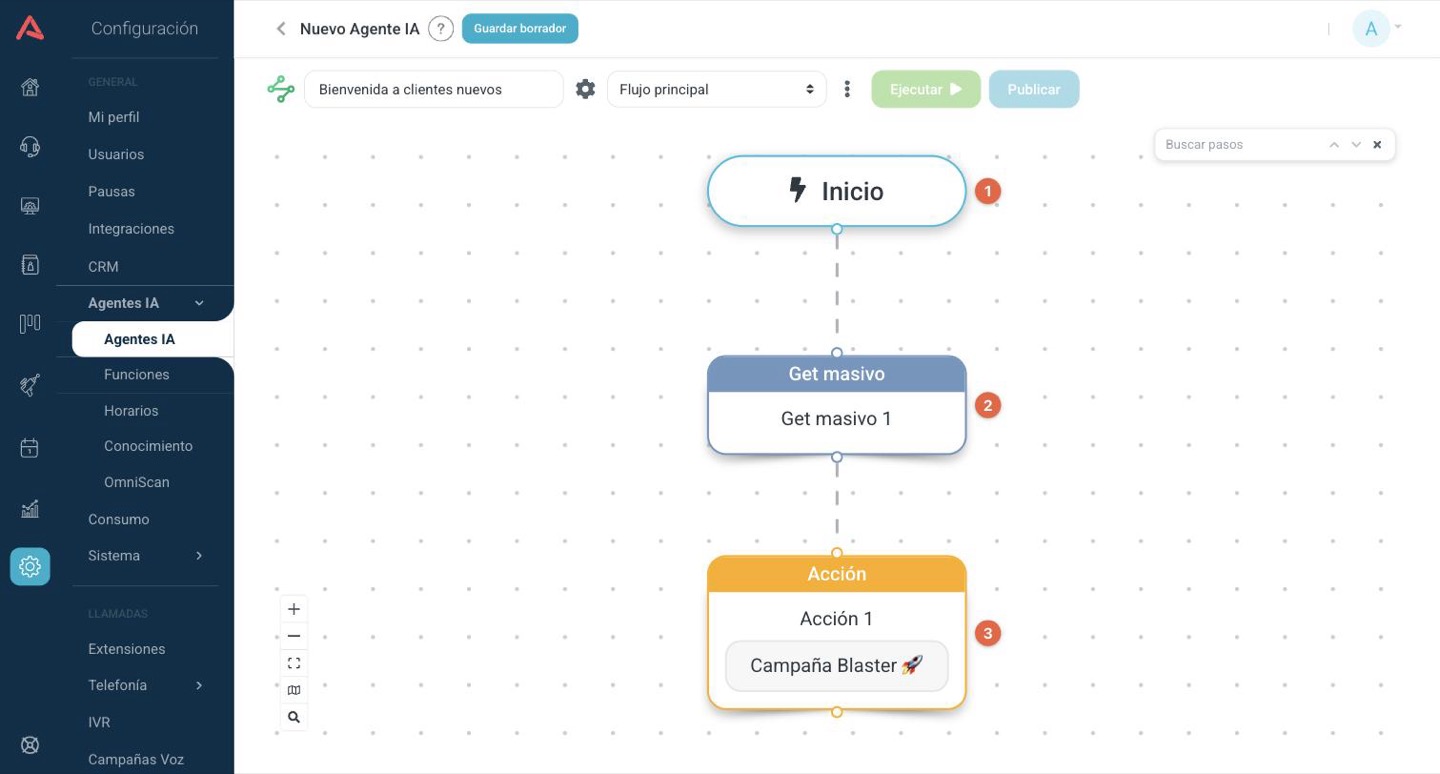
And what it gains: the Bulk Get, the Export report step and, inside Action, Blaster campaign. The three sections that follow are about those three.
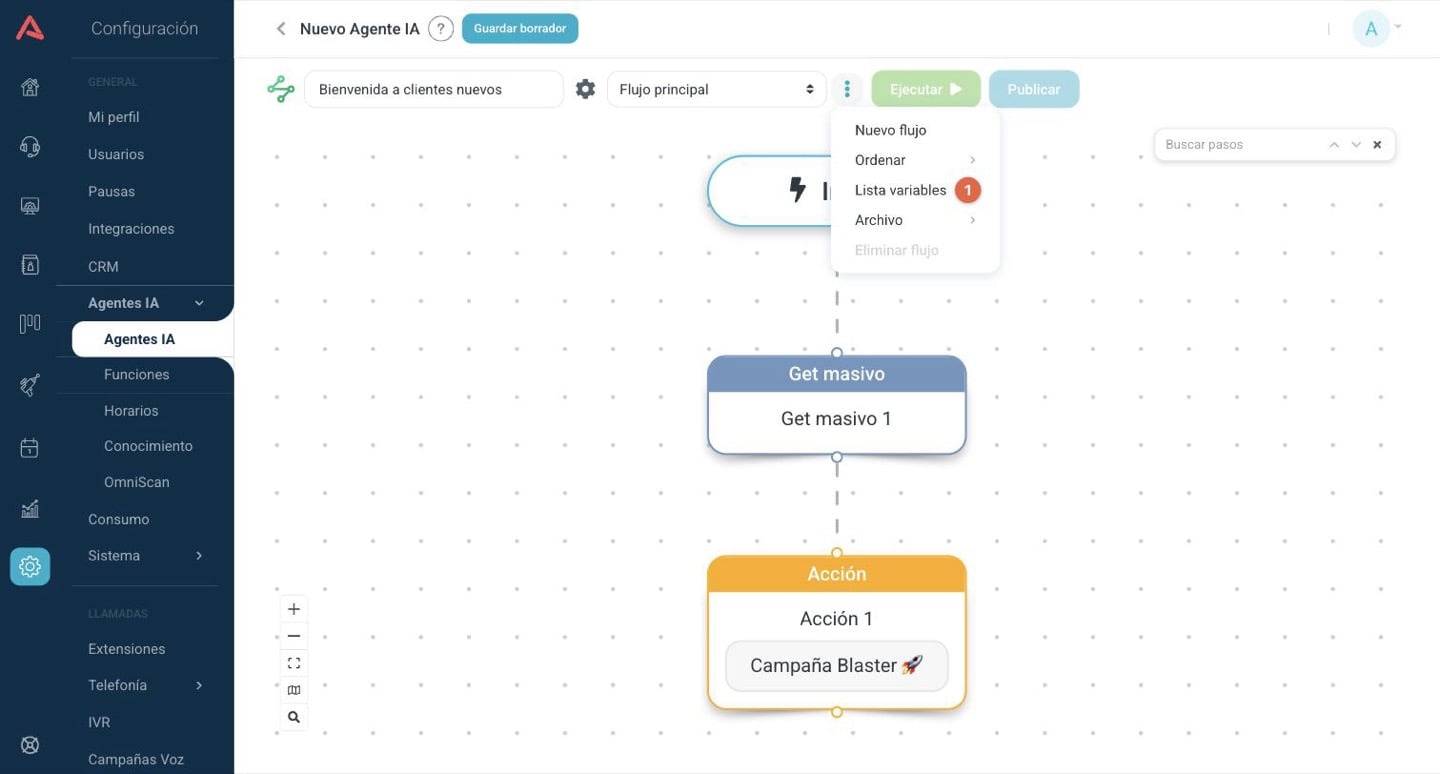
The Finalize action exists but is hardly ever needed: when the flow runs out of steps, the automation finishes by itself. Use it only to cut things short, for instance inside one branch of a condition.
Bulk Get: bringing in many contacts at once
The usual Get brings in one record from a CRM. The Bulk Get brings in all the ones that meet a filter and leaves them in a list variable.
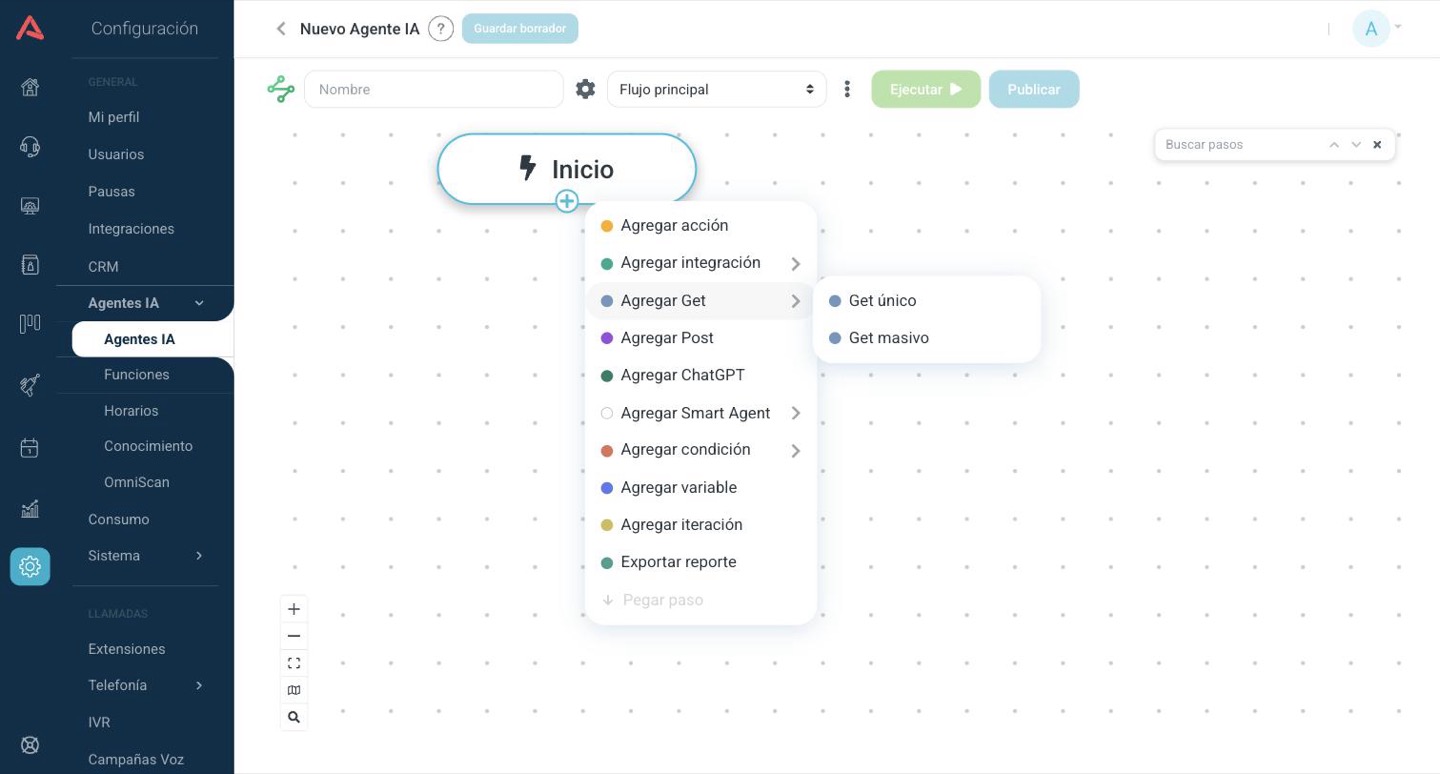
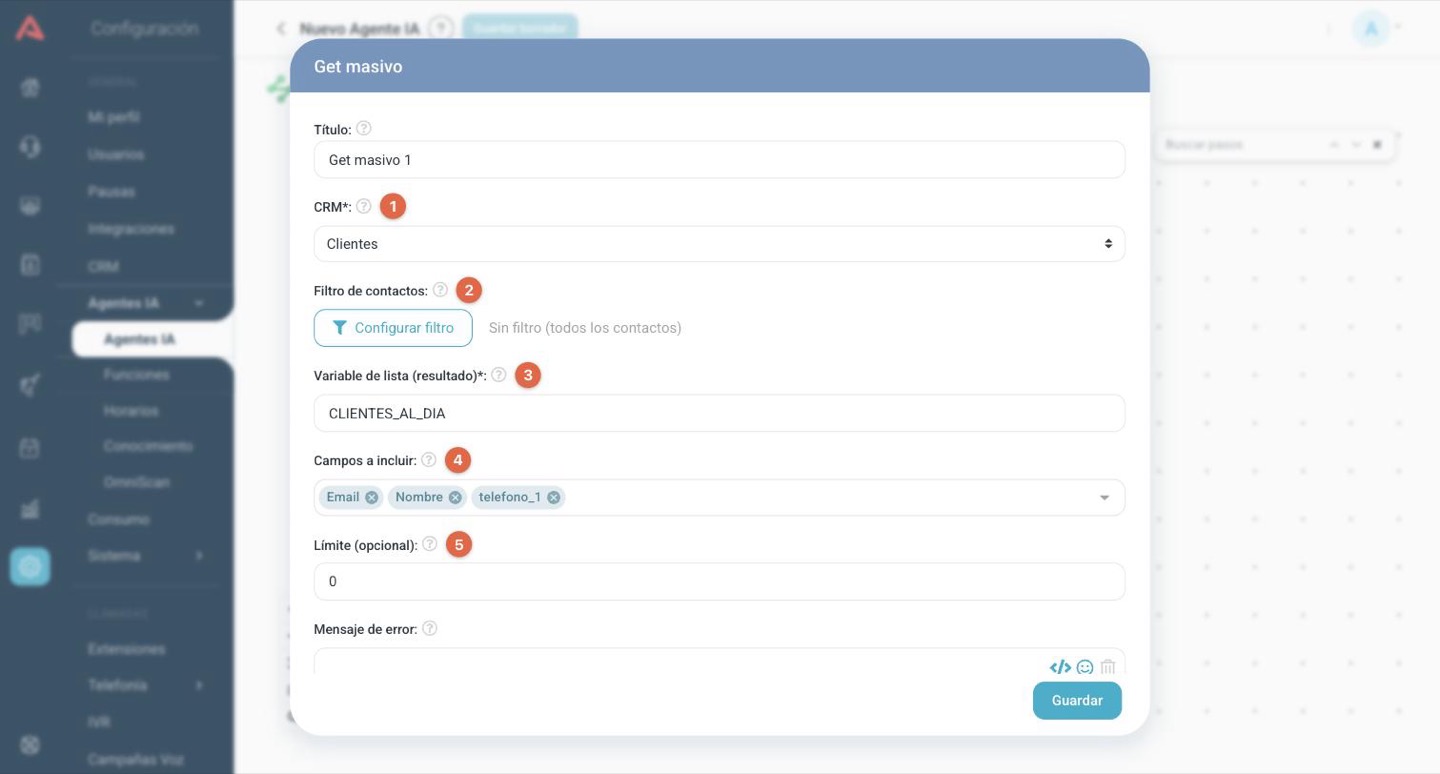
- 1 CRM
- Which CRM the contacts are brought in from.
- 2 Contact filter
- Which contacts. Configure filter opens the same filter window as the CRM module, where you can use a saved one, put a quick one together or create a new one. If you set no filter, it brings them all.
- 3 List variable (result)
- The name of the variable the result is left in. It is the one you will pick afterwards in the campaign action.
- 4 Fields to include
- Which fields of the contact each record of the list carries. Pick only the ones the flow is going to use. File fields are not offered, because an attachment cannot be sent inside a list.
- 5 Limit (optional)
- A cap on the records. At zero there is no cap.
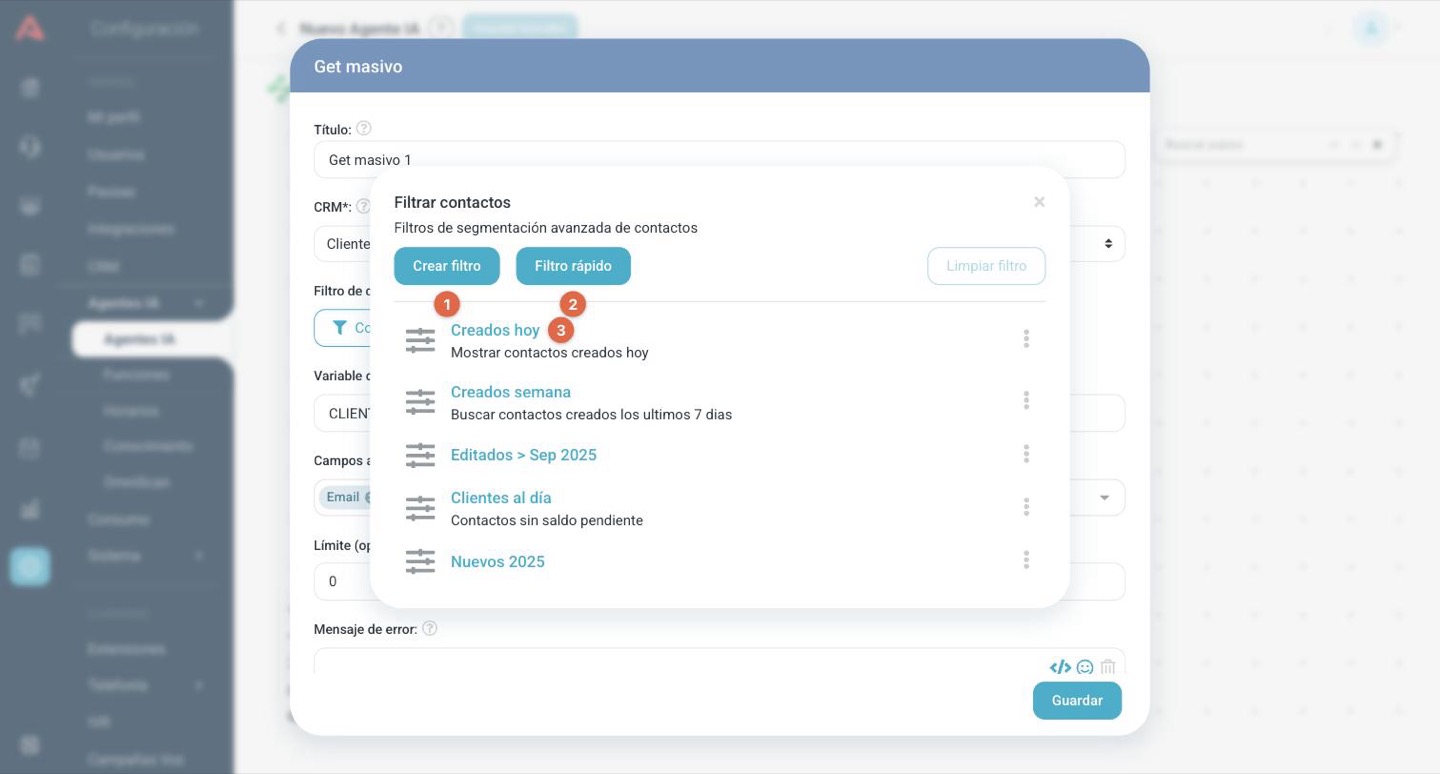
An empty list is not an error. If the filter finds nobody, the step carries straight on with the empty list and the following steps run just the same. The error step is only taken when the query genuinely fails. If you want to stop when there are no contacts, put a condition after it.
The Error message field that appears at the end of the form reaches nobody in an automation, because there is no conversation to show it in. To handle the error, use In case of error, go to step.
Blaster campaign: sending to the whole list
It is an action, not a step of its own: you add an Action step and in the Action field you pick Blaster campaign. It takes a list variable and loads those contacts into a dynamic campaign, which is what does the sending.
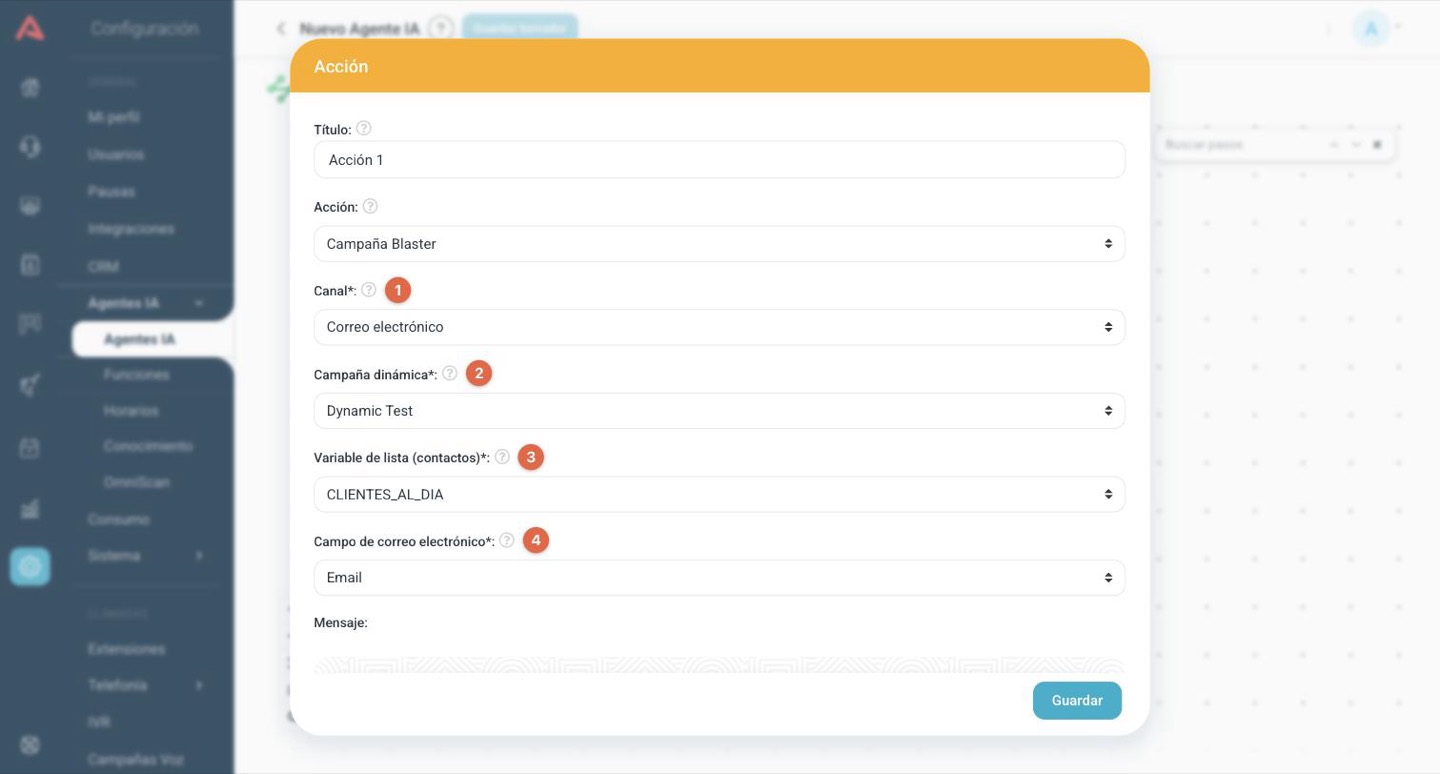
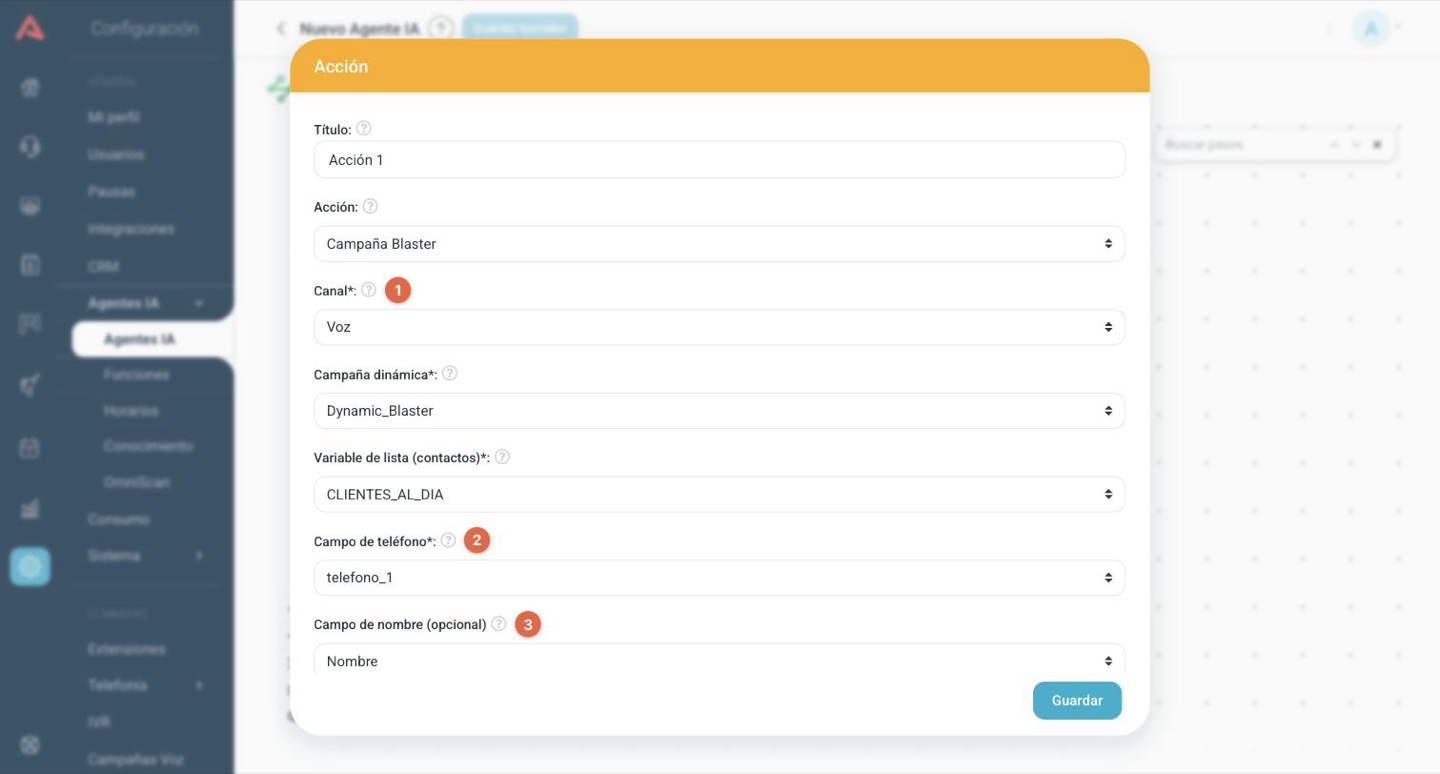
- 1 Channel
- Email, WhatsApp, SMS or Voice.
- 2 Dynamic campaign
- The campaign that will receive the contacts. Only the dynamic campaigns of that channel appear, which are the ones built to keep receiving contacts while they run. If the list comes out empty, create the campaign in its own module first.
- 3 List variable (contacts)
- Where the contacts come from. Usually the one a Bulk Get filled in earlier.
- 4 Email field or Phone field
- Which field of each record is the destination address. That is why that field has to be among the ones you picked in the Bulk Get.
If the channel sends a message, the campaign's template appears underneath read only, with one row per variable it carries, so you can say where each one gets its value from.
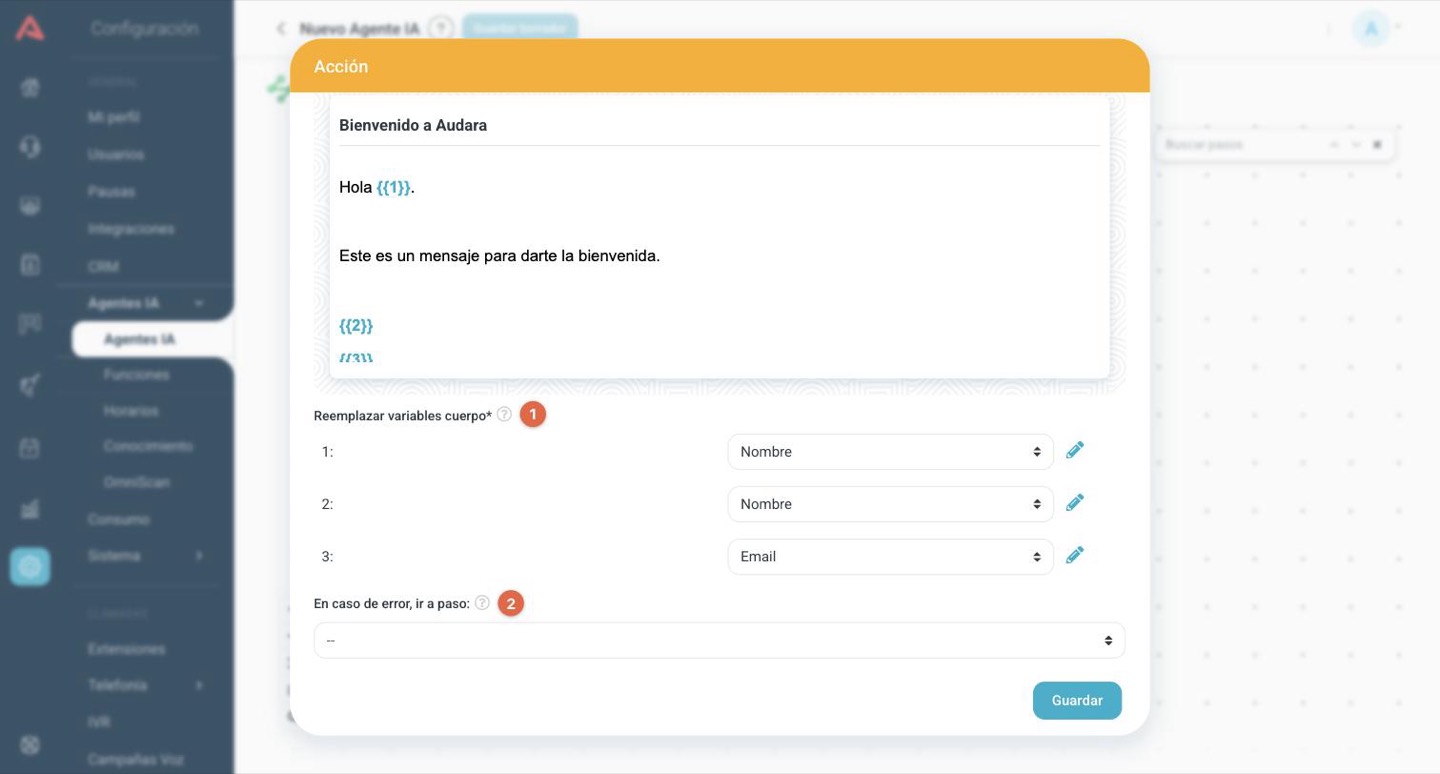
The Voice channel works differently: it does not send a message, it dials, so it has no template and no variables. Instead it asks for the phone field and, optionally, a field with the name of the contact, which is the one that shows up afterwards in the dialer monitor and in the reports.
On WhatsApp, templates carrying an image, a video or a document in the header are no good for a bulk send from an automation, because that file would have to be different for each recipient and there is nowhere to get it from. Pick a text-only template.
A Bulk Get and a campaign action, in that order, are the most common automation of all.
Export report
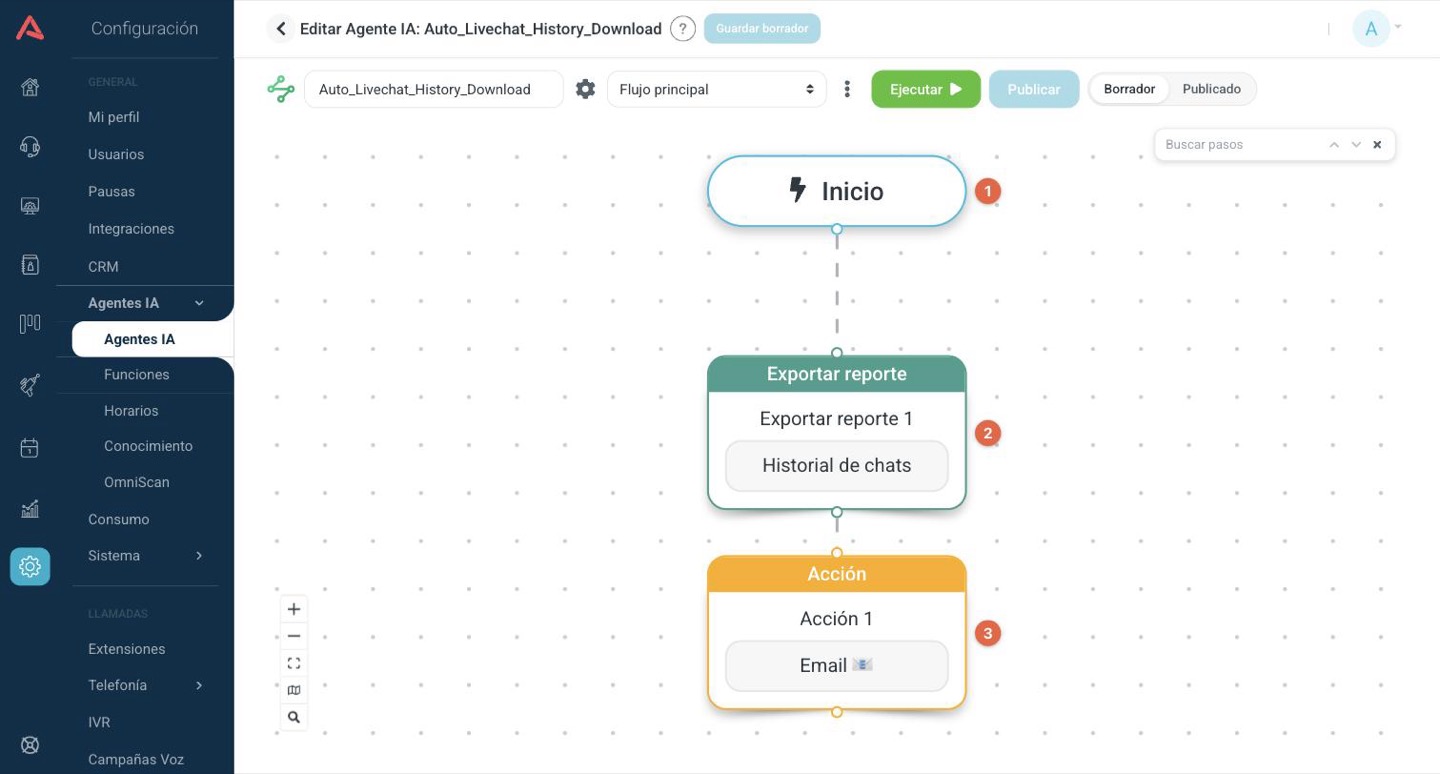
This step builds a compressed file with a report in it and leaves the download link in a variable. It does not send it: you do that with an email action afterwards, putting the variable in the body of the message.
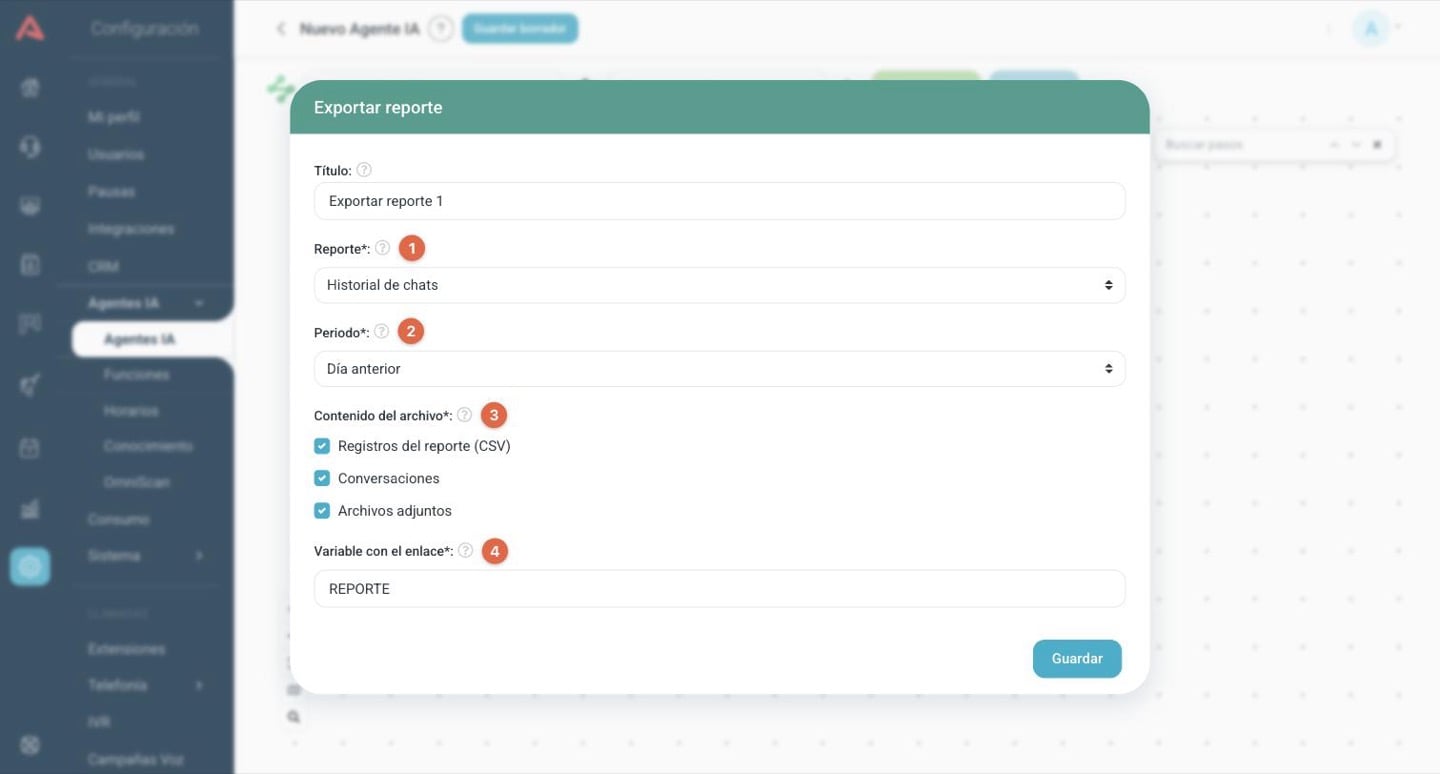
- 1 Report
- Which report is exported. Today there is the Chat history.
- 2 Period
- What range it covers: the previous day, the last seven days or today so far. It is worked out at the moment it runs, so a daily automation with Previous day always brings in the day that has just ended.
- 3 File contents
- What goes inside the archive: the records of the report in CSV, the full conversations and the attachments that were exchanged. You have to leave at least one ticked.
- 4 Variable for the link
- Where the download address of the file is left, to be used further on with
{{NAME}}.
Running, publishing and deactivating
The editor bar of an automation has a button the other agents do not have.
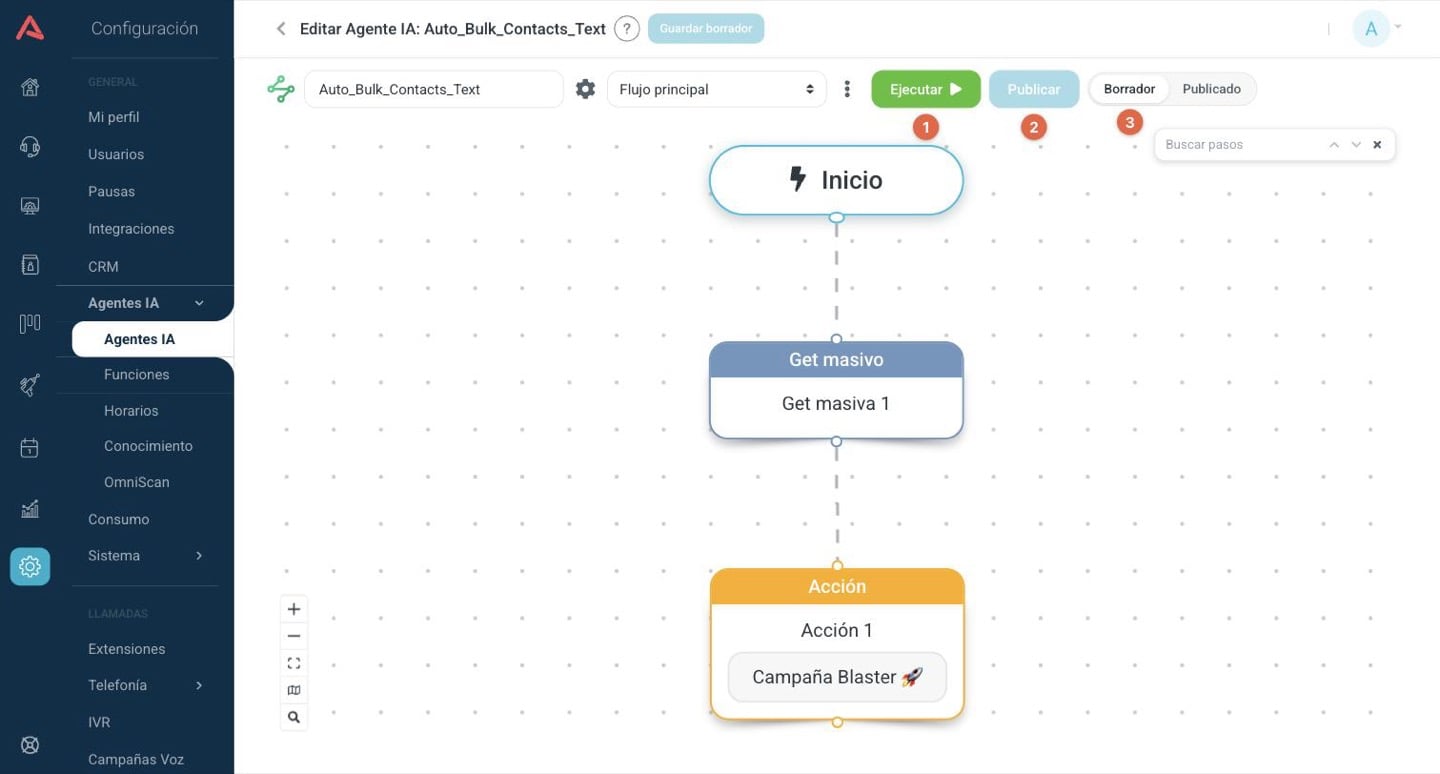
A chatbot is tested by having a conversation with it in a window. An automation cannot be tested that way, because there is no conversation, so what you do instead is actually run it and look afterwards at what happened. That is Run automation.
Running uses the published version, not the one you are looking at. If you have just changed the flow, publish first. Unpublished, the button tells you the automation is not published yet and nothing runs. And since it runs for real, if your flow loads a campaign, that campaign is going to start sending.
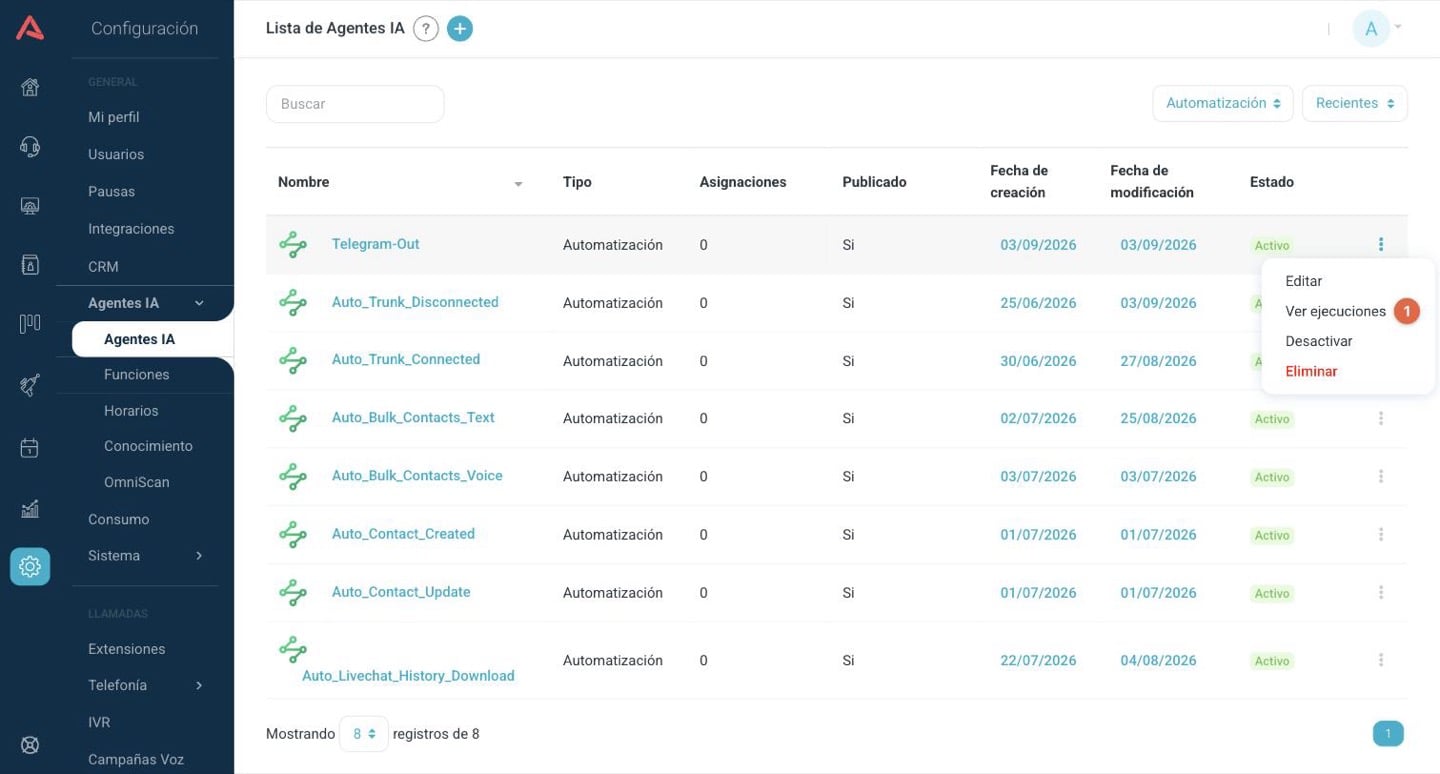
To switch an automation off without deleting it, use Deactivate in the menu on its row. A deactivated automation does not run by any route: not scheduled, not by event, not by webhook, not by hand.
The execution log
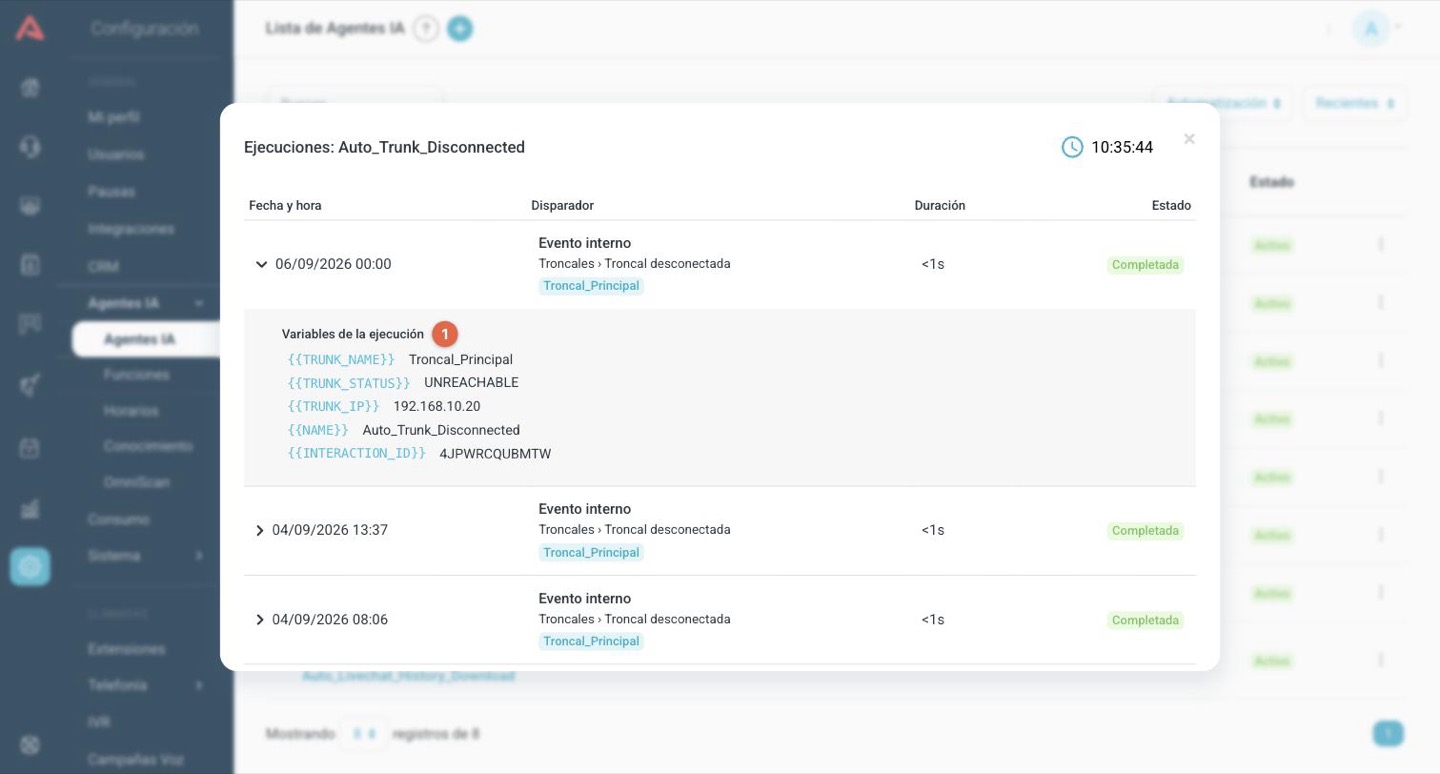
Since nobody watches an automation run, every attempt is written down. You get in from the menu on its row in the list.
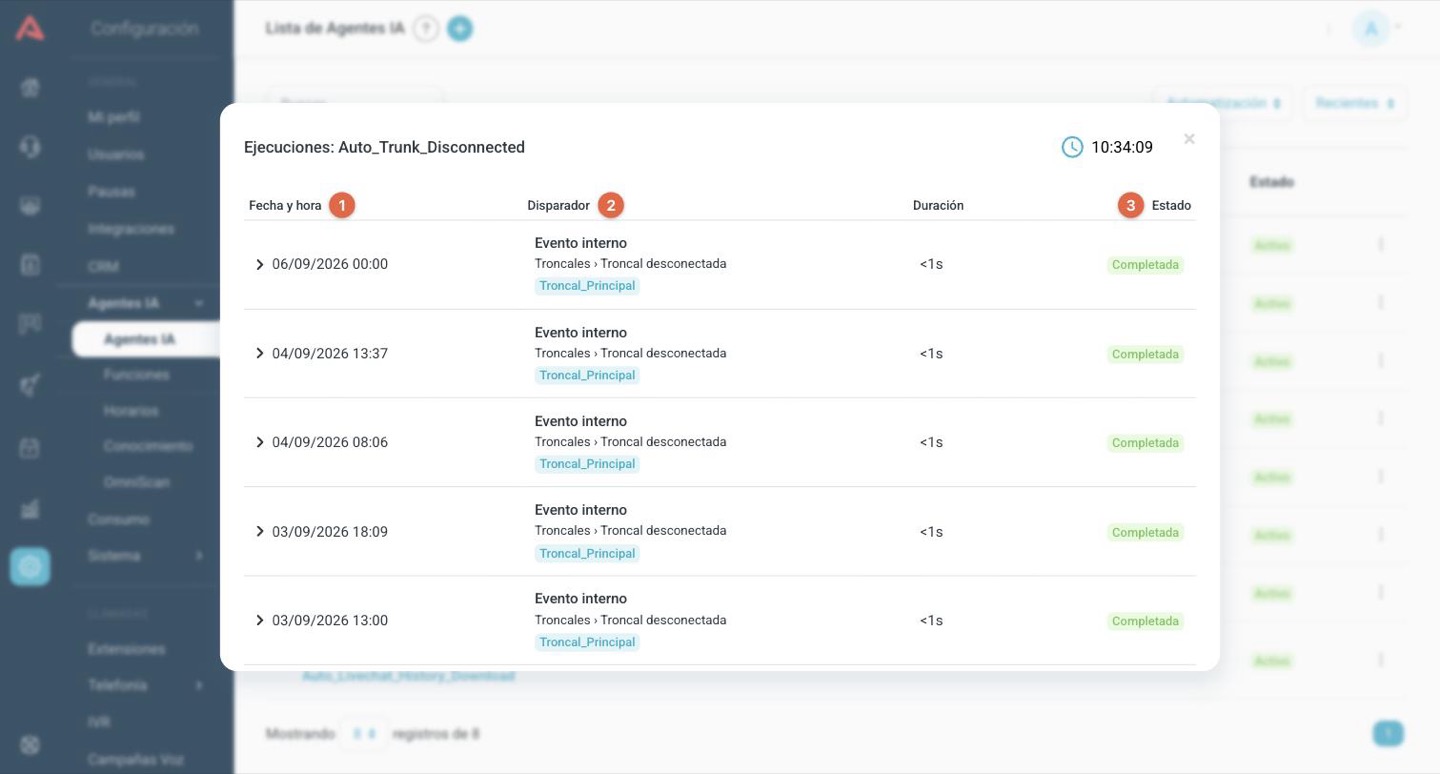
The Trigger column says where each run came from and adds the detail: who ran it if it was manual, which event and on which item if it was internal, or which IP address it arrived from if it was a webhook. The Status can be:
- Completed
- The flow made it to the end.
- Started
- It started and has not finished yet. If one stays like that for a long time, it got stuck; there is a ten minute safety cap that closes it.
- Off schedule
- Something tried to trigger it while the agent was outside its schedule, so it did not run.
- Failed
- The run could not be created.
The arrow on each row opens the Run variables: what values that particular run started with. It is the most useful thing in the whole window when something turned out differently from what you expected, because it is the only way of looking inside an automation that has already finished.
Good practice
- Start on manual
- Build the flow with a manual trigger, run it and check the execution log. Once it does what you expect, change the trigger to the one it is really going to use. It is far easier than waiting for an event to happen.
- Test with a low limit
- Before letting a bulk send loose, put a Limit of two or three on the Bulk Get and look at who received it. Then raise it. An unfiltered list plus a campaign is an email to your entire database.
- Ask only for the fields you use
- Both in the fields of the CRM trigger and in those of the Bulk Get. A list with twenty fields per contact and thousands of contacts is heavy, and you gain nothing by it.
- Name it after what it does, not after what it is
- Since there is no conversation to read, the name of the agent and the title of each step are nearly all the documentation that will be left. Trunk down alert still makes sense in six months' time; Automation 3 does not.
- Treat the webhook URL like a password
- Whoever has it can trigger the automation. If it leaks, regenerate the token and tell the other system, because the previous address stops working.
- Check the log now and then
- A scheduled automation that has stopped running does not tell you. If you were expecting a daily execution and the last one is a week old, something happened: it may be deactivated, unpublished or falling outside its schedule.