MCP Integrations
The tools of an MCP server in your bots
What this module is for
MCP is a standard by which a service publishes tools: queries and actions an artificial intelligence system can run without anybody programming a bespoke integration. If your company already has an MCP server, this module connects it to Audara and its tools become available to your AI agents and to the flows of your chatbots and voicebots.
You will find it under Setup > General > Integrations, on the MCP card. That is where you see the list of the servers you have connected.
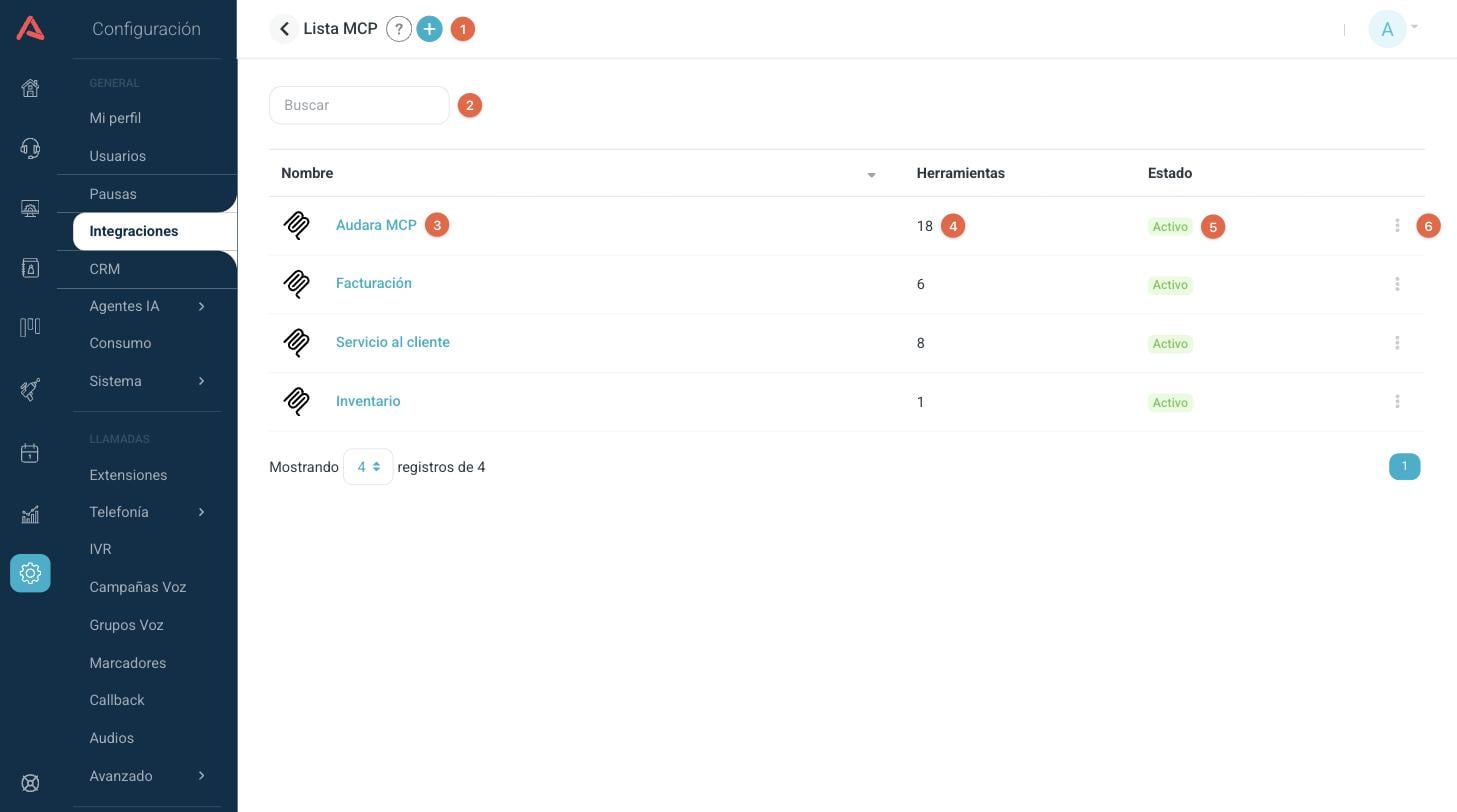
- 1 Connect a new server with the (+) button in the header.
- 2 Search by name once you have several servers.
- 3 The name of the server. Click to open and edit it.
- 4 How many tools that server has loaded today.
- 5 The status of the server, active or inactive.
- 6 The more options menu (⋮) for editing, deactivating or deleting.
The screenshots in this article use a sample server called Audara MCP. On your installation you will see the servers you have connected, with the names you gave them.
Connecting a server
Press the (+) button in the header of the list. The settings are organised into two tabs: Settings, which holds the address and the authentication, and Tools, which holds the catalogue the server publishes. The required fields are marked with an asterisk (*).
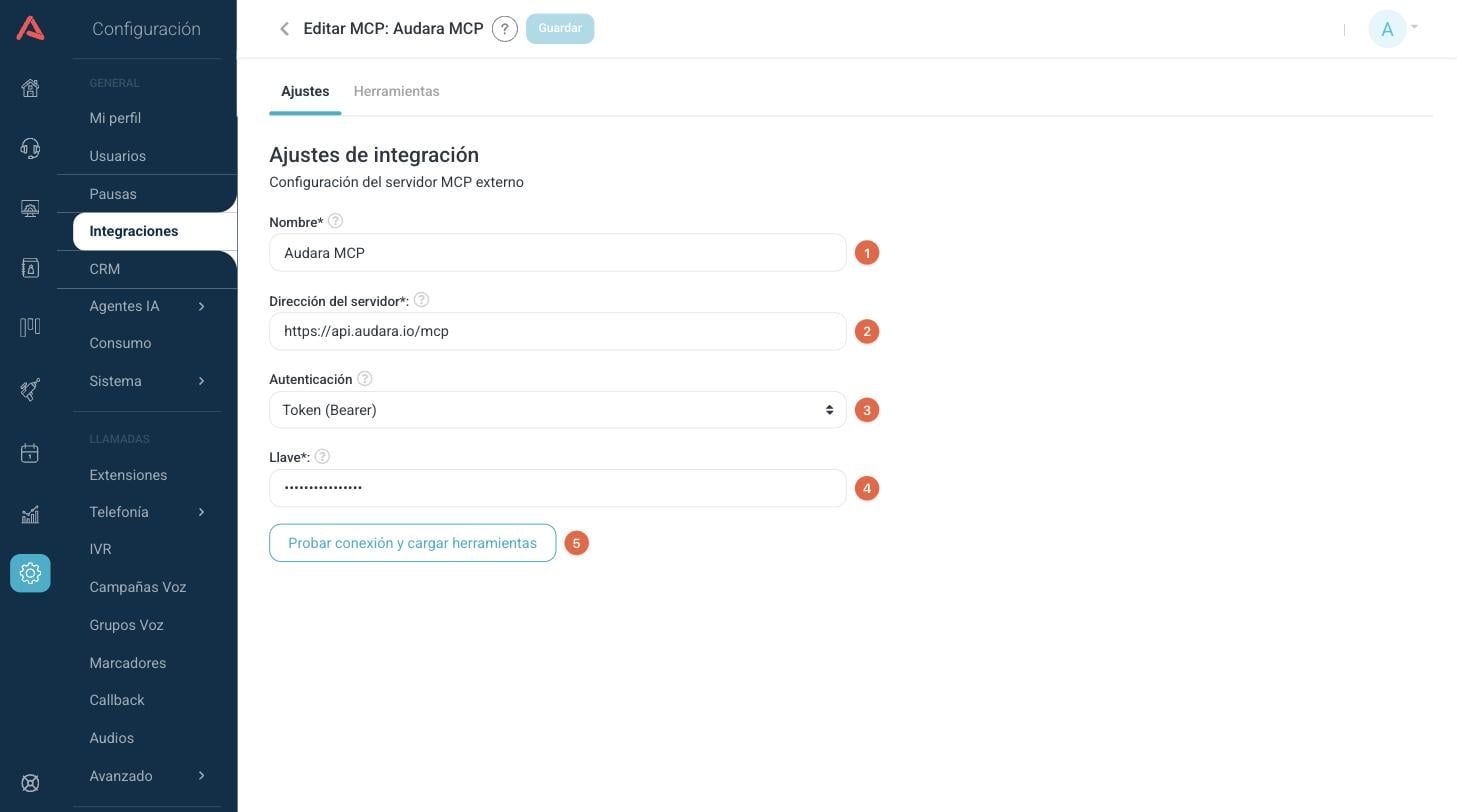
- 1 The name you will recognise this server by inside Audara.
- 2 The address of the MCP server.
- 3 How Audara authenticates itself to the server.
- 4 The key or token handed over by the provider. It is stored masked, so when you open the screen again you will see it as dots.
- 5 Queries the server and brings back its catalogue of tools.
- Name*
- The name you will identify this server by inside Audara. It cannot repeat the name of another server.
- Server address*
- The HTTP address of the MCP server, the same one the provider hands over for connecting clients. It has to start with http:// or https://.
- Authentication
- No authentication for an open server, Token (Bearer) when the key travels in the Authorization header, and Custom header when the server expects it in a header of its own. Check with the provider which of the three it uses.
- Header name*
- Only appears with Custom header. It is the name of the header the server expects the key in, for instance X-Api-Key.
- Key*
- The key or token handed over by the provider. It appears when you choose any authentication other than No authentication.
The address has to be reachable from the internet. Audara does not connect to servers living on a private network or on the same machine, so if you enter an address of that kind, loading the tools fails and tells you so.
Loading the tools
Audara does not guess what the server offers: it asks. The Test connection and load tools button does both at once, checks that the address and the key work and stores in the form the catalogue the server answered with.
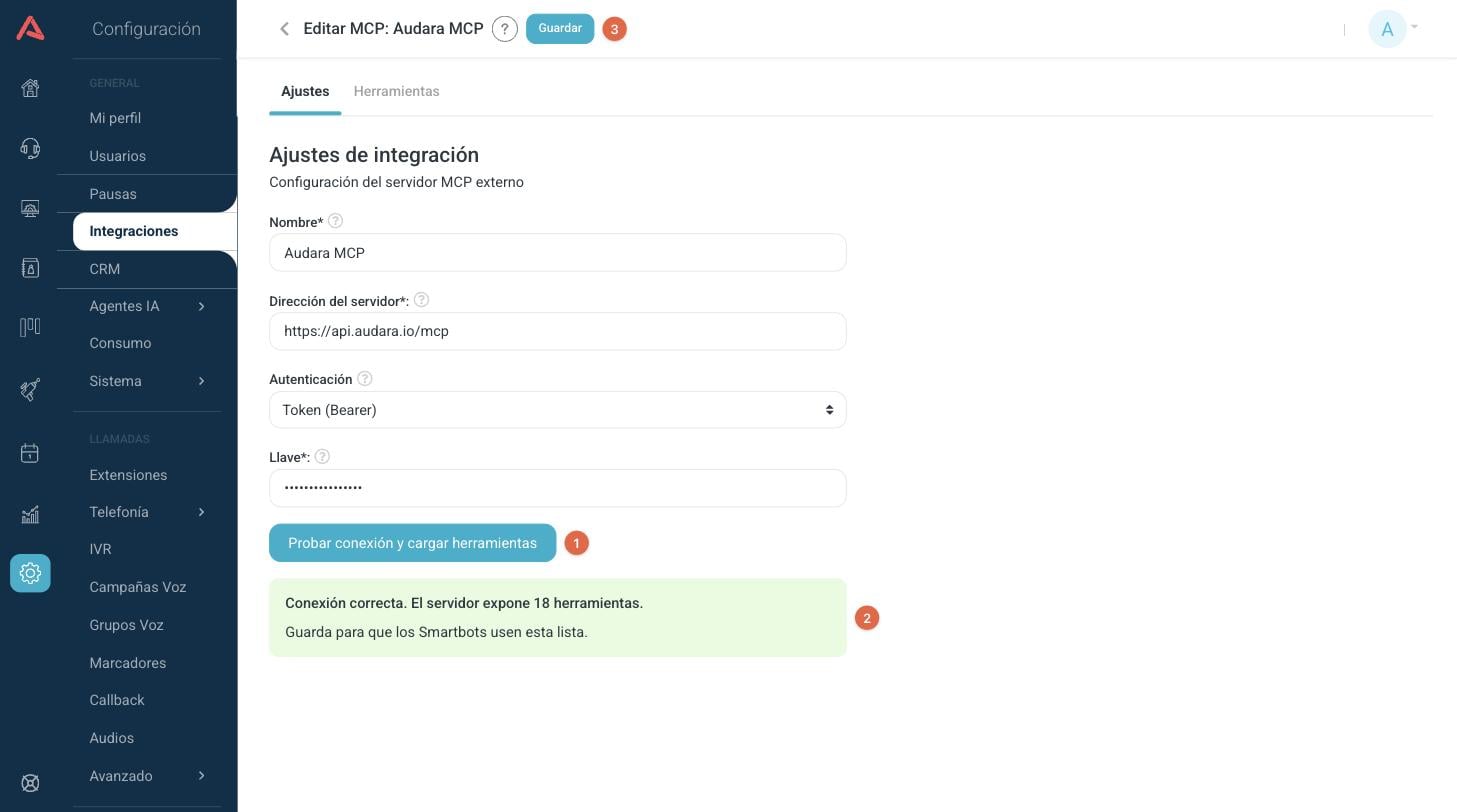
- 1 Press the button whenever you want to bring in the server's catalogue.
- 2 The result of the query, with how many tools the server exposes.
- 3 Save so that the list is recorded.
If the server does not answer, or if the key does not work, you will see the error message with the text the server returned, which is the best clue as to whether the problem is in the address, in the key or on the other side.
When you had already loaded tools before, the result also tells you what changed:
- New: tools the server has added since the last load.
- No longer available: tools the server has stopped offering. Those are the important ones, because a bot using them will keep looking healthy until it tries to call them.
Loading is not saving. Until you press Save, the list you brought in lives only on the screen and your bots carry on using the previous one.
The saved list is a snapshot of the moment you loaded it, and that snapshot is what your bots see. That is on purpose: it means a conversation under way does not change tools half way through. When the provider tells you they have added, removed or changed something, come back to this screen, load again and save.
The Tools tab
This is where the catalogue you loaded lives. Each tool is a row that expands, closed to begin with, because a server can bring in twenty and the first thing you want to see is which ones came through.
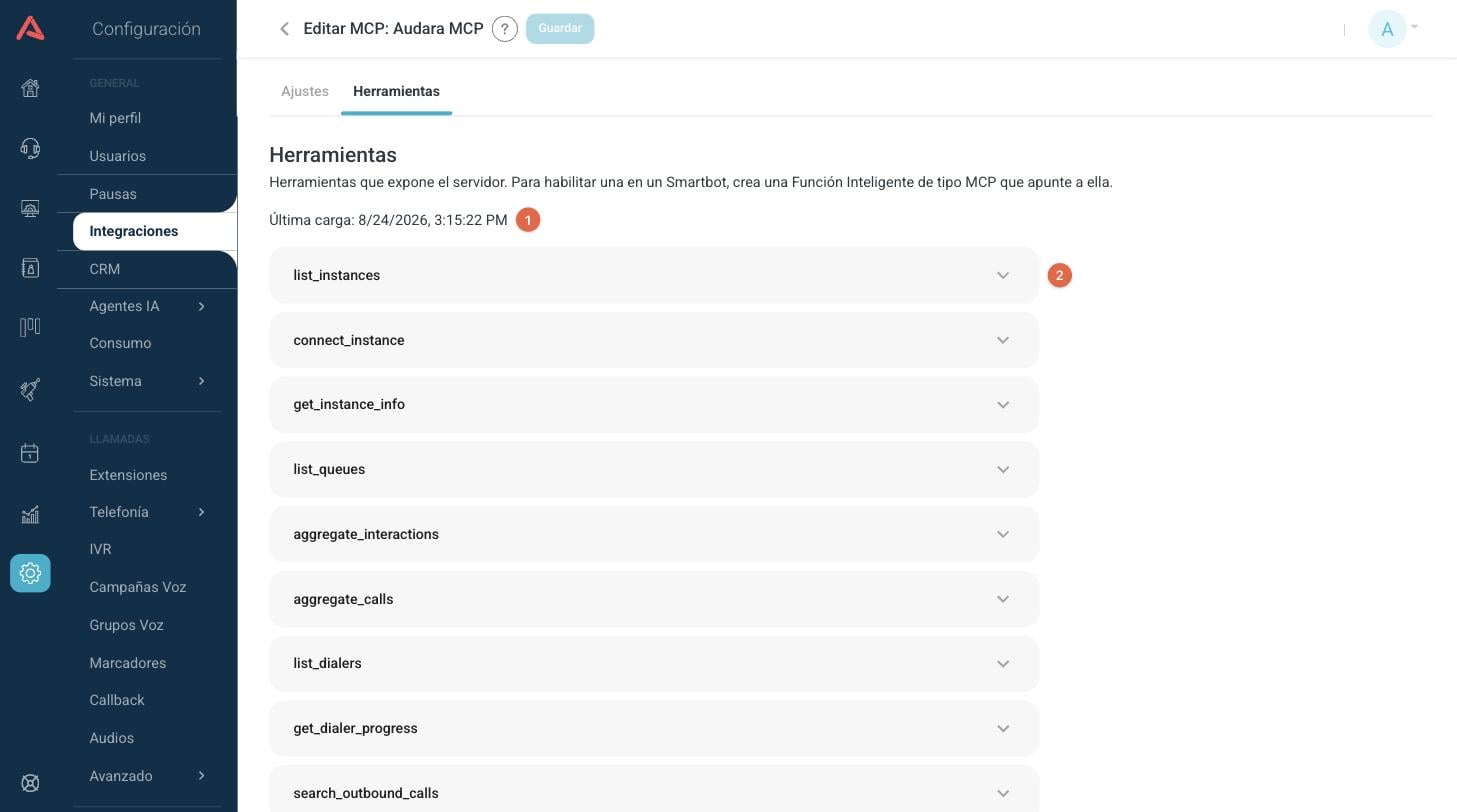
- 1 The date of the last load. It is the first thing to look at when a bot starts failing while calling a tool.
- 2 One row per tool. Open it to see its description, its parameters and its test.
Underneath the name, a tool that already has fields chosen from its answer shows how many there are. That is the difference between a tool a flow can read and one nobody has tested yet.
The parameters of a tool
Opening a tool shows you what the server declares about it: its description and the parameters it takes. None of this is edited here, because it belongs to the server. The description comes exactly as the provider wrote it, so it may be in another language.
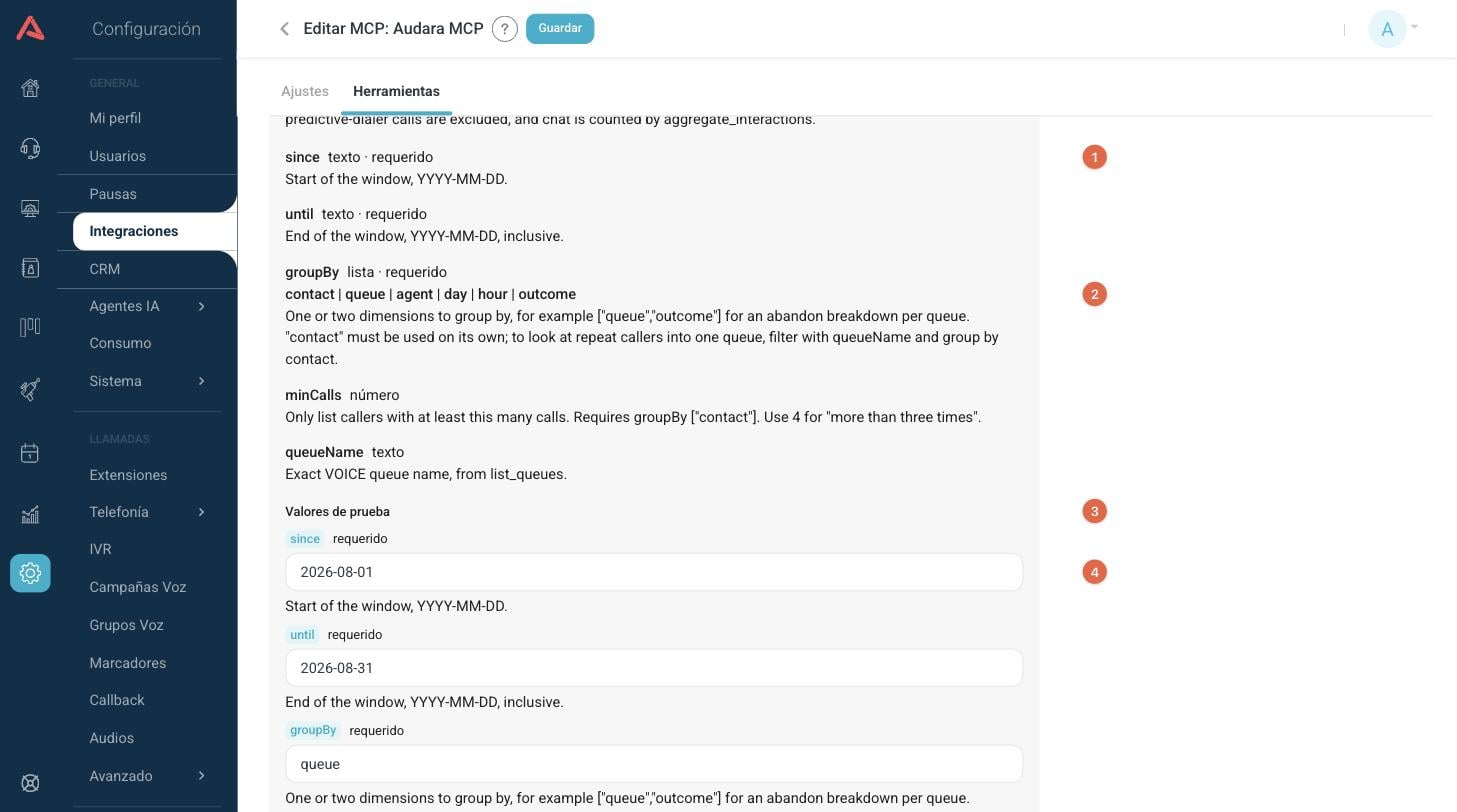
- 1 Each parameter with its name, its type and whether it is required.
- 2 When the parameter only takes certain values, the server declares them and they appear here.
- 3 The values you are going to run the test with.
- 4 One field per parameter, with its description underneath.
The types are shown in words: text, number, yes or no, list and object. When a parameter is an object grouping several fields, Audara takes it apart and shows you one field per member, with the name of the group in front, so you do not have to write the object out by hand.
The test values are saved along with the tool. That way, when you come back to this screen in a month's time, testing is a single click and nobody has to remember which ID number it was tested with.
Testing a tool and choosing fields
The Test button really does run the tool against the server, with the values you wrote. This answers something the connection test cannot: what that tool actually replies, and which parts of that answer are of any use to a flow.
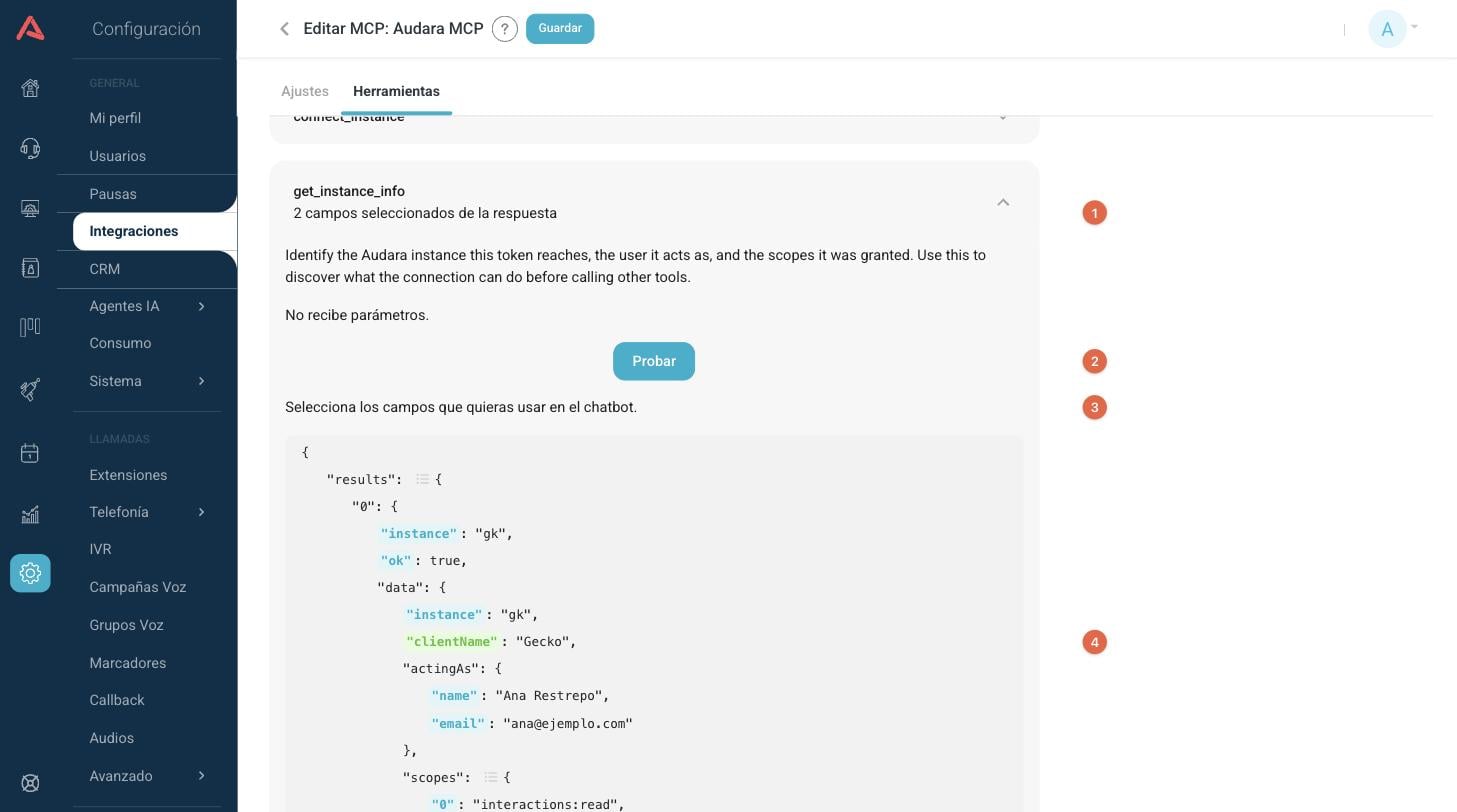
- 1 How many fields of the answer ended up chosen for this tool.
- 2 Runs the tool with the test values.
- 3 The answer, if it came in a data format, is shown as a tree you can click on.
- 4 A chosen field is marked in green. Click again to remove it.
An MCP tool always answers with text, because the standard does not require the answer to have a shape. When that text carries structured data, Audara recognises it and builds the tree above. When it does not, it shows you the answer exactly as it arrived, and the only thing a flow can do with it is store the whole thing in a variable.
Two cases you will run into sooner or later:
- The tool answered with an error. The text it returned is shown as it is, because it is exactly what your bot would receive. There are no fields to choose there.
- The answer arrived cut off. Very long answers get trimmed, and no fields can be chosen on an incomplete answer. If it happens to you, use a tool that returns less data or ask the provider for a narrower version.
The fields you choose are also stored with the Save button in the header. If you leave the screen without saving, you lose them.
Using a tool with an AI agent
With the server connected and its tools loaded, the way to put them within reach of an AI agent is to create an MCP smart function under Setup > General > AI Agents > Functions. A single function can carry several tools from the same server, and they all run on the same step of the flow.
That is where you decide something this screen does not: the text you use to explain to the model what each tool is for and when to use it. That description is the one that rules, not the one that comes from the server, and it is what makes the difference between a bot that calls the tool when it should and one that does not. The details are in the Smart Functions article.
A function carries tools from one server only, because the server is what holds the address and the credential. If you need tools from two servers, create two functions and hook them both onto the same agent.
Using a tool from a flow
The other way of calling a tool is a step inside the flow of a chatbot or a voicebot. The difference from the smart function is who decides: in a function, the model decides whether to call it and with what arguments; in a step of the flow you decide, and it runs every time the conversation passes through there.
To add it, open your agent under Setup > General > AI Agents and use the (+) button on the step you want to carry on from.
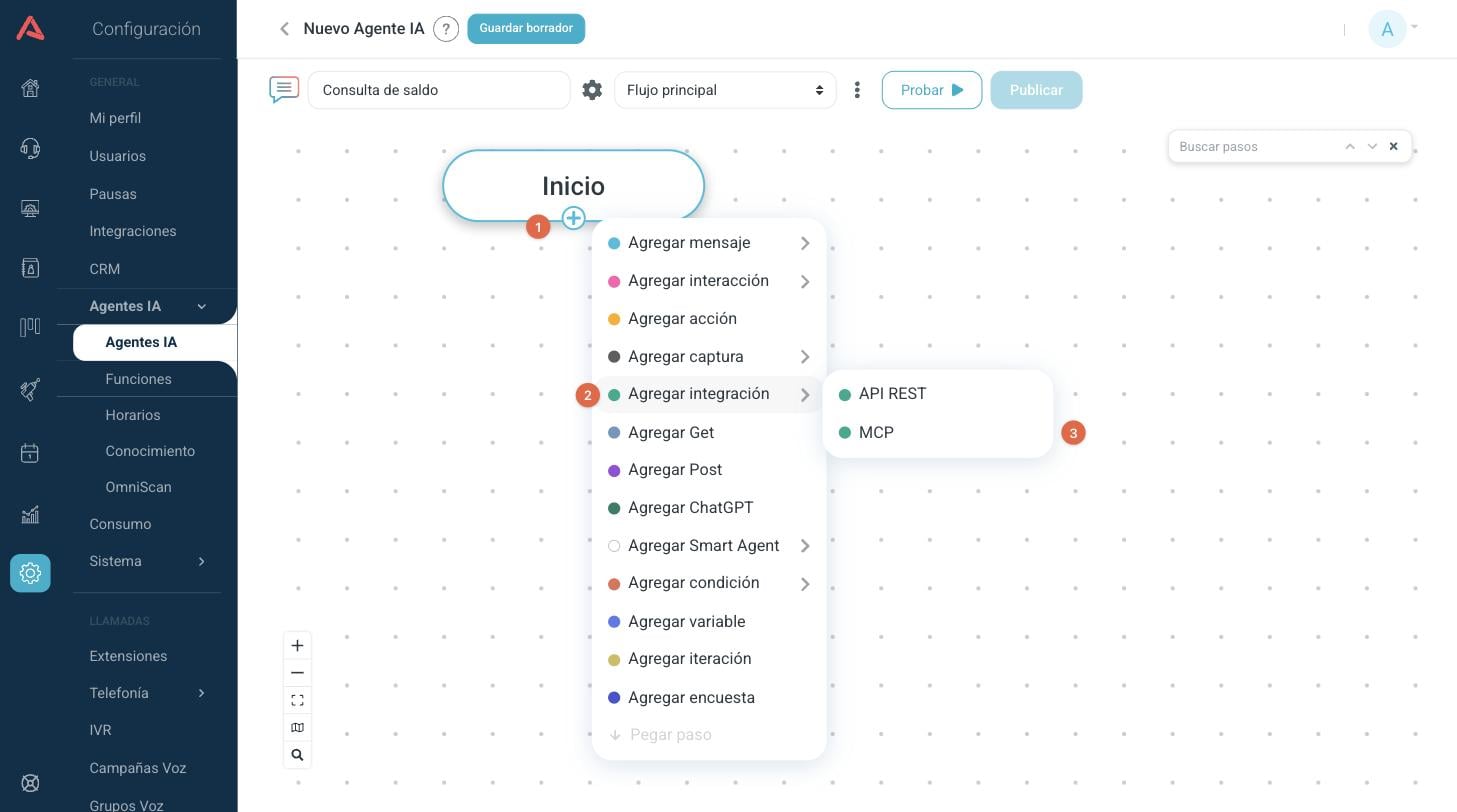
- 1 The (+) button on the previous step opens the step menu.
- 2 Go into Add integration and pick MCP. The other option in that submenu, API REST, is the equivalent step for REST integrations.
The settings of the step open up.
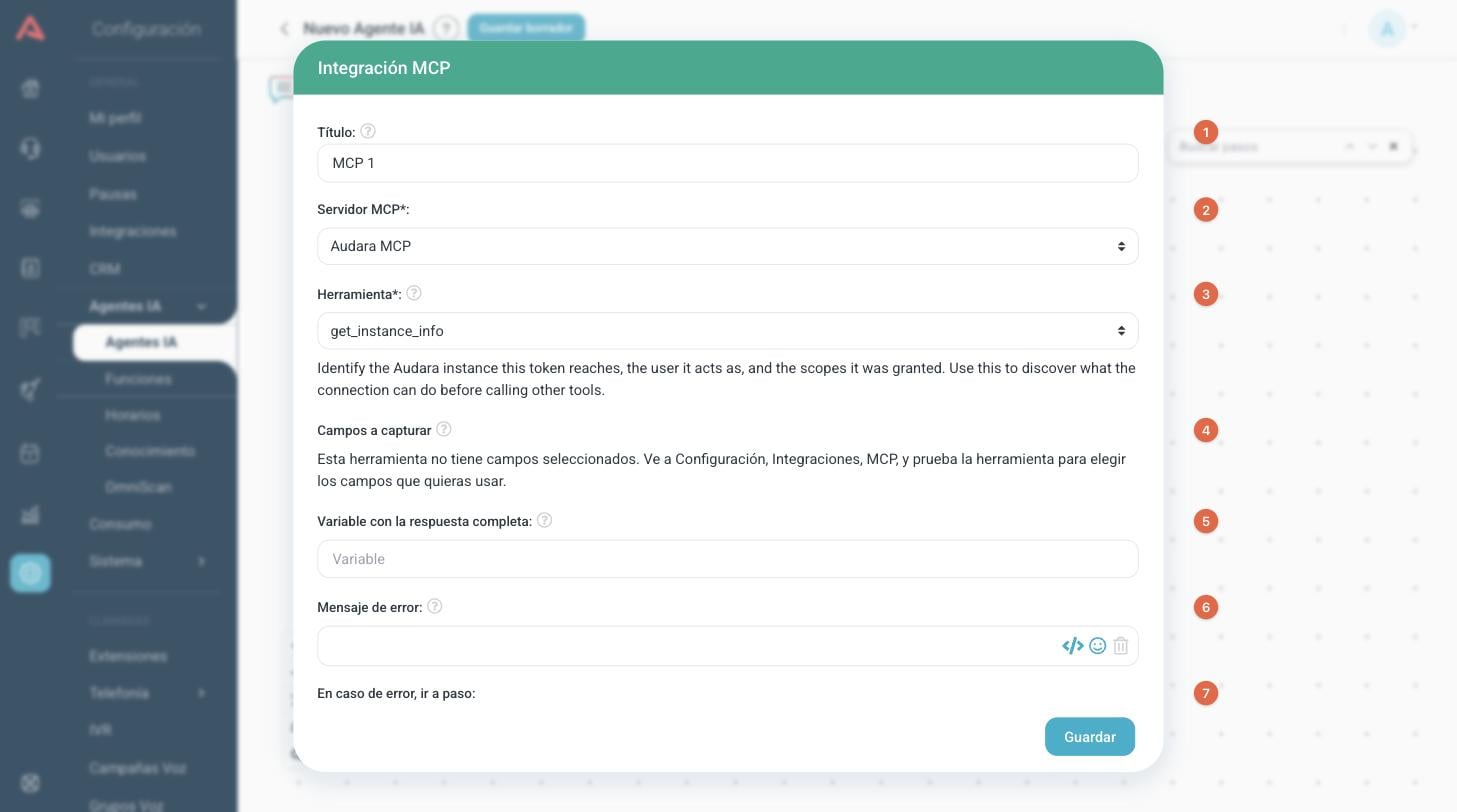
- 1 The name of the step, the one you see on the flow canvas.
- 2 The MCP server, out of the ones you have connected.
- 3 The tool this step is going to call, from the catalogue loaded for that server.
- 4 The fields of the answer that become available as chat variables.
- 5 The variable the whole answer is stored in, exactly as it arrived.
- 6 The message sent to the person if the tool fails.
- 7 The step the flow carries on to when there is an error.
When the tool takes parameters, the Data to send block appears with one field for each of them.
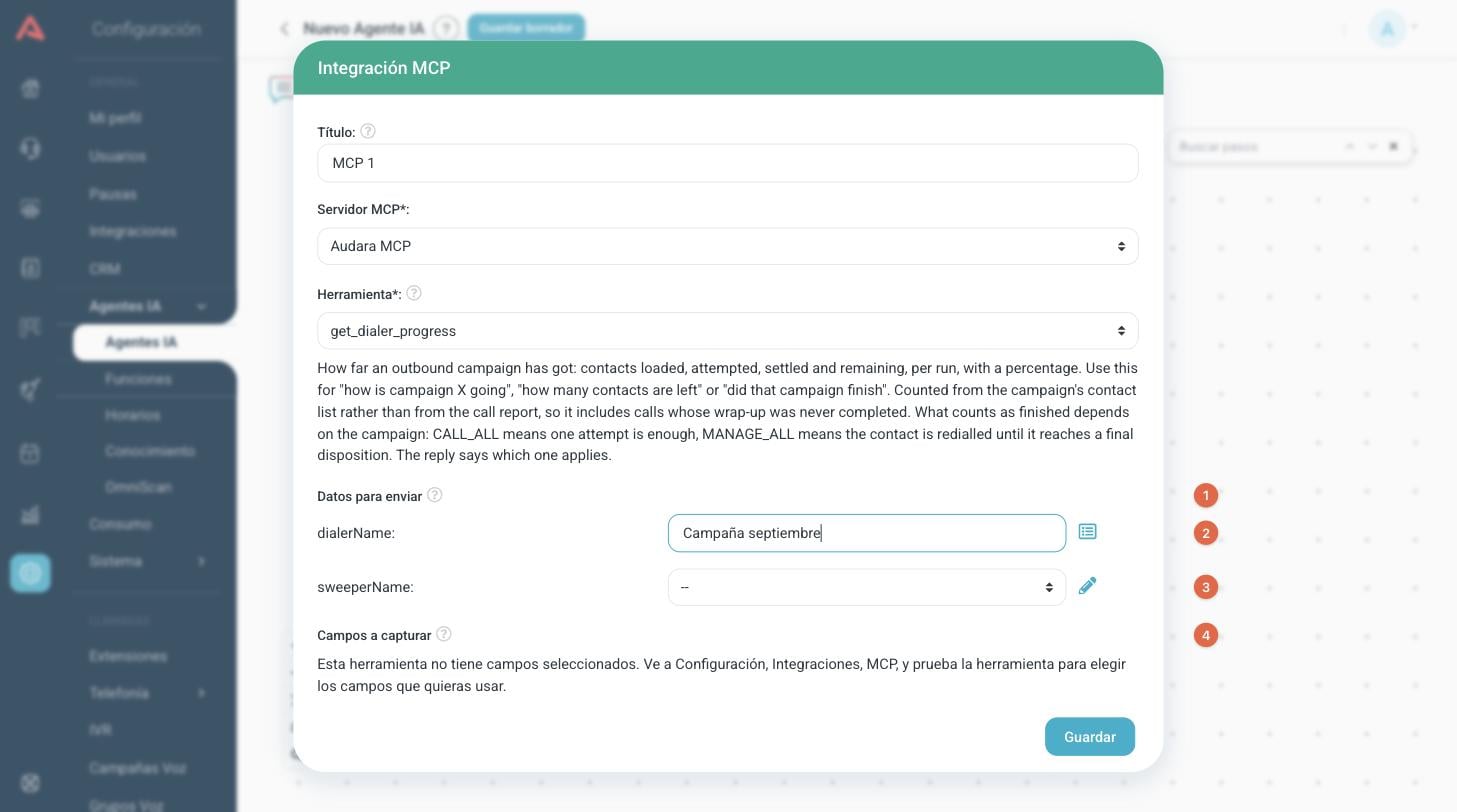
- 1 One line per parameter the tool declares.
- 2 A fixed value, typed by hand. Inside the text you can insert variables with {{VARIABLE}}.
- 3 Or the value of a variable from the conversation. The icon on the right switches between the two forms.
- 4 The fields you can capture are the ones you chose when testing the tool in Integrations.
- Title
- The name of the step inside the flow. It is only for you, the person having the conversation does not see it.
- MCP server*
- The server the tool comes from. Changing it clears the selected tool.
- Tool*
- The tool this step runs. If one is missing, go back to Integrations > MCP and load the server's tools again.
- Data to send
- What the step sends to each parameter of the tool. Each value can take the value of a chat variable or a fixed text.
- Fields to capture
- The fields you chose when testing the tool. Here you only decide which chat variable each one is stored in.
- Variable with the whole answer
- Stores the whole answer, exactly as it arrived. It is useful when the tool answers with text and not data, which is the case where there are no fields to choose.
- Error message
- What is sent to the person if the tool does not answer, or answers with an error.
- In case of error, go to step
- Where the flow carries on when it fails. It is worth filling in: a tool answering "I could not find that ID number" takes this branch, and that is precisely the conversation that has to be dealt with.
On a voice call it can be heard. Each call to an MCP server takes around a second, sometimes more, and that time is silence for whoever is on the line. Say hello before querying, and do not chain three queries whose result you are not going to use in the next sentence.
Editing, deactivating or deleting
Click the name of a server to edit it. From the more options menu (⋮) on the right of each row you can Edit, Deactivate or Delete. A deactivated server keeps its settings and its tools, but stops being available.
A server that is in use cannot be deactivated or deleted, and Audara tells you what the problem is by name: the smart functions pointing at it and the agents that have an MCP step to it. Change or remove those first. Editing it is possible at any time, and that is the way out when what changed was the address or the key.