Integrations
Viewing and managing the connections with outside services
A look at the module
The Integrations module is the point where you connect Audara with the outside services your operation uses: the artificial intelligence providers, your mail server, your SMS provider and your CRM. You will find it in Setup > Integrations.
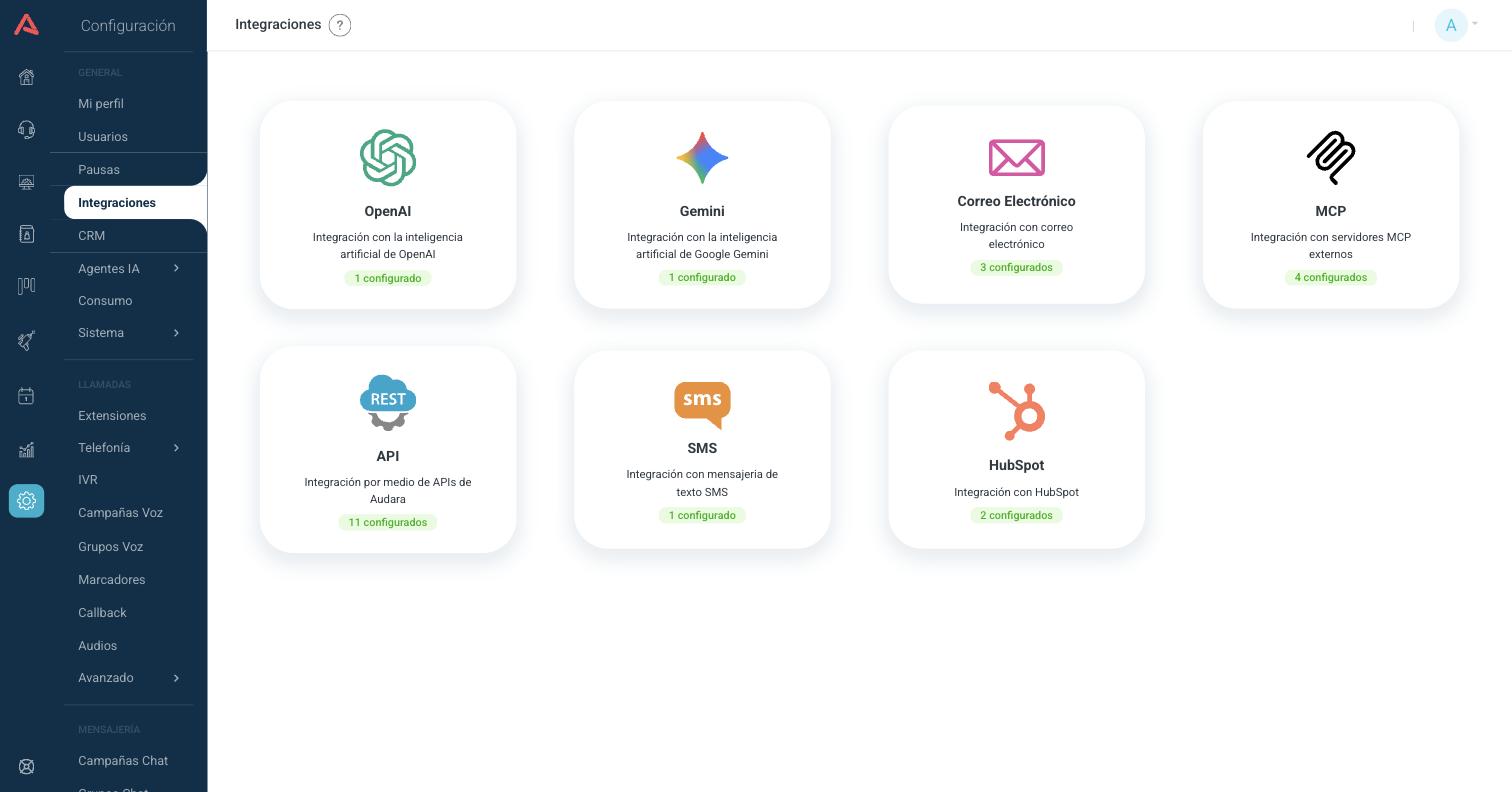
The first screen is a board of cards, one for each type of integration available. Each card shows the name of the service, a short description and a status label that tells you how many integrations of that type you have created:
- Not configured
- You have not created any integration of that type yet. The label shows in grey.
- 1 configured / N configured
- You already have integrations of that type. The label shows in green and the number is the total, counting the active ones and the inactive ones alike.
Pressing a card takes you into the list of that type of integration. From there you create, edit and deactivate each connection.
The cards you see depend on your plan and on your installation, so they can vary between clients. If a card does not appear and you need it, write to Audara support.
Permissions
Each type of integration has its own permission, independent of the others. A user can have access to the email integration and not to the OpenAI one.
- With no read permission
- The card still appears on the board, but pressing it brings up a notice that you do not have access and you do not get into the list.
- With read, without write
- You see the list and you can open each integration to look at it, but the Save button stays off and the more options menu (⋮) only lets you edit, with no deleting and no deactivating.
- With write
- You can create, edit, delete, activate and deactivate integrations of that type.
Permissions are assigned by role in the Users module.
How an integration is created
Every type of integration is handled the same way, so the walk is the same whichever one you pick:
- Press the card of the service on the board. You get into the list of integrations of that type.
- Press the (+) button in the header. The form of a new integration opens.
- Fill in the fields. The mandatory ones are marked with an asterisk (*).
- Press Save. The integration appears in the list and is left active.
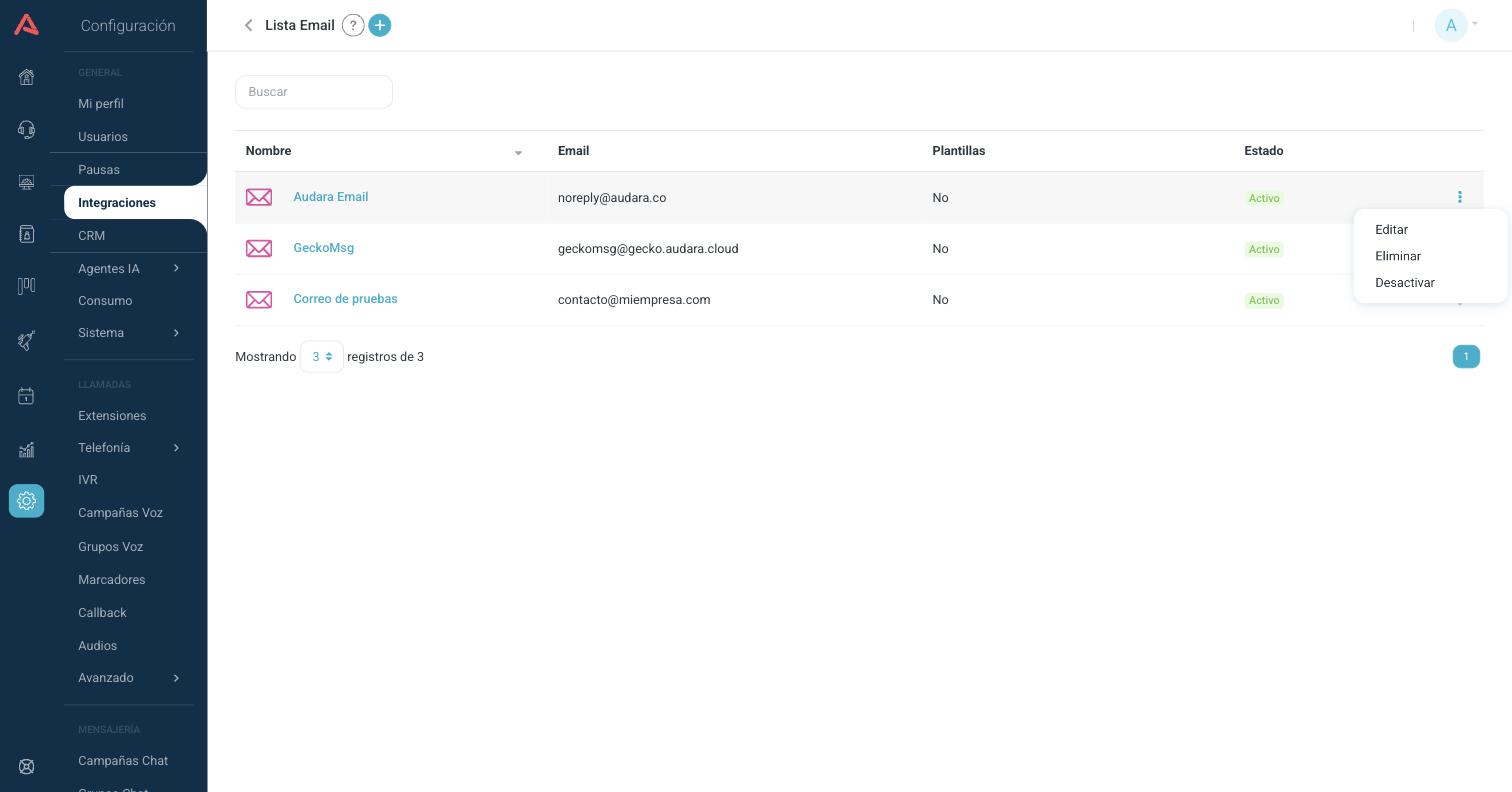
- 1 Go back to the integrations board with the arrow in the header.
- 2 Create a new integration with the (+) button.
- 3 Search by name.
- 4 Open the more options menu (⋮) to edit, delete or deactivate.
Every list has the same structure: a Name column, one or two columns of the integration type's own, and a Status column with the more options menu.
Deactivating an integration does not erase it, but it does take it out of circulation: the modules that use it stop finding it. Before deactivating an email or SMS integration, check that no campaign and no bot flow depends on it.
The name of each integration has to be unique within its type. If you repeat a name, the form warns you with "An integration with that name already exists" and does not save.
OpenAI
The OpenAI integration is the one that gives Audara access to the OpenAI models. It is what feeds the AI agents, the smart functions, the audio transcripts and the conversation analyses.
The list shows the Name of each integration, how many Assistants it has configured and its Status.
Settings
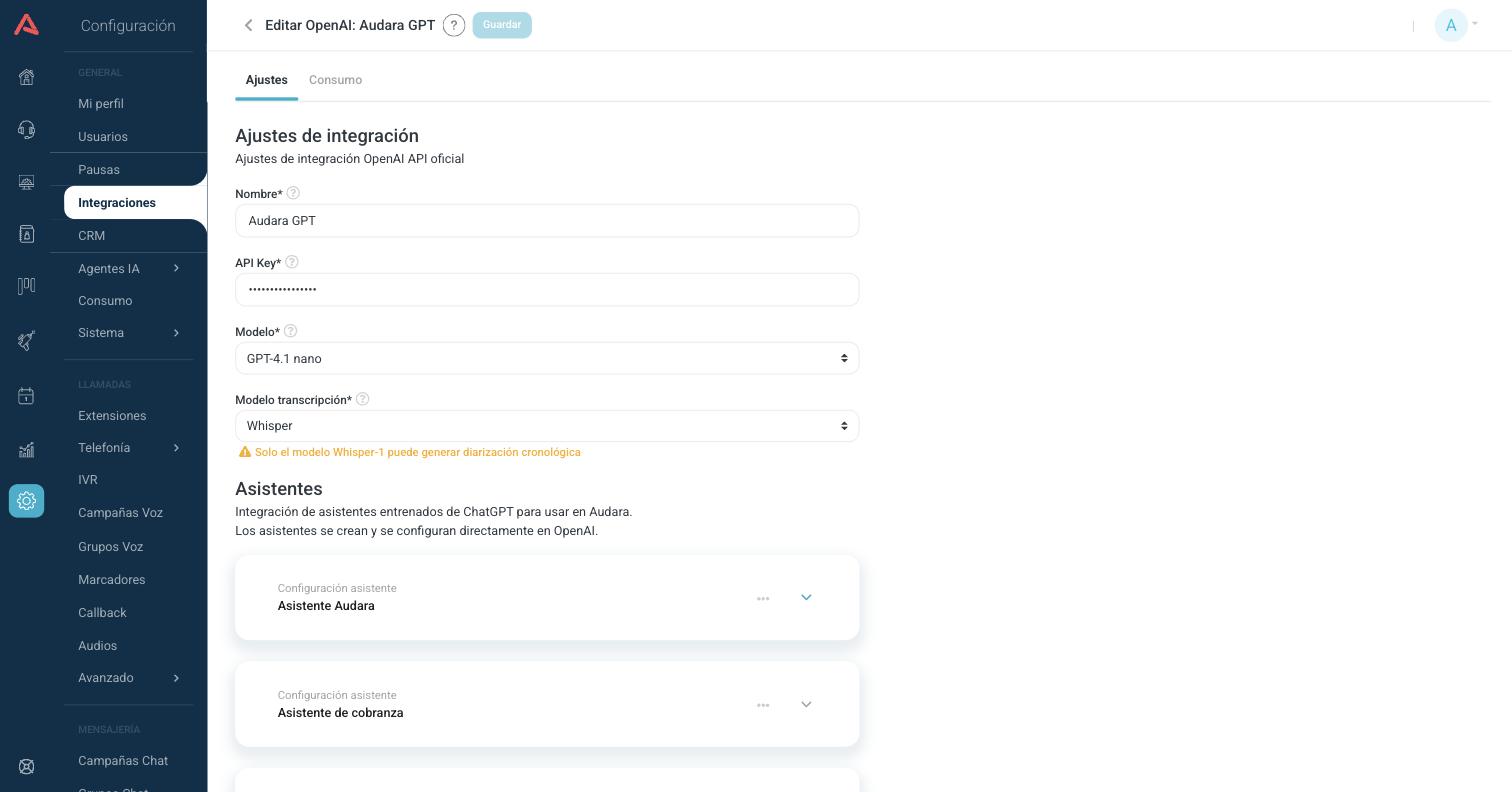
- Name*
- Name the integration is identified by in Audara. It is the one you are going to see in the selectors of the other modules, so give it one you can tell apart.
- API Key*
- The key of your OpenAI account. You generate it in the OpenAI dashboard. Do not share it and do not publish it: OpenAI automatically disables any key it detects as leaked.
- Model*
- The OpenAI model used by default in the queries. The list of available models comes from the catalogue of your license, you do not type it by hand.
- Transcription Model*
- The OpenAI model that turns audio into text. It is used by the campaigns and the dialers that have their transcription model on Default; one that names its own model ignores this field.
Only the Whisper-1 model generates chronological diarization, that is, the transcript separated by speaker and in order. The other models return blocks of text with no chronology, which serve just as well for analysis but not for reading the conversation turn by turn.
Assistants
Below the settings you can add assistants with the (+) button. An assistant is a prompt you created and configured directly in the OpenAI dashboard, and that you only register here so it can be used from Audara.
- Name
- Name you are going to pick this assistant by from the other modules.
- Description
- What the assistant is for. It is only there so you can find your way around the list.
- ID*
- The identifier of the prompt in OpenAI. It starts with
pmpt_and you copy it from the OpenAI dashboard. - Character limit per query
- Cuts the query sent to the assistant if it goes over that length.
- Word limit per response
- Asks the assistant not to go on for more than that number of words.
The identifiers of the old assistants API, the ones that start with asst_, still work but OpenAI shuts them down on 26 August 2026. If you have any, create that assistant again as a Prompt in the OpenAI dashboard and replace the ID with the new one. Audara marks the ones in the old format for you in the form.
Usage
The Usage tab only appears when you are editing an integration that already exists, because before saving it there is nothing to report. There you see what that integration has spent in the month you pick.
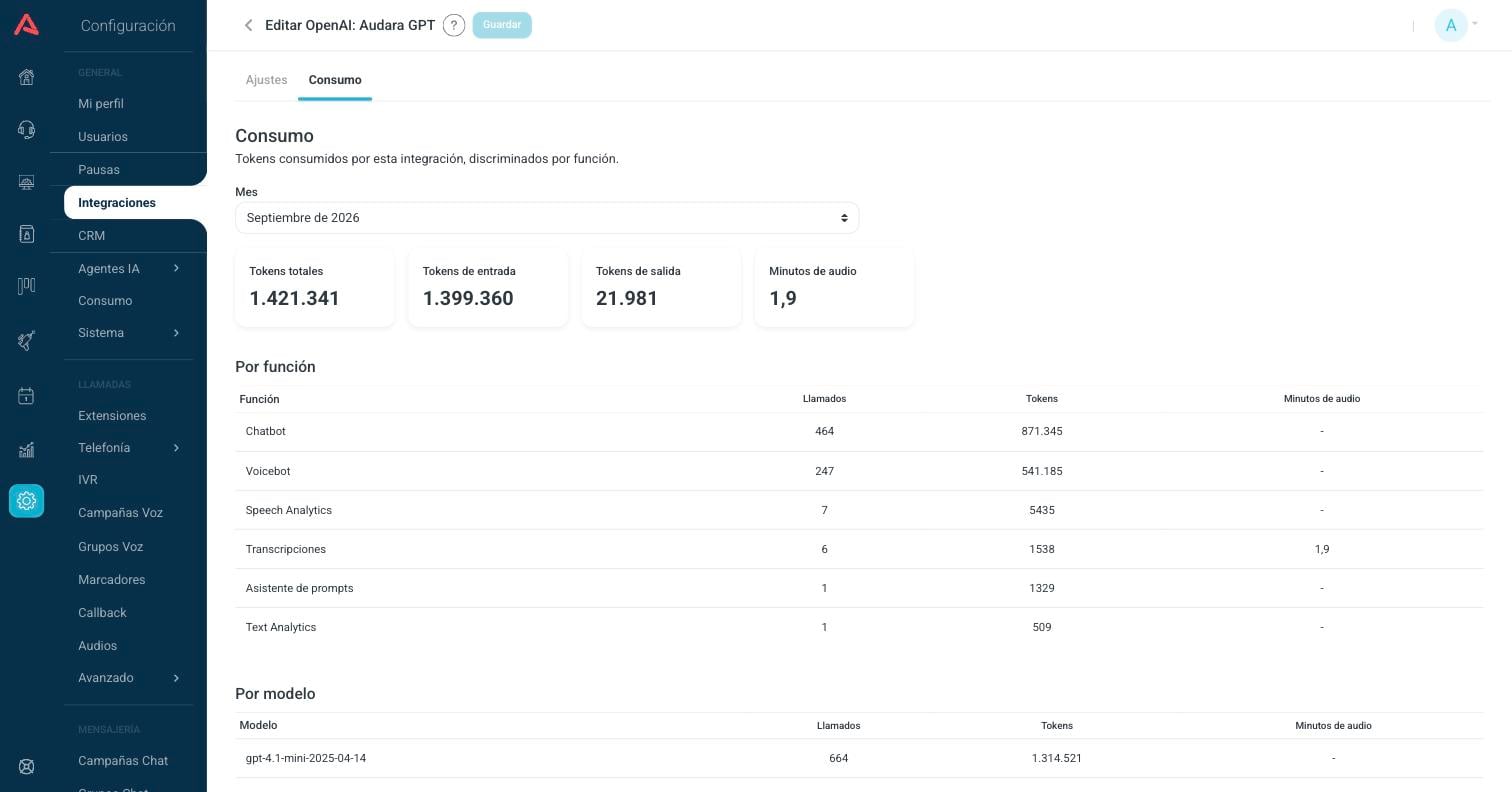
At the top go the totals of the month: the total tokens, the input ones, the output ones and the audio minutes that were transcribed. Below, the same usage broken down in two ways:
- By feature
- How much each part of Audara consumed: Chatbot, Voicebot, Automation, Copilot, Smart function, Speech Analytics, Text Analytics, Transcripts, OmniScan and the Prompt assistant.
- By model
- How much each OpenAI model consumed.
Of each row you see the Calls, the Tokens and the audio minutes. If the integration has not spent anything yet, the tab tells you so instead of showing you an empty table.
Gemini
The integration with Gemini, the artificial intelligence from Google. It is the shortest of them all: it is configured with four fields.
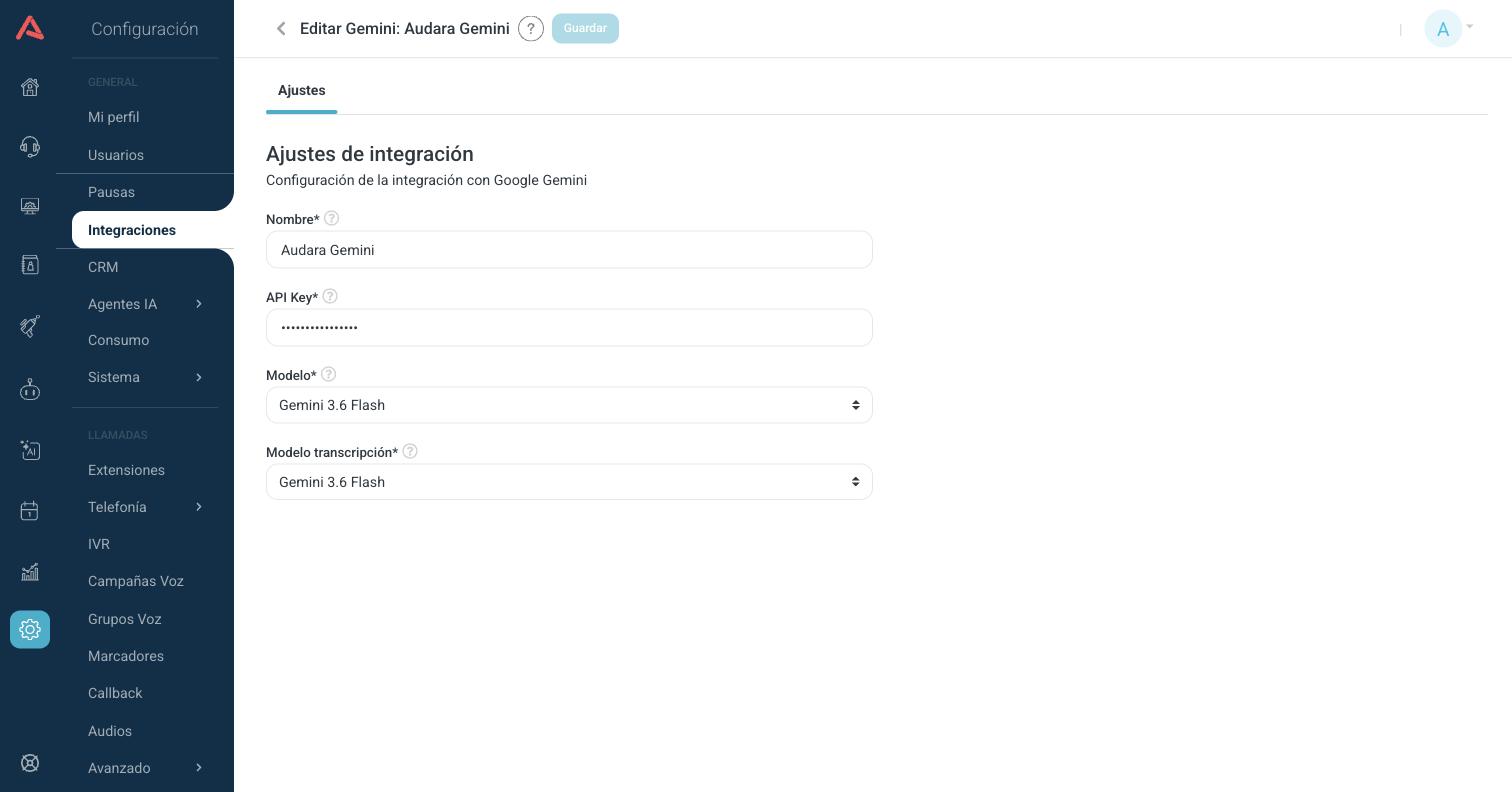
- Name*
- Name the integration is identified by in Audara.
- API Key*
- The key of your Google account. You generate it in the Google console.
- Model*
- The Gemini model that answers the analysis. It is used by the campaigns that have their analysis model on Default.
- Transcription Model*
- The Gemini model that transcribes. It is used by the campaigns that have their transcription model on Default. Gemini transcribes separating the speakers out of the mixed recording, so only the models that know how to do that show up here.
The list shows the Name and the Status of each integration.
The two models here are the default value, not an order: a campaign that names its own model ignores this field. And the Model is shared by the call analysis and the text analysis of the chats, so if you need a different one for each thing, create a second integration with the same key.
The email integration is what lets Audara send email: notifications, campaigns, scheduled reports and the emails that the bot flows send.
The list shows the Name, the Email, the Templates and the Status.
Integration Type
The first thing you pick is the type, and the rest of the form depends on it:
- SMTP
- Audara connects to your mail server with the credentials you give it. It is the normal case: you use your own domain and your own server.
- Outbound Mailbox
- Audara manages the mailbox for you on a domain that is already registered and verified. You only pick the domain and the name of the mailbox.
The integration type cannot be changed after saving: the selector is locked when editing. If you got it wrong, create a new integration with the right type.
Fields of an SMTP integration
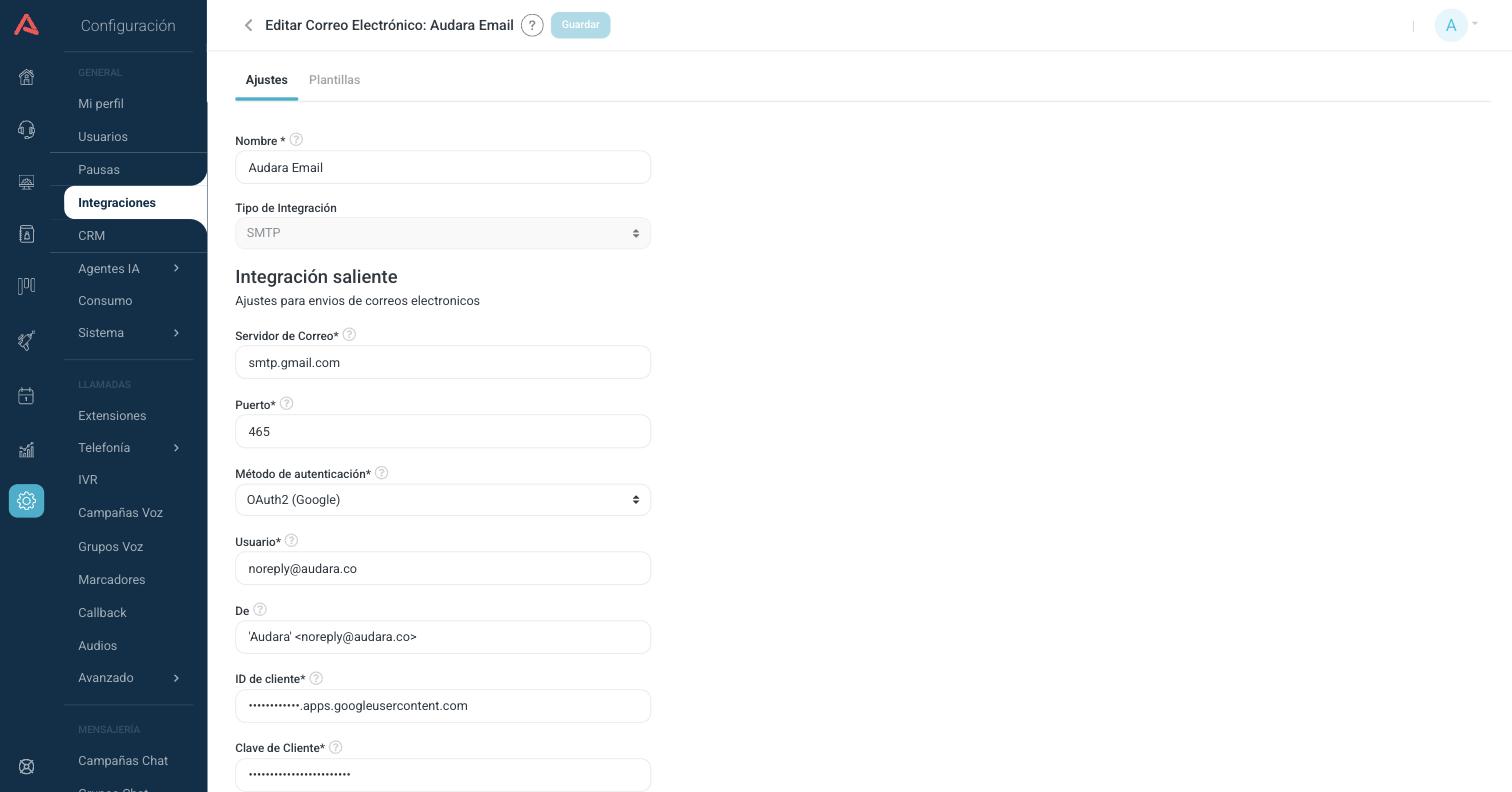
- Name*
- Name the integration is identified by in Audara. Three characters minimum.
- Email Server*
- The address of the SMTP server of your provider, for example
smtp.mycompany.com. - Port*
- The port it connects to the server through. Your mail provider tells you which one to use.
- Authentication method*
- How Audara identifies itself to the server. Most servers use User and password. Pick OAuth2 (Google) only if your provider gave you a client ID, a client secret and a refresh token.
- User*
- The email address of the account. It has to be a valid email.
- Password*
- The password of that mail account. It only appears if you picked user and password.
- Client ID*, Client password*, Refresh token*
- The three OAuth2 credentials. They only appear if you picked that method, and your provider hands them to you.
- From
- The name and the address that whoever receives the mail sees, in the format
Name <[email protected]>. - Accept unverified certificate
- Turn it on only if the server uses its own certificate or one issued for a different domain and the connection fails because of it. The connection stays encrypted, but the identity of the server stops being checked. It only appears when authenticating with user and password.
Testing the connection
The Test connection button turns on once you have filled in the minimum needed to attempt a connection, and it tells you there and then whether the server accepts the credentials. When it fails, the message tells you what failed:
- The server rejected the user or the password
- The credentials are wrong. Check them with your provider.
- The server accepted the connection, but it does not allow signing in with a user and password on this account
- The credentials are right, but the account has password authentication disabled. The mail administrator of your company has to enable it.
- No server was found with that name
- The address of the server is misspelled, or it is an internal server that only answers from inside the company network.
- Could not reach the server
- The server did not answer. Check the address and the port.
- The server presented a certificate that could not be verified
- Turn on Accept unverified certificate and try again.
Fields of an Outbound Mailbox
- Domain*
- The domain the emails are sent from. You pick one of the ones already registered. If the one you need is not on the list, ask Audara support to add it, after verifying it on your mail service.
- Mailbox*
- The part that goes before the @ symbol. Only letters, numbers, dots, hyphens and underscores are allowed.
Under the two fields, Audara shows you the resulting address already assembled, so you can confirm it came out the way you wanted before saving.
Templates
The Templates tab lets you create reusable emails so you do not have to write the same message every time.
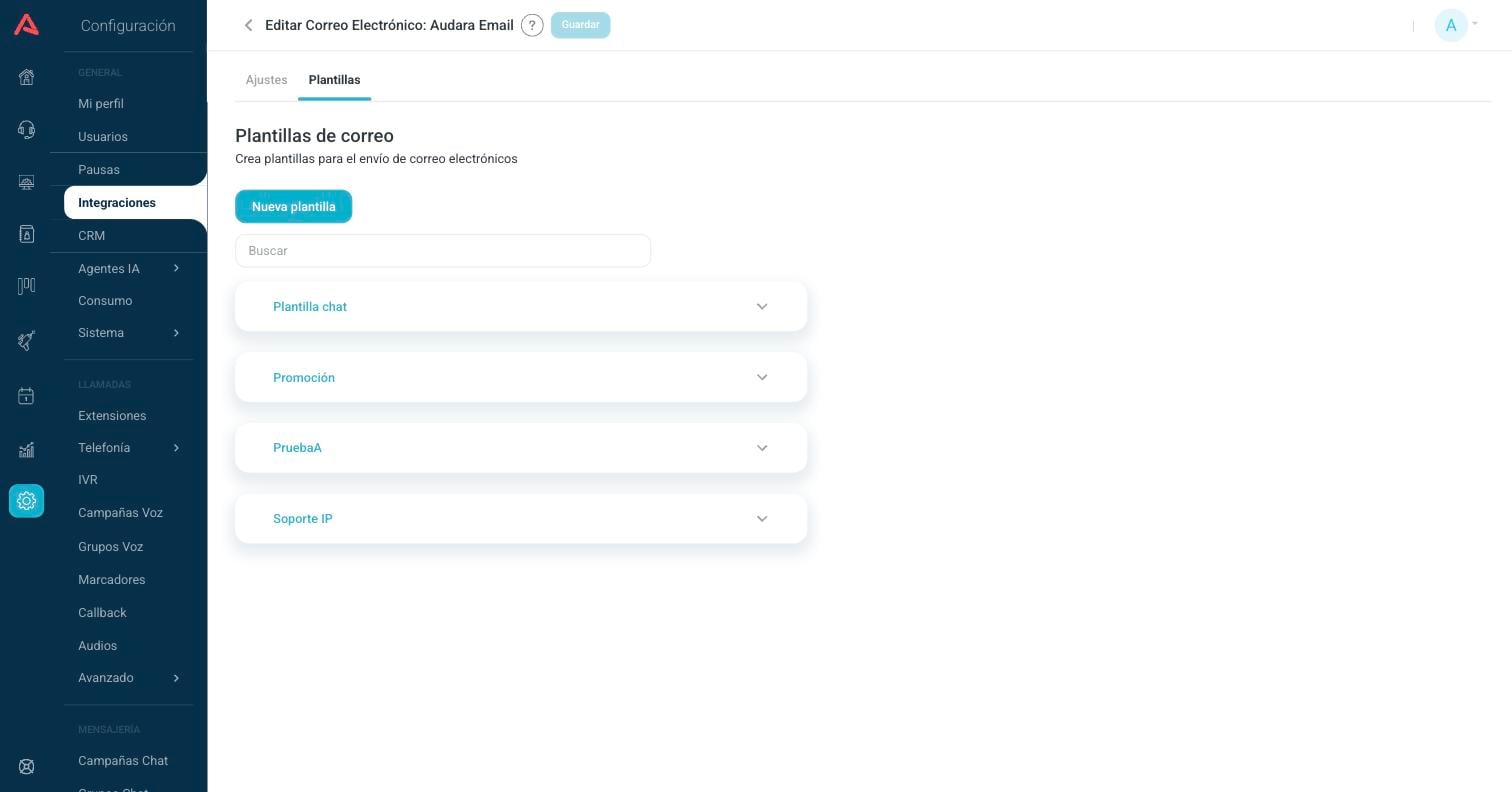
Each template has a subject and a body, and it can be of two types:
- Text
- A rich text editor, for simple messages.
- Design
- An HTML editor, for laid-out emails.
Both the subject and the body accept variables. Next to the editor you can write example values for the variables and see the preview of the email with those values replaced, without having to send it.
SMS
The SMS integration is what lets Audara send text messages, both from the SMS Blaster campaigns and from the bot flows.
The list shows the Name, how many Templates it has and the Status.
Settings
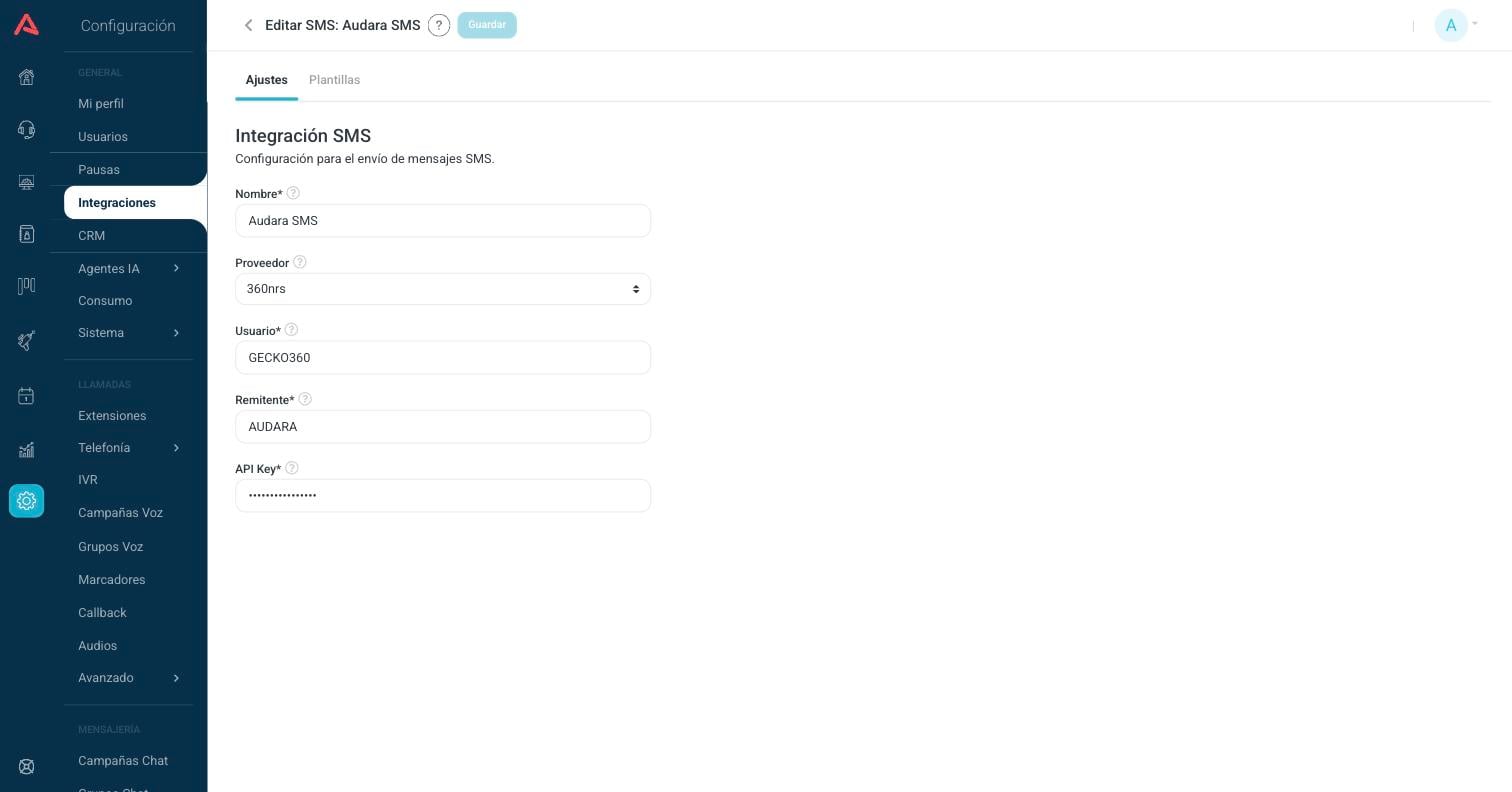
- Name*
- Name the integration is identified by in Audara. Three characters minimum.
- Provider
- The SMS provider you are going to use. It is the decision that rules the whole screen: the names of the credential fields and which other settings appear depend on it.
- Username*
- The username of your account with the provider.
- Sender
- The name or number the recipients see.
- API Key*
- The key the provider gave you.
If your provider is Masiv
With Masiv the screen changes. The three credential fields are renamed to be called what Masiv calls them, and three more settings appear that do not exist with any other provider.
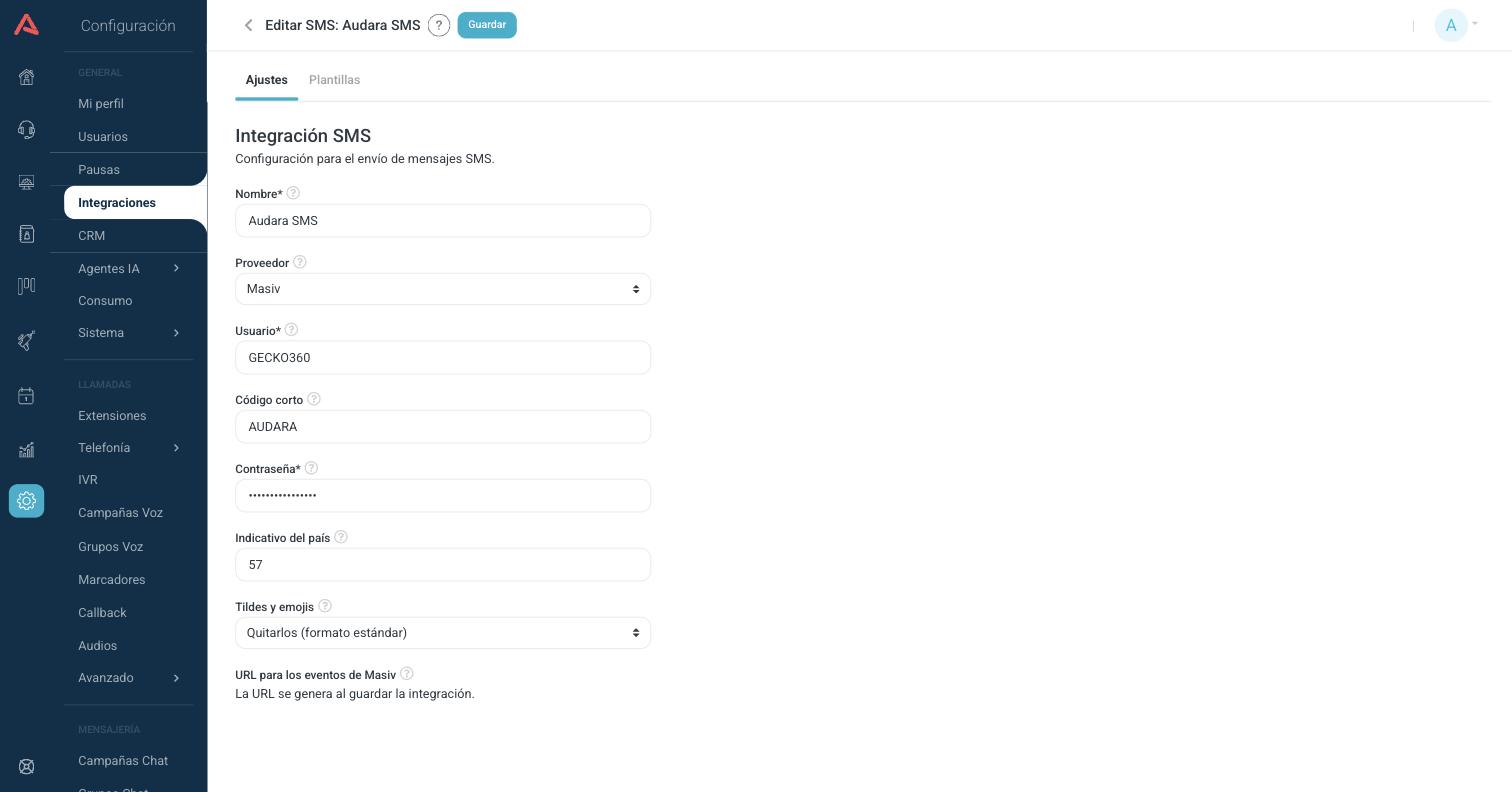
- Username*
- The username of your Masiv account, the same one you use to sign in to their platform.
- Short code
- The short code Masiv assigned you, for example 87007. If you leave it empty, Masiv uses the first route available on the account. It is the field that with other providers is called Sender.
- Password*
- The password of your Masiv account. It is the field that with other providers is called API Key.
- Country code
- It is put in front of the numbers that do not carry it. For Colombia it is 57.
- Accents and emoji
- What to do with the characters the standard format does not admit. It is explained below.
Accents and emoji
Masiv does not admit á, í, ó, ú or emoji in the standard format. This selector decides what to do with them:
- Remove them (standard format)
- The characters the standard format does not admit are erased from the message before it is sent. The message is charged every 160 characters.
- Keep them (rich format)
- The message is sent exactly as it is, with accents and emoji, but it is charged every 70 characters instead of every 160.
With the standard format the message is sent all the same, only without the accents. It is not an error and not a delivery failure: it is the provider cleaning up the text. If the message has to arrive properly spelled, pick the rich format and keep in mind that it is going to cost you more.
URL for Masiv events
Masiv tells Audara the status of each message by sending it to a URL. That URL is generated when you save the integration, and from that moment it appears in the form with a button to copy it. Until you have saved, it says in its place that the URL is generated on save.
For the statuses to arrive, you have to ask Masiv to register that URL, telling them the id of the account, the events you want to receive and the type of traffic.
The URL is unique to this integration and carries a token inside it. Do not share it and do not publish it: anybody who has it can send fake events to your operation.
Templates
Just as with email, the Templates tab keeps reusable messages. An SMS message accepts variables with the syntax {{name}}, and you can give them example values to see the preview.
The editor warns you when the message goes over the character limit of a standard SMS. If the message has variables, the warning is different: Audara does not know how long the real values are going to be, so it warns you that the final message could go over the limit and not be delivered.
HubSpot
The HubSpot integration connects the Audara CRM with the HubSpot one: it defines the requests Audara makes to the HubSpot API and it syncs the contact properties between the two platforms.
The list shows the Name, the Audara CRM it is associated with, whether it is Synced and the Status.
Settings
The settings tab is short: name and token.
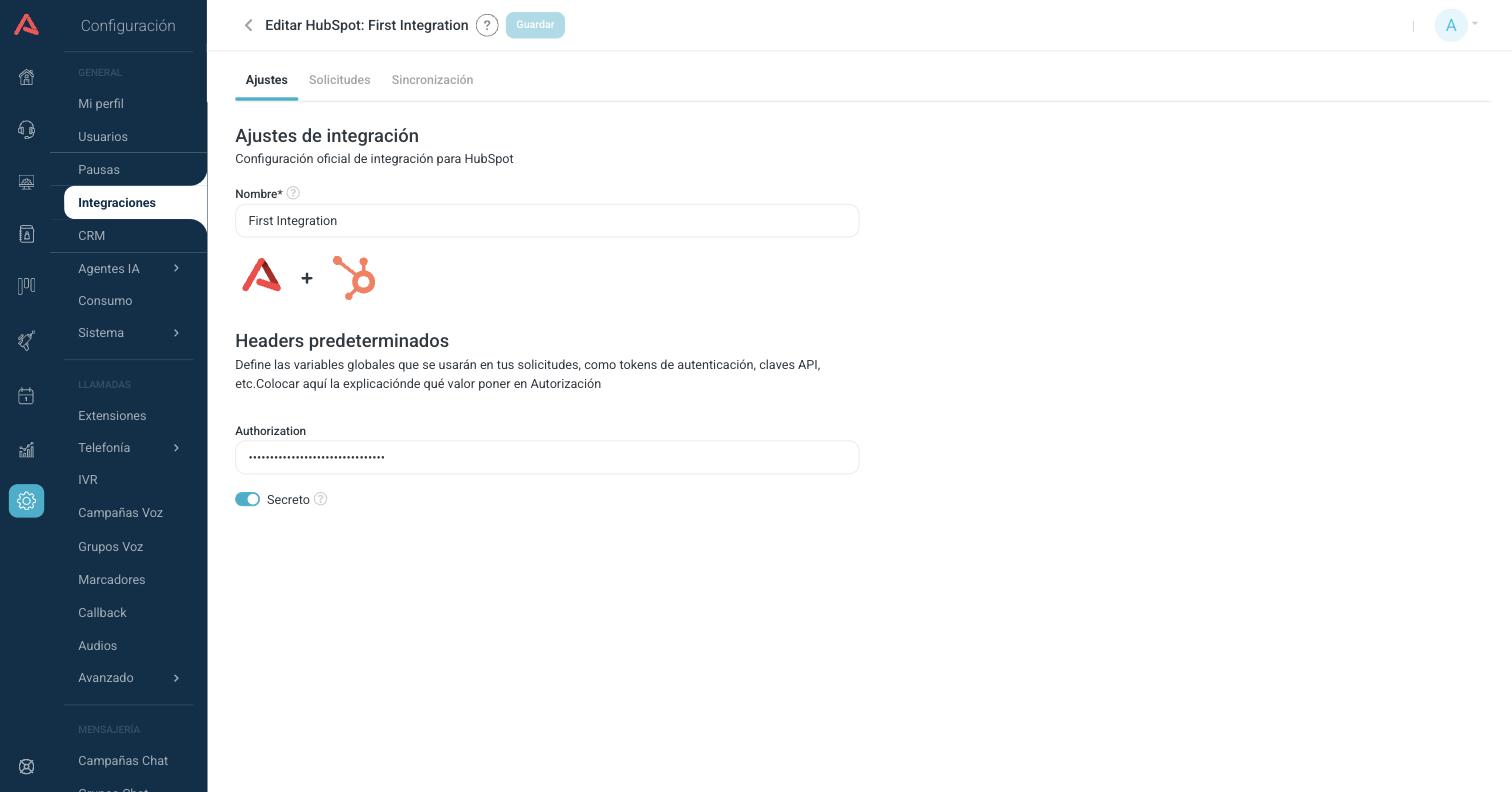
- Name*
- Name the integration is identified by in Audara.
- Authorization
- The token Audara authenticates with against HubSpot. It is sent as the authorization header on every request of this integration. You generate it in your HubSpot account.
- Secret
- With the switch on, the token is hidden when the integration is opened again and in the logs. It only enables once you have written a token.
Leave Secret on always. The HubSpot token gives access to the contacts of your CRM, and with the switch off it is in plain sight of anybody who can open the integration.
If you try to create a second integration with the same token, Audara does not save it and tells you under what name it already exists. One token is used in one integration only.
Requests
In the Requests tab you define each call Audara makes to HubSpot.
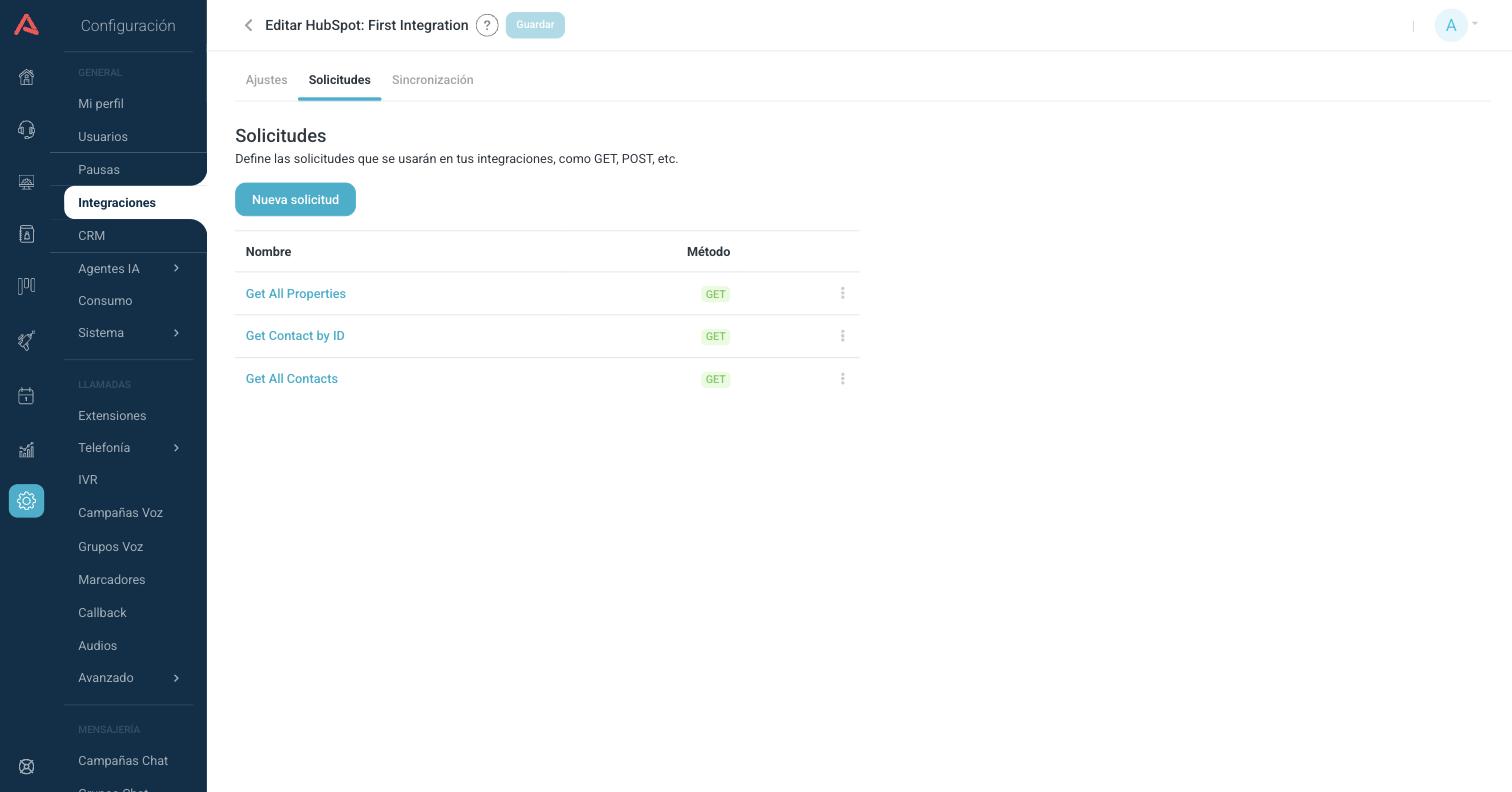
The list shows the Name and the Method of each one. You create a new one with the New Request button, and from the more options menu (⋮) of each row you edit it or delete it.
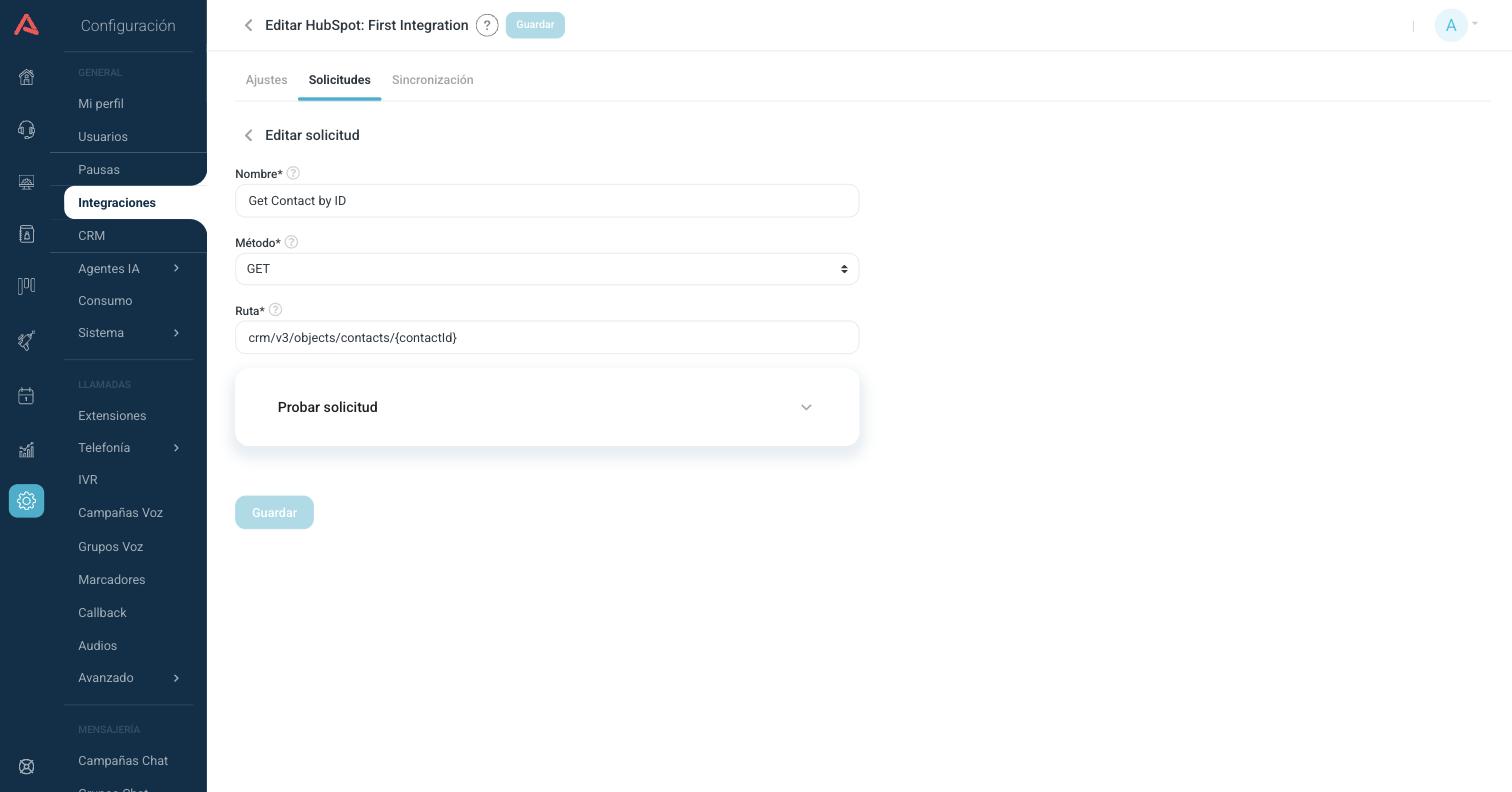
- Name*
- Name the request is identified by.
- Method*
- The HTTP method: GET, POST, PUT and the rest.
- Path*
- The path of the resource in the HubSpot API, for example
crm/v3/objects/contacts. It can carry variables in braces, likecrm/v3/objects/contacts/{contactId}, and the value is passed to it when it runs.
Under the fields is Test Request. Unfolding it lets you run the request for real and see the status and the complete response. On that response you pick which fields you want to use in Audara, and you can rename them if the names HubSpot returns are not clear.
Test every request before saving it. It is the only way to confirm that the token and the path came out right, and along the way it is how you pick the fields of the response without having to guess how they arrive.
Sync
The Sync tab is the one that pairs up the HubSpot fields with the Audara CRM ones.
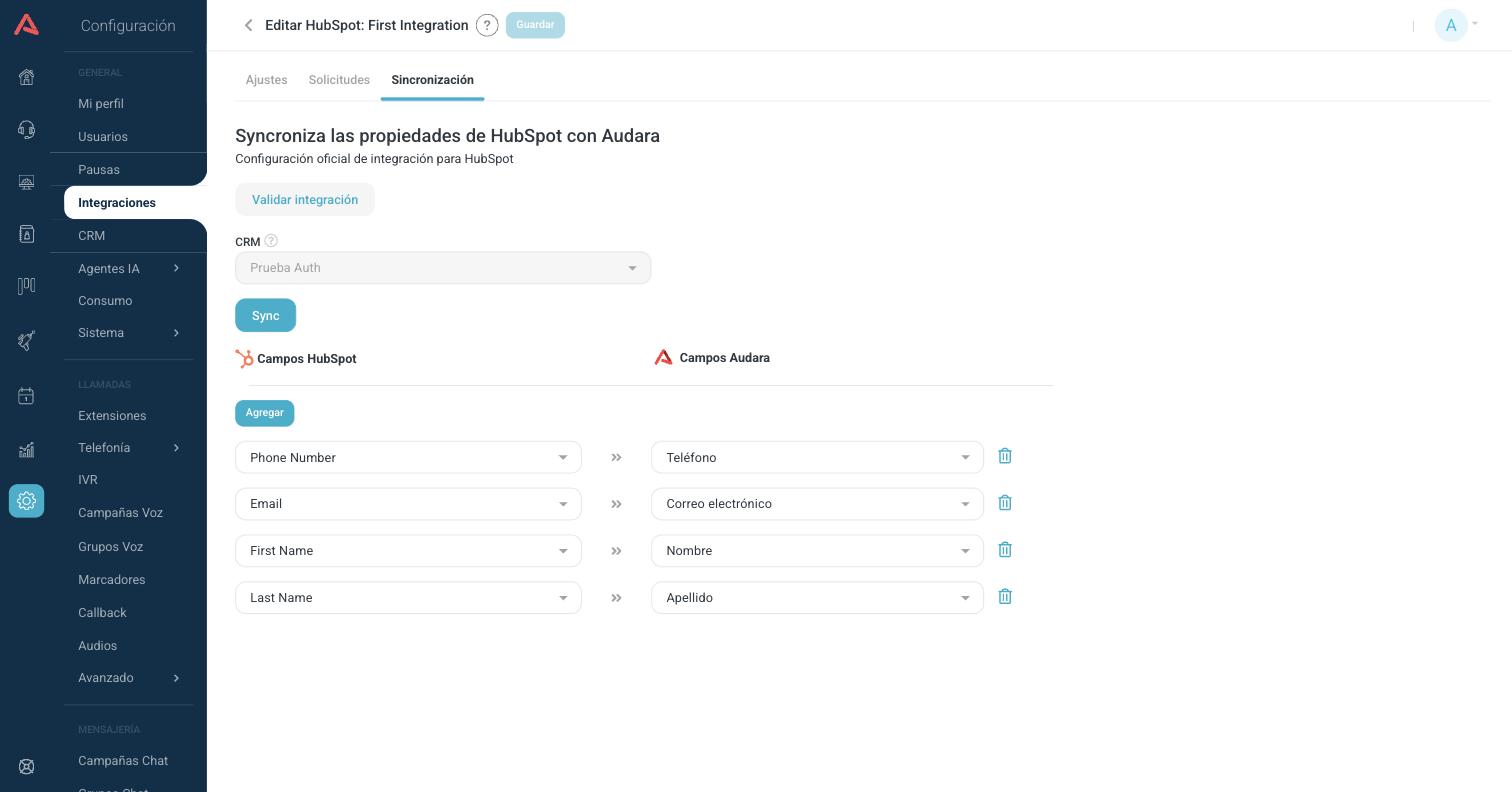
The walk is this one:
- Press Validate integration. Audara asks HubSpot for the list of available properties and confirms that the token works.
- Pick the Audara CRM it is going to sync with.
- Pair up the fields: on the left you pick a HubSpot field, on the right the Audara field that goes with it. Add as many pairs as you need with the Add button, and take the spare ones out with the bin icon.
- Press Sync and confirm.
If you try to sync without having validated first, or without having paired any field, Audara tells you so and does not start.
While the sync is running, the integration is locked and cannot be edited. The form warns you with a strip at the top. Wait for it to finish before touching it again.
API and MCP
Two of the cards on the board have their own article, because they are big enough not to fit here:
- API
- The REST API integrations, with which Audara reads from and writes to the systems of your business from the bot flows. They are explained in the API Rest article.
- MCP
- The connection with outside MCP servers, which hand tools to your bots without you having to define each request by hand. They are explained in the MCP Integrations article.