Users
Who gets into Audara, and what each person can do
A look at the module
A user is a person who logs into Audara. What they can do inside is not defined by the user itself but by the roles you assign them: agent, supervisor or admin. The same user can exist with no role at all, and in that case they only get in to see their profile.
The module is in Setup > General > Users.
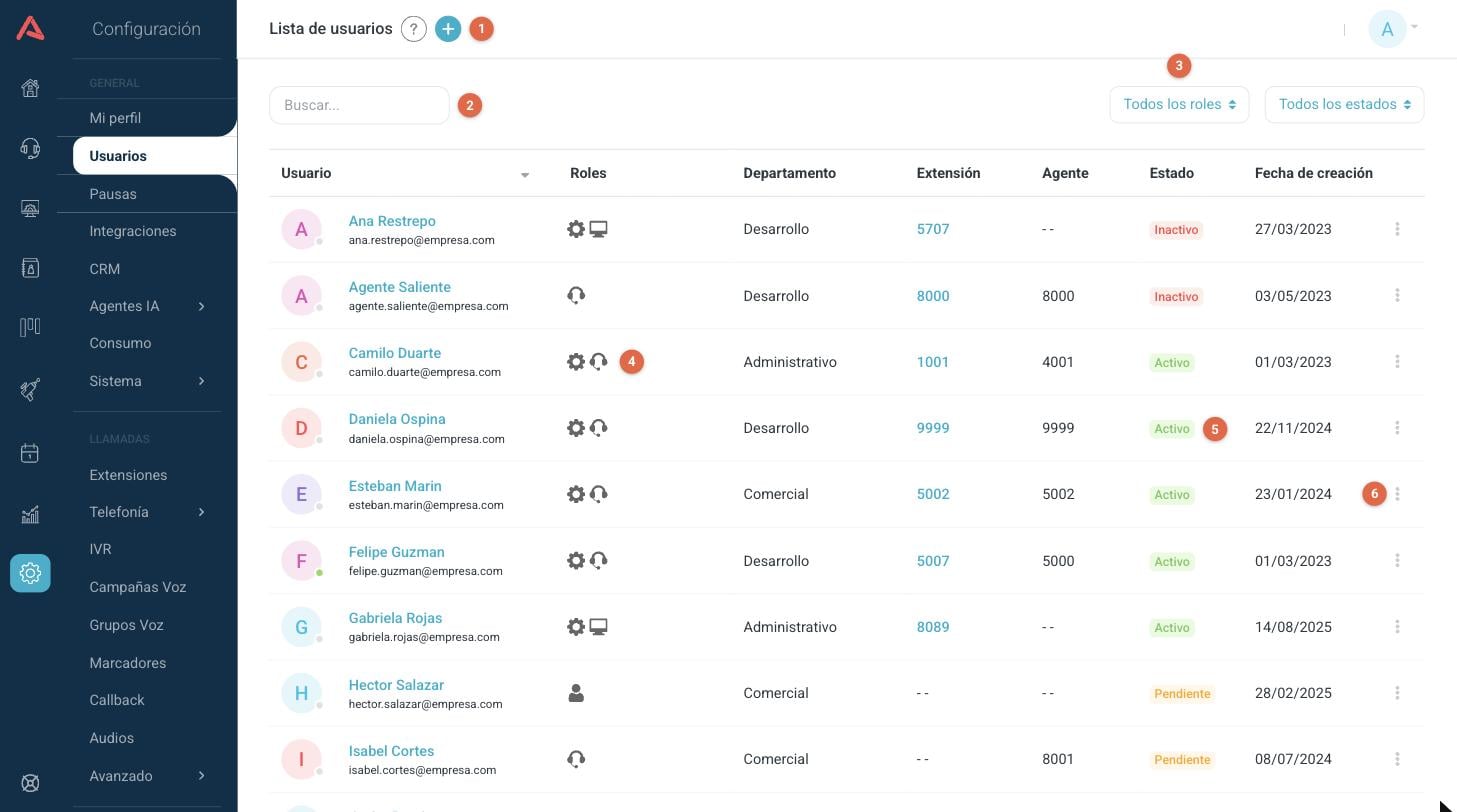
- 1 Create a new user with the (+) button in the header.
- 2 Search by name or by email.
- 3 Filter the list by role and by status.
- 4 The icons in the Roles column say what each person is. They show lit up when the person has an open session in the panel.
- 5 The status label.
- 6 The more options menu (⋮) of each row.
The coloured dot over the avatar is a separate thing: green means the person is online on the platform right now, and grey that they are not.
The columns
- User
- Name and email. Click the name to open the user.
- Roles
- One icon per assigned role. If the person has none, a single user icon appears.
- Department
- The group they belong to. Departments group extensions and are the ones that show in the user panel.
- Extension
- The telephone extension assigned. It is a link: it takes you to that extension in its module. A double dash means they have none.
- Agent
- The agent number, which only users with the agent role have.
- Status
- Active: they log in and carry out their roles normally. Inactive: they cannot log in or carry out any role. Pending: they have not yet accepted the invitation that reached them by email.
- Creation Date
- When the user was created.
How many users you can create, and of which roles, is defined by your license. When you reach the cap, Audara tells you as you try to create one more.
Creating a user
Press the (+) button in the header. The form has three tabs: Profile, Information and Roles. The mandatory fields are marked with an asterisk, and the Save button turns on when you complete them.
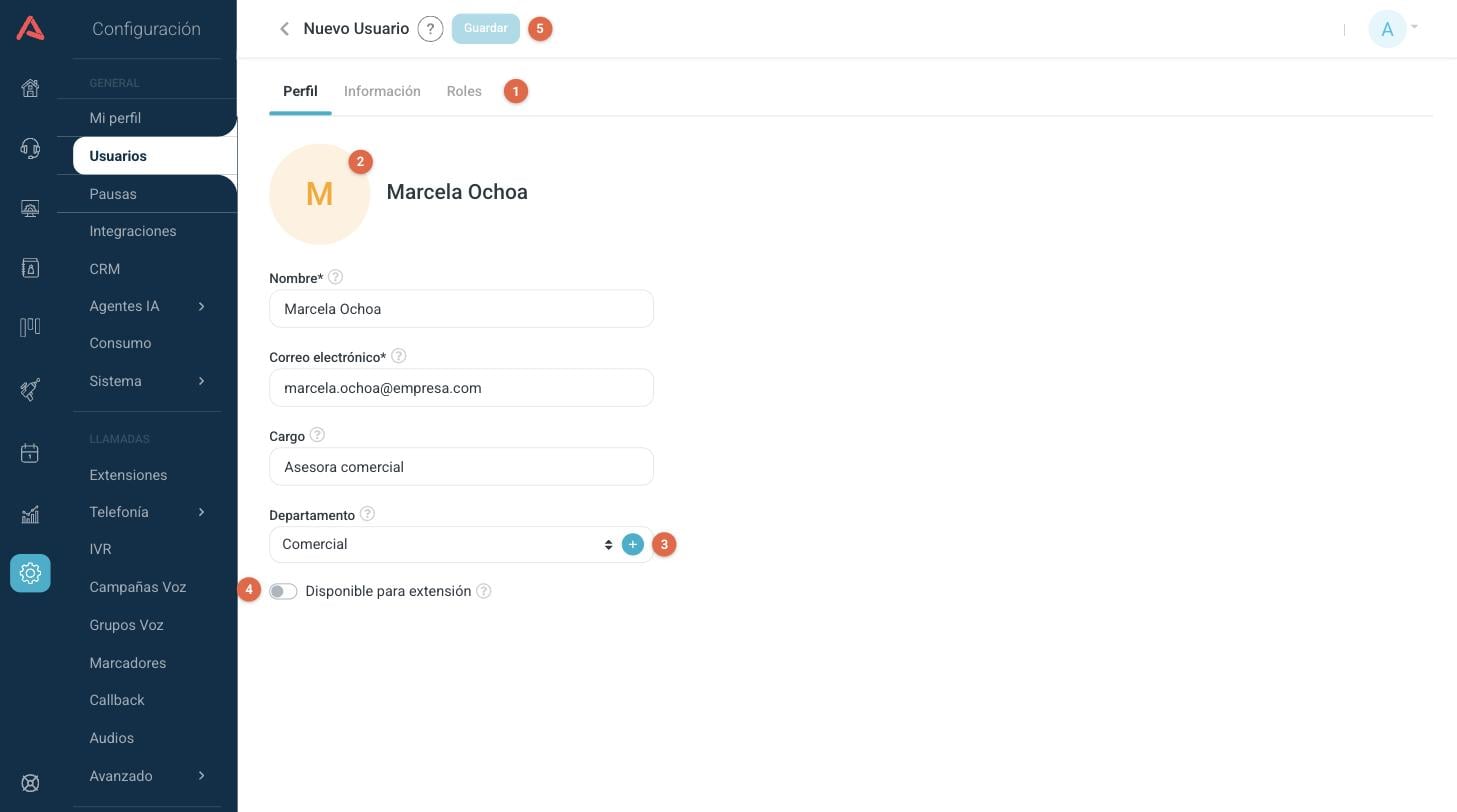
- 1 The three tabs of the form. You can move between them before saving.
- 2 The avatar. Until you upload a photo it shows the initial of the name.
- 3 The (+) button opens the department list, where you create and edit them without leaving here.
- 4 The switch that leaves the user available to receive an extension.
- 5 Save.
- Name*
- Name the user will be identified by in Audara. Three characters minimum.
- Email*
- It is the main contact with the person: the invitation to activate the account and the notifications arrive there. Once the user is created, this email cannot be modified.
- Position
- Informative, not mandatory.
- Department
- Departments work as groups of extensions and are needed for the person to show in the user panel.
- Available for Extension
- Turning it on leaves the user available for you to assign them a telephone extension. The extension is not created here: it is created in the extensions module and the user is assigned to it there.
The new user stays in the Pending state until they confirm their account from the invitation that reaches their email. While they stay pending, Resend Invitation appears under the email, and you can resend it as many times as you need.
Departments
The (+) button next to the Department field opens the Department List. From there you manage all the departments of the account, without losing what you have written in the form.
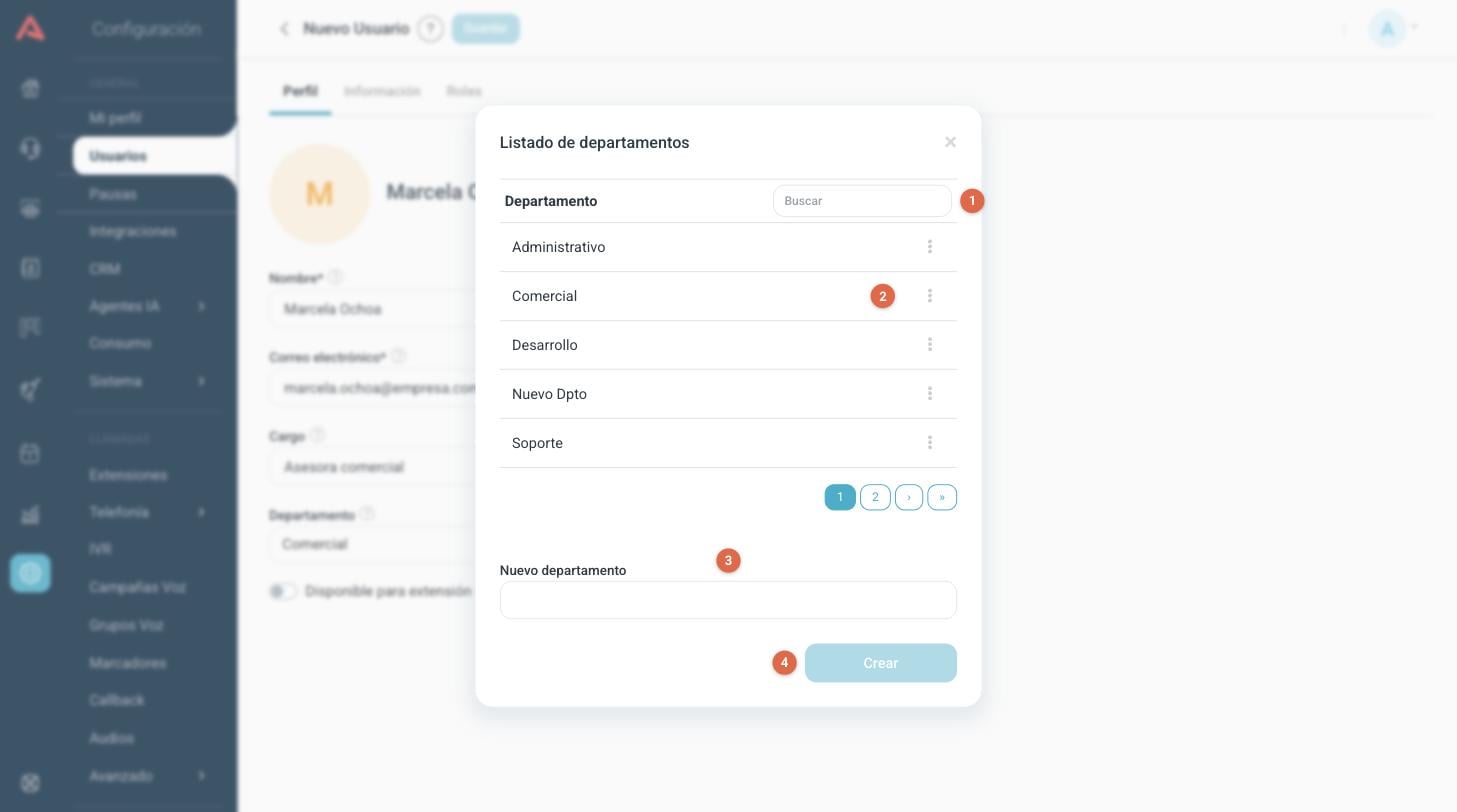
- 1 Search for a department by its name.
- 2 The (⋮) menu of each row lets you rename it or delete it.
- 3 Write the name of the new department here.
- 4 Create it with Create.
Personal Information
The second tab keeps contact and location data. They are all optional: they are there to have the record of the person complete, they do not change anything about what they can do on the platform.
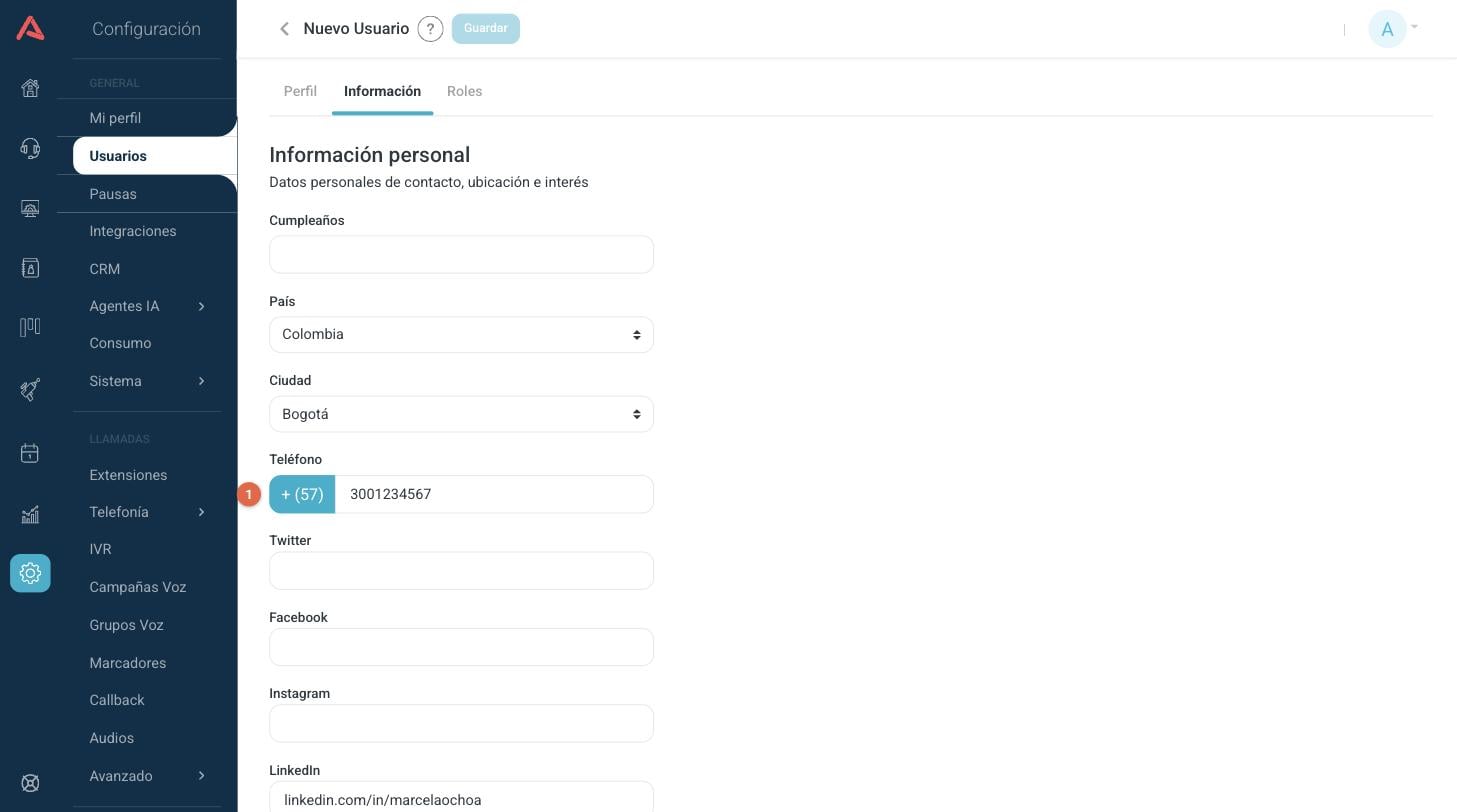
- 1 The dialling code of the phone comes from the country you pick above, so pick the country first.
The fields are Birthday, Country, City, Phone and four networks: Twitter, Facebook, Instagram and LinkedIn.
Roles
The third tab is the one that decides what the person can do. At the top you have three buttons, one per role, and each one opens its own configuration with a switch to activate it.
A user cannot be an agent and a supervisor at the same time. If you try to activate the second one, Audara rejects it. Admin does combine with either of the two.
To create agents or supervisors you need to have created beforehand the campaign groups or the dialers they are going to work in.
The roles you see depend on your license: if your plan does not include supervision, that button does not appear, and the same goes for agent and for admin.
The agent role
The agent is the one who handles the interactions from the agent panel. Here you define their number, their level, the breaks they are going to see and the channels they are going to work in.
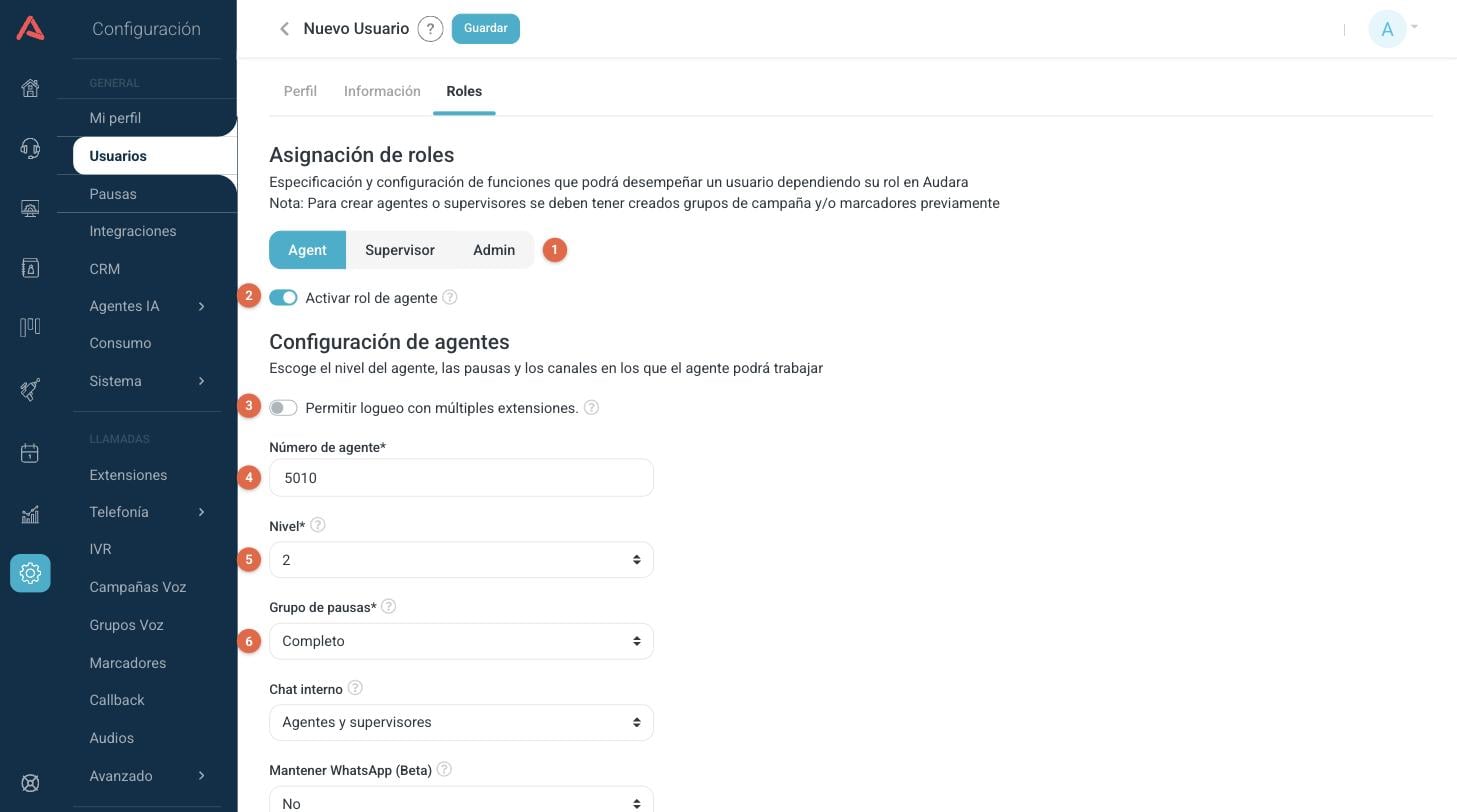
- 1 The three role buttons.
- 2 The switch that activates the role and unfolds its configuration.
- 3 Login with multiple extensions.
- 4 Agent number.
- 5 Level.
- 6 Break group.
- Allow login with multiple extensions
- Turning it on lets the agent get into the panel with any existing extension and not only with the one assigned to them.
- Agent Number*
- The number they are identified by in the operation. It cannot be repeated between agents.
- Level*
- It is there to measure and filter agents in the productivity reports.
- Break Group*
- Defines which breaks the agent is going to see in their panel.
- Internal chat
- Who they can chat with inside Audara: Disabled, Only supervisors or Agents and supervisors.
Further down are the channels and a couple of destinations for what the agent does outside a campaign.
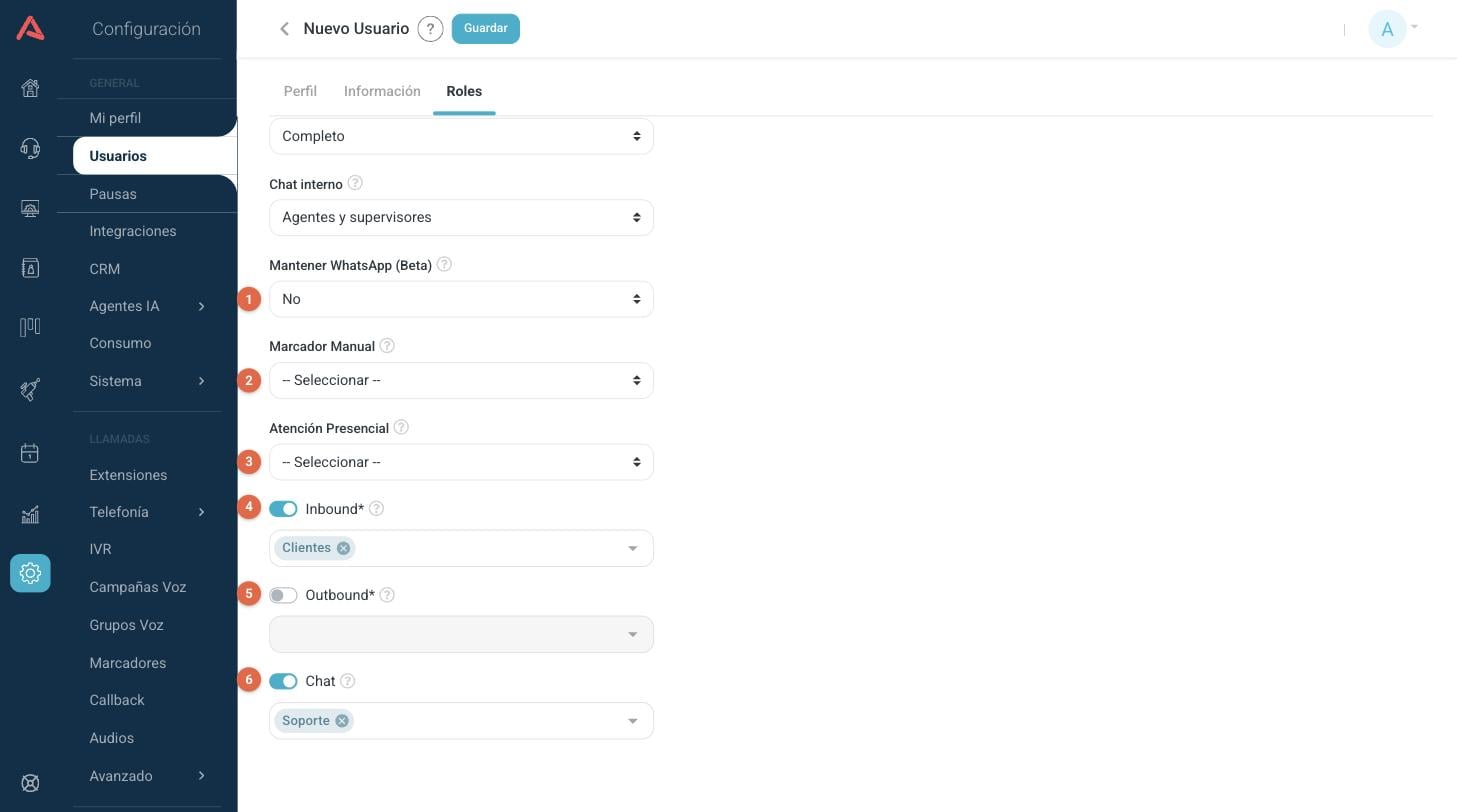
- 1 Persist WhatsApp (Beta). It appears when you activate the Chat channel.
- 2 Manual Dialer.
- 3 On-site.
- 4 Inbound, with the groups of incoming campaigns.
- 5 Outbound, with the dialers.
- 6 Chat, with the chat groups.
- Persist WhatsApp (Beta)
- Turning it on keeps the WhatsApp conversations assigned to the agent even if they close their session in the panel.
- Manual Dialer
- Every manual call the agent makes from their extension that does not belong to a dialer or to an incoming campaign is recorded in this dialer and typed with the typings they have configured.
- On-site
- The walk-in interactions the agent handles are recorded here. The typing and the CRM contact they attach in their panel are saved in this on-site entity.
- Inbound*
- Turning it on makes the agent part of the incoming channel and shows it in their panel. Below you pick the campaign groups they are going to work in.
- Outbound*
- The same as the previous one, but for the outgoing channel, and below you pick the dialers.
- Chat
- Turning it on makes the agent part of the chat channel and shows it in their panel.
The supervisor role
The supervisor does not handle interactions: they watch them. Their configuration is the list of what they are going to be able to view and monitor from the supervision panel, grouped by channels.
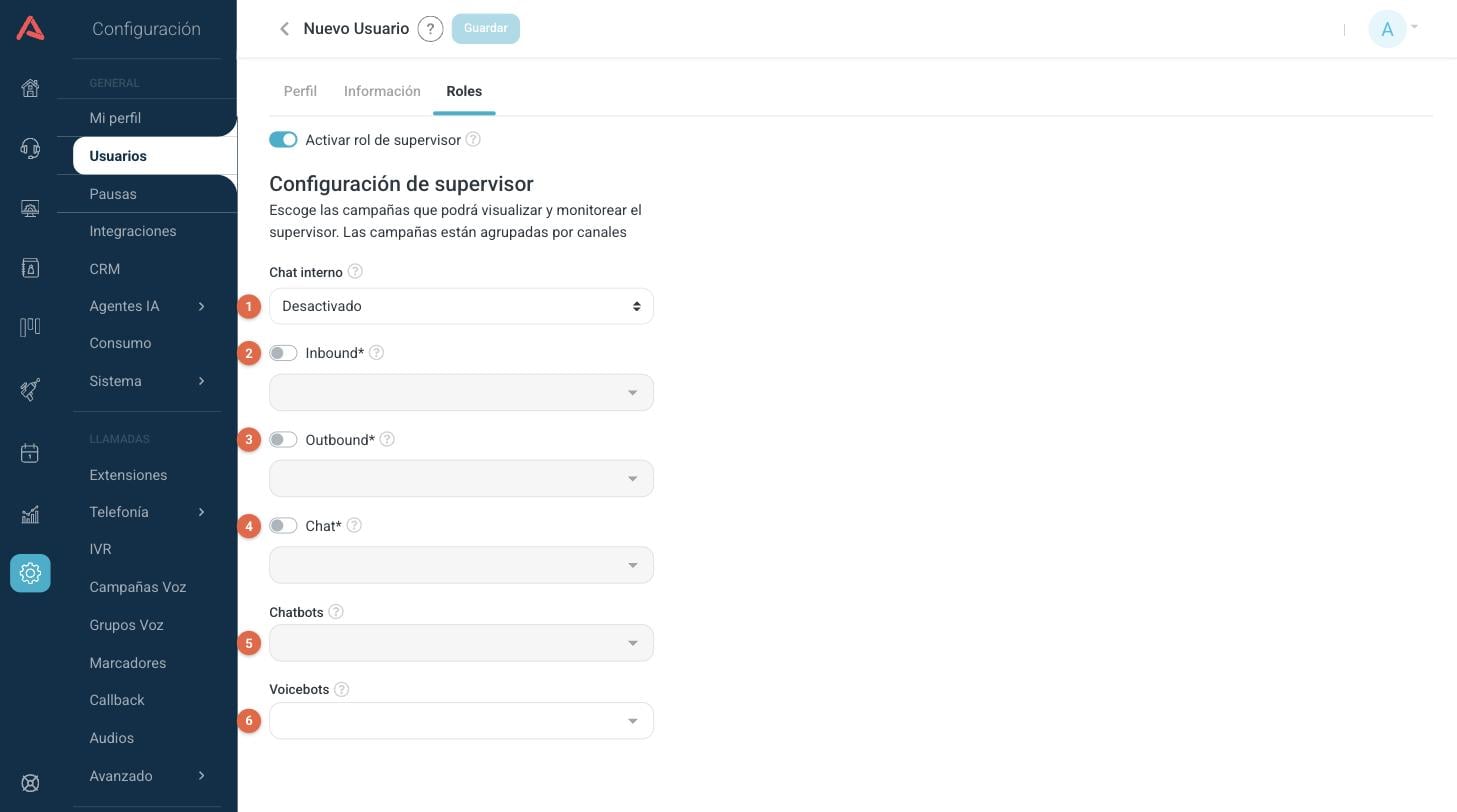
- 1 Internal chat.
- 2 Inbound: the campaign groups they are going to see.
- 3 Outbound: the dialers.
- 4 Chat: the chat groups.
- 5 Chatbots.
- 6 Voicebots.
On the three channels, the switch decides whether the supervisor sees that channel, and the selector below limits which campaigns or dialers they see inside it. Chatbots and Voicebots carry no switch: if you leave the list empty, they see none.
The admin role
The admin gets into the configuration of Audara. Unlike the other two roles, here you do not configure where they work but which parts of the platform they can open and which ones they can modify, module by module.
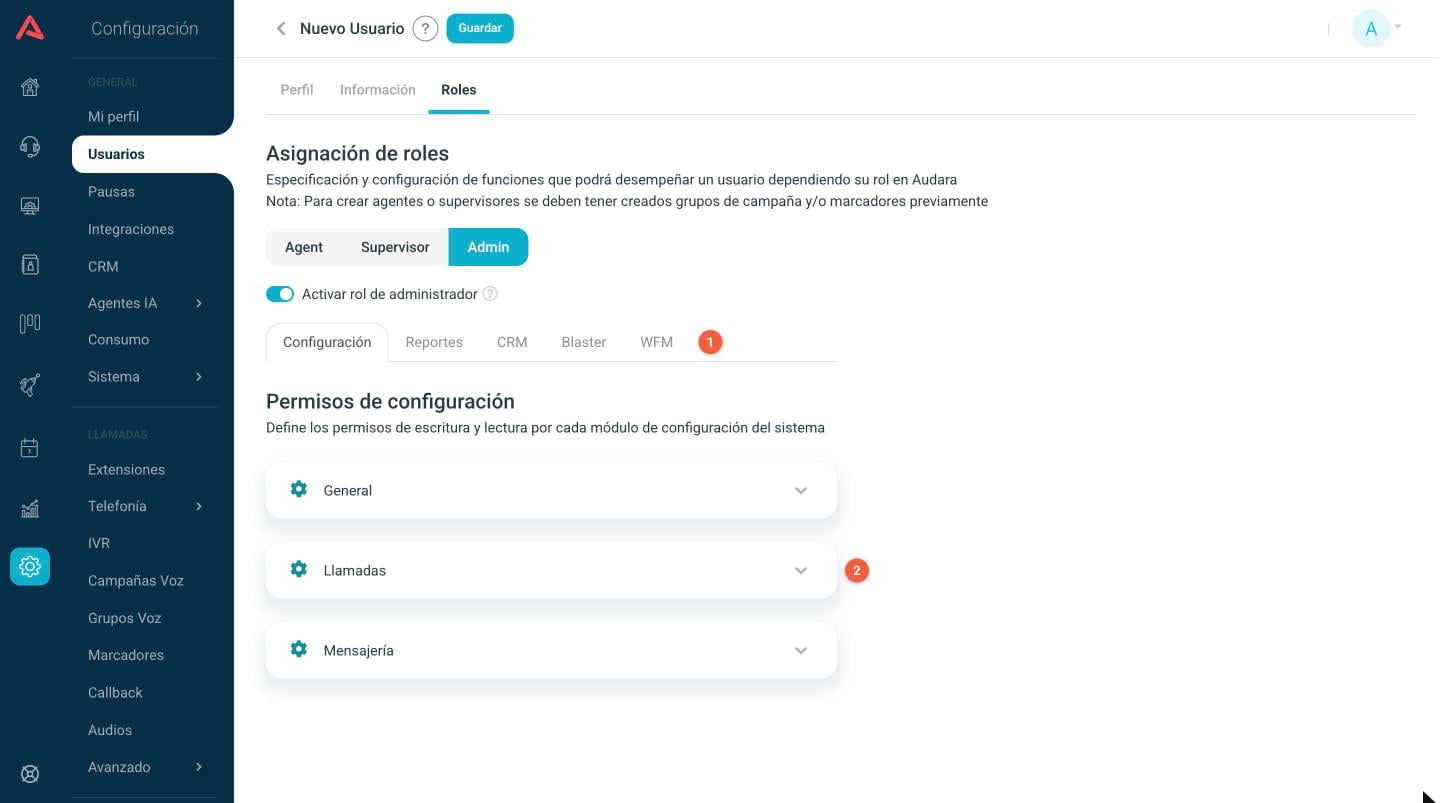
- 1 The permissions are split into five tabs: Setup, Reports, CRM, Blaster and WFM.
- 2 Inside each tab, the modules come in collapsible groups.
Open them and you are going to find a table with one row per module and two columns.
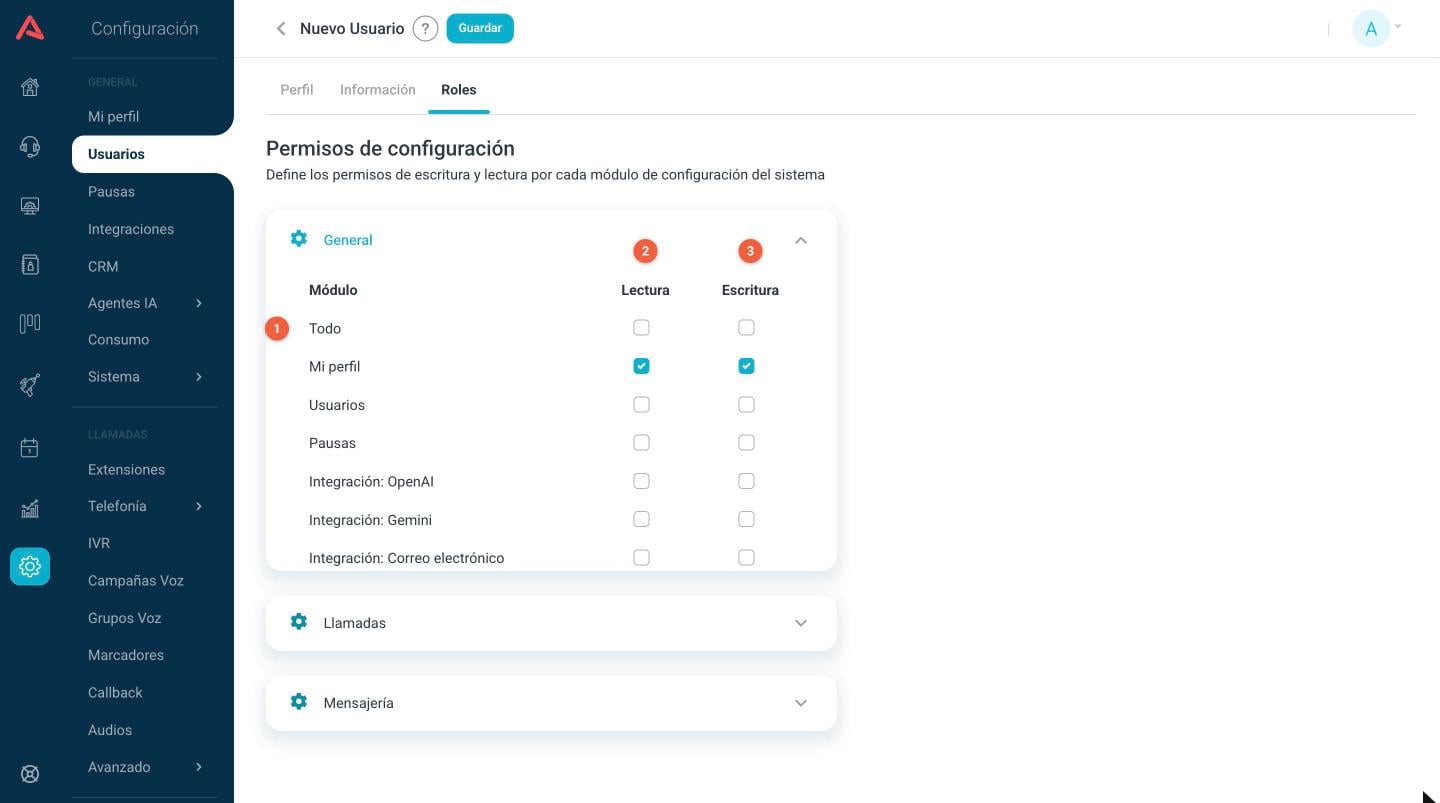
- 1 The All row ticks and unticks the whole group.
- 2 Read: they can open the module and see what is there.
- 3 Write: on top of that they can create, edit and delete.
The five tabs
- Setup
- The read and write permissions for each system configuration module, grouped into General, Calls and Messaging.
- Reports
- The viewing permissions for each report module. Here you can also limit the admin to certain campaign groups or certain dialers within the reports you enabled for them.
- CRM
- Which of the Audara CRMs they can get into.
- Blaster
- Which Blaster dialers they can get into.
- WFM
- The permissions of the workforce management module.
Start by ticking only Read and add Write nowhere but on the modules the person is really going to administer. An admin with write on Users can change everybody else's permissions, yours included.
Editing a user
Click the name of the user in the list, or use Edit in the (⋮) menu of their row. It is the same creation form, with two differences: the email can no longer be changed and one more tab appears.
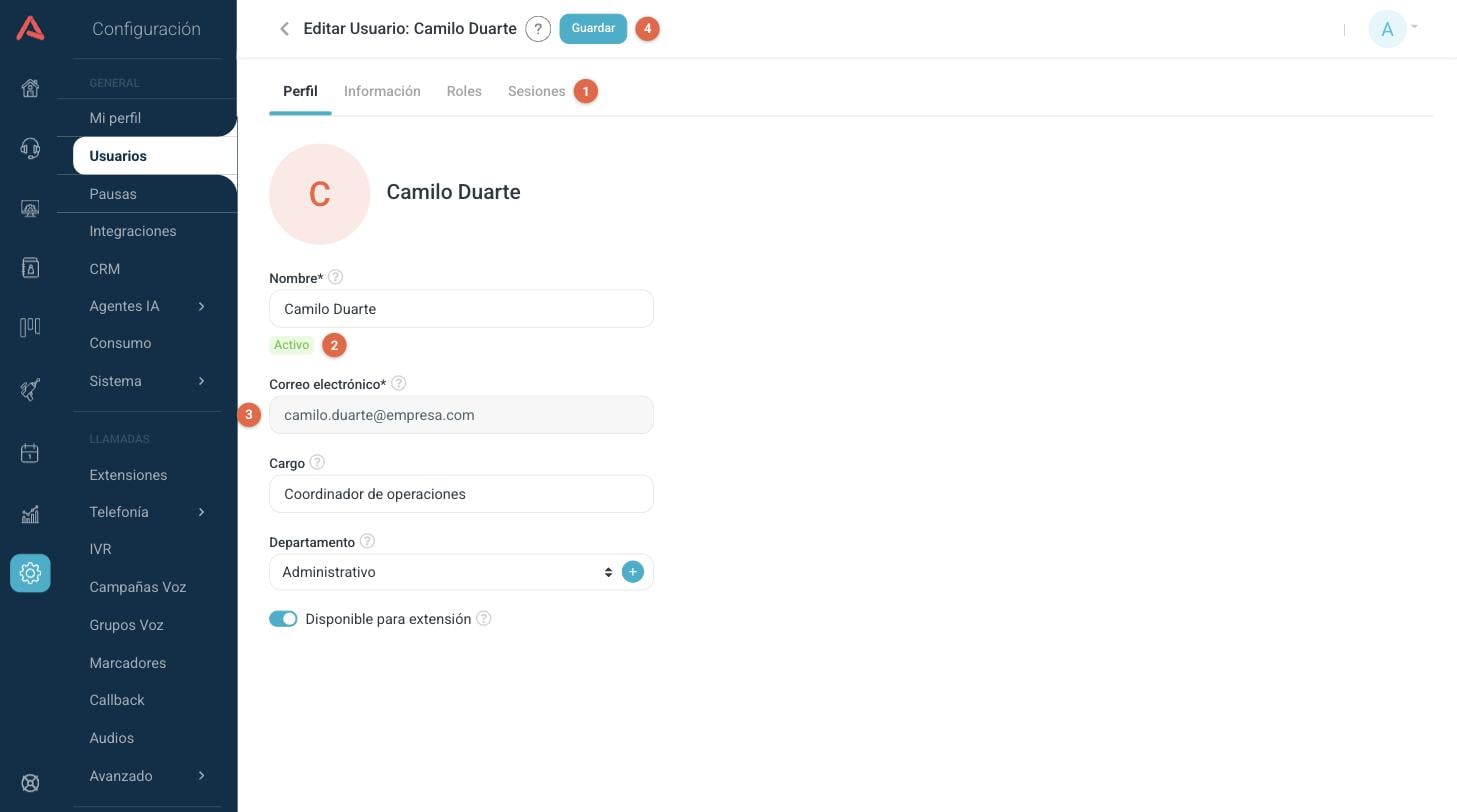
- 1 Logins, the tab that only exists when editing.
- 2 The status of the user, under the name.
- 3 The email shows locked.
- 4 Save stays off until you change something.
Saved changes do not roll back on their own. To go back you have to edit the corresponding fields again.
If your installation has AI assistant access included, editing also shows an AI Access tab, where you authorise an assistant to query the data this user can see. AI Access covers it.
Logins and passwords
The Logins tab shows the recent entries of that person. It is there to answer two quick questions: whether they really are logging in, and from where.
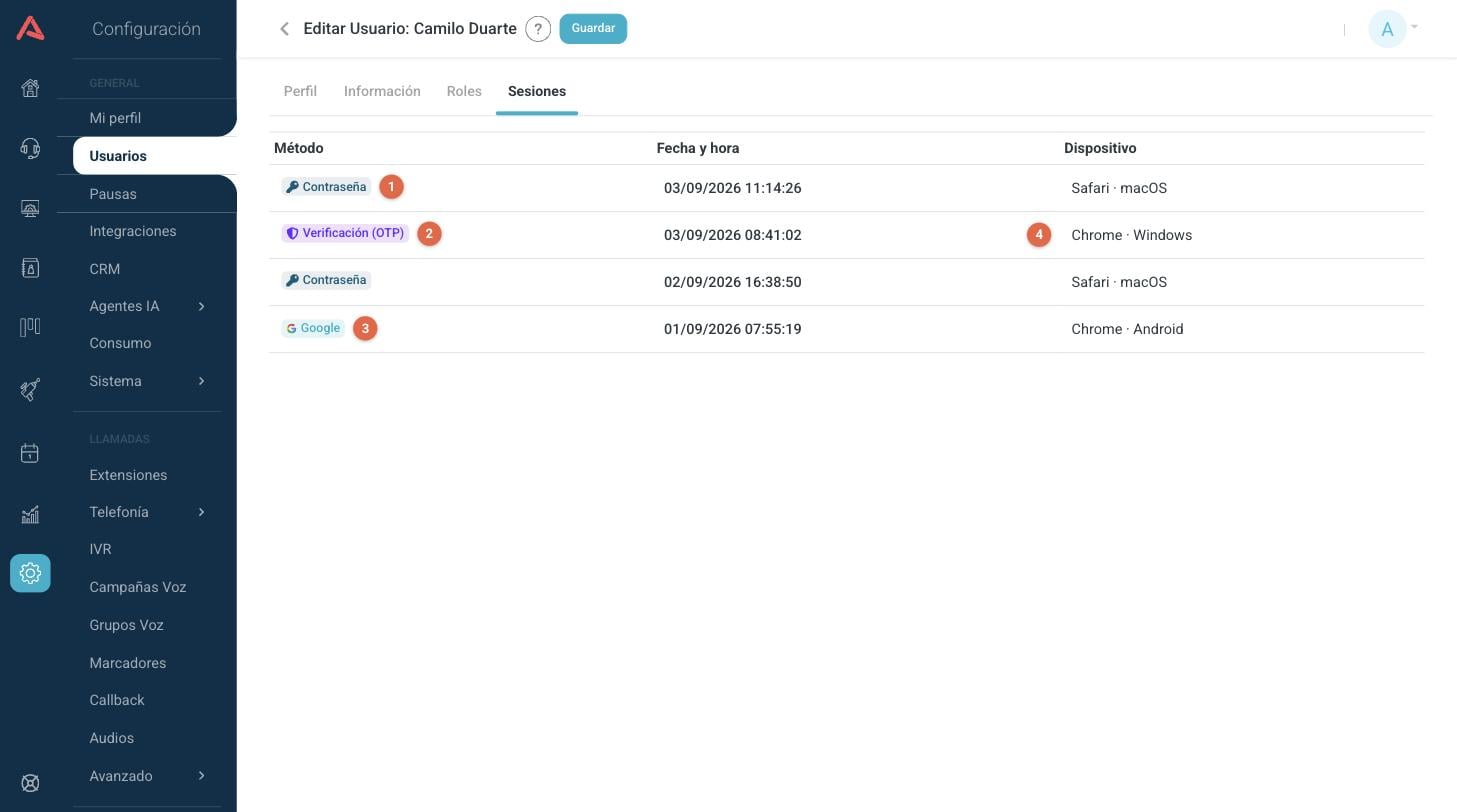
- 1 Password: they got in with their email and their password.
- 2 Verification (OTP): they got in with a password and on top of that confirmed with a code.
- 3 Google: they got in with their Google account.
- 4 The browser and the operating system they came in from.
The list runs from the most recent to the oldest and keeps loading as you scroll down.
The password and Google do not live together. When your account has the Google link turned on, the first time a person gets in through Google they are tied to that method, and from then on logging in with a password is rejected for them. The code verification is a different thing: it is not a third method but a second step added to the password.
Resetting somebody's password
When a person cannot get in, an admin can generate a new password for them from their profile.
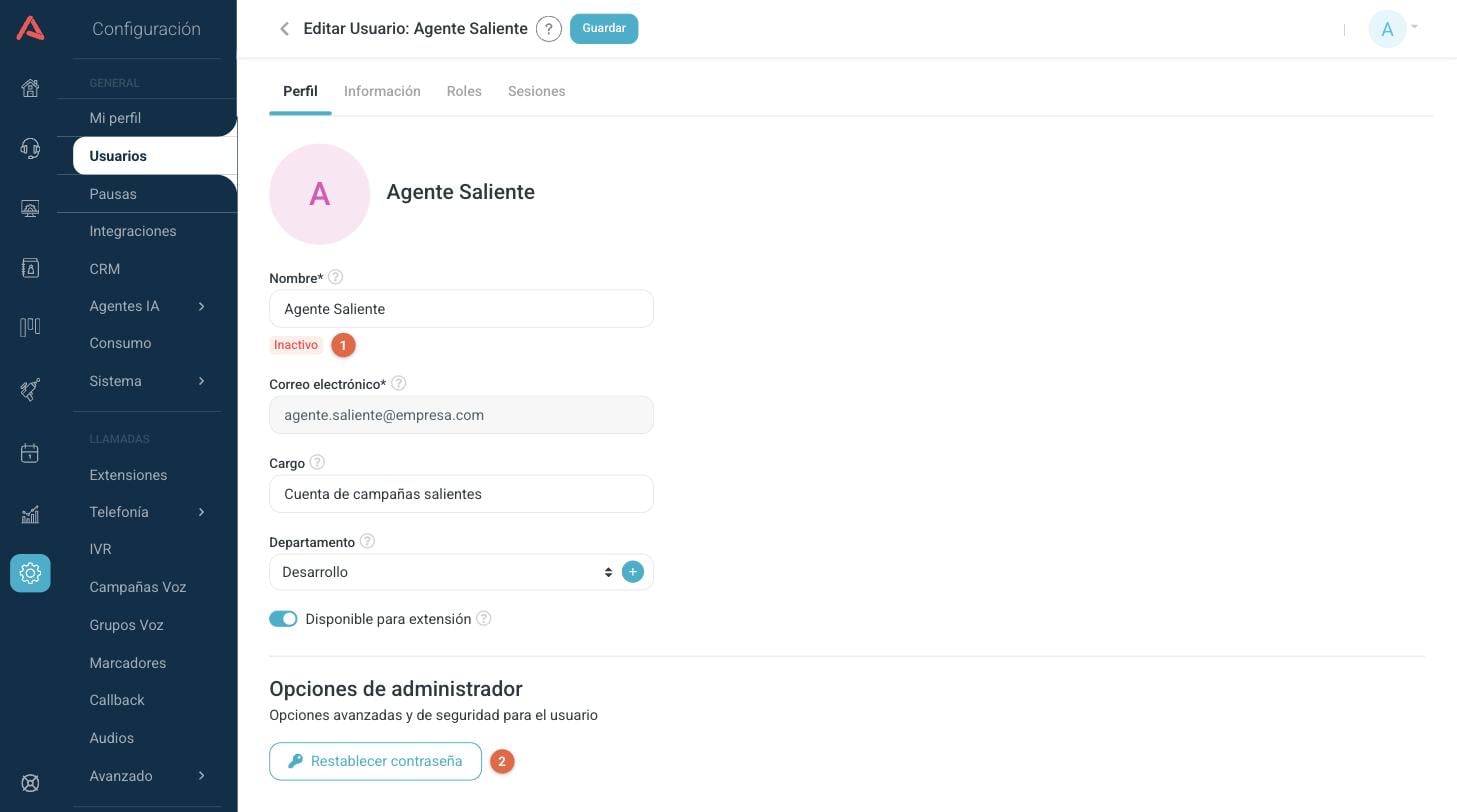
- 1 The user has to be Active or Inactive. A Pending one gets the invitation resent, not the password changed.
- 2 Reset password generates a secure password and shows it to you once only, so you can pass it on to the person.
This block does not show on every user. It does not appear on admins or on the owner of the account, nor on those who only get in with Google, nor when your license has password login turned off.
Creating several users from a template
When a group of people comes in to the same position, you do not have to configure every role from scratch. Open the (⋮) menu of a user that is already the way you want and choose Use as Template.
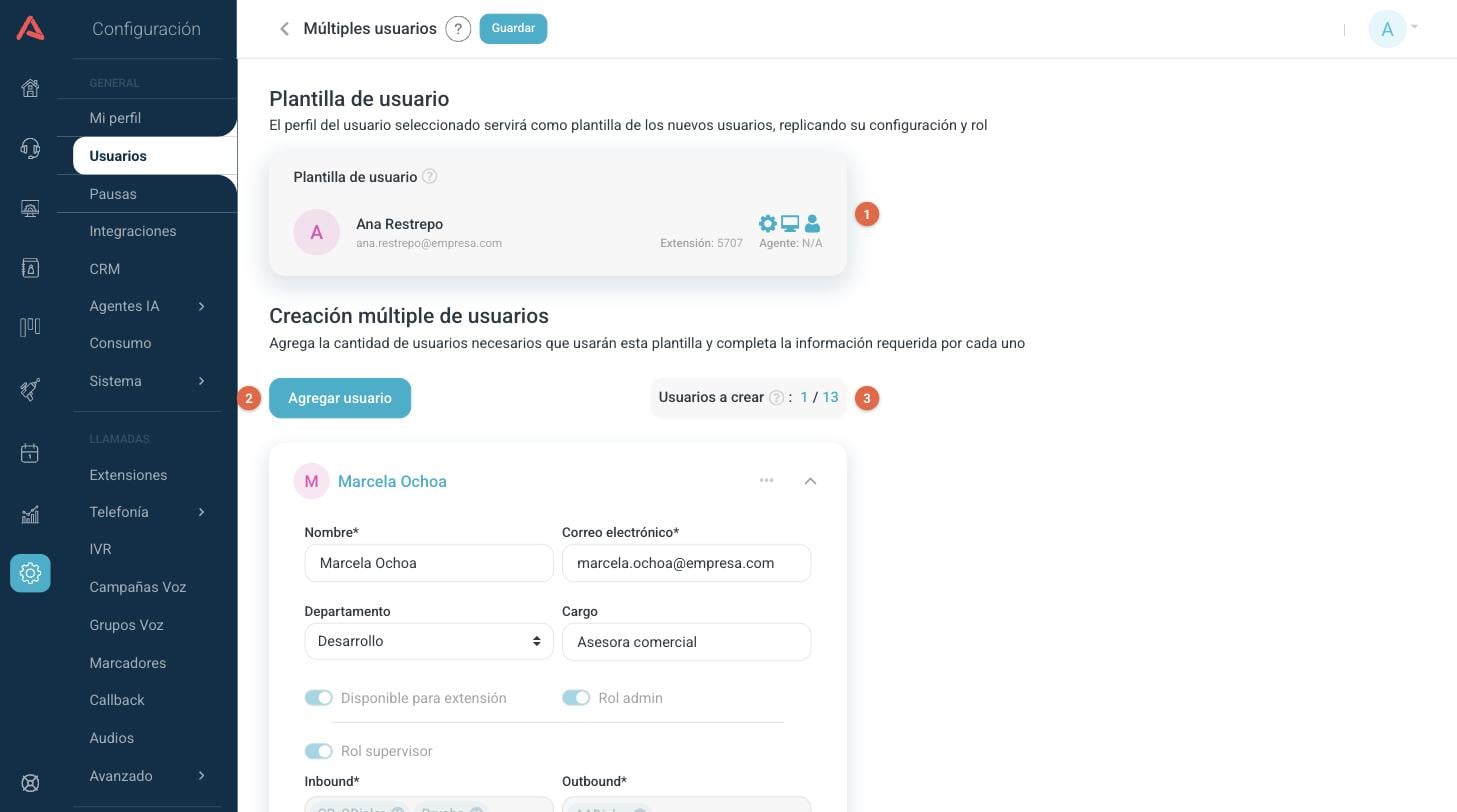
- 1 The card of the template, so you can confirm it is the right profile: name, email, roles, extension and agent number.
- 2 Add User adds one card per new person.
- 3 How many you have configured so far and how many your license allows.
Of each person it only asks for what makes them different: name, email, department and position. The rest, the roles and their configuration, is replicated from the template and that is why it shows greyed out. When you finish filling in all the cards, Save turns on and they are all created in one go.
Activating, deactivating or deleting
The (⋮) menu of each row of the list is where the life cycle of a user is managed.
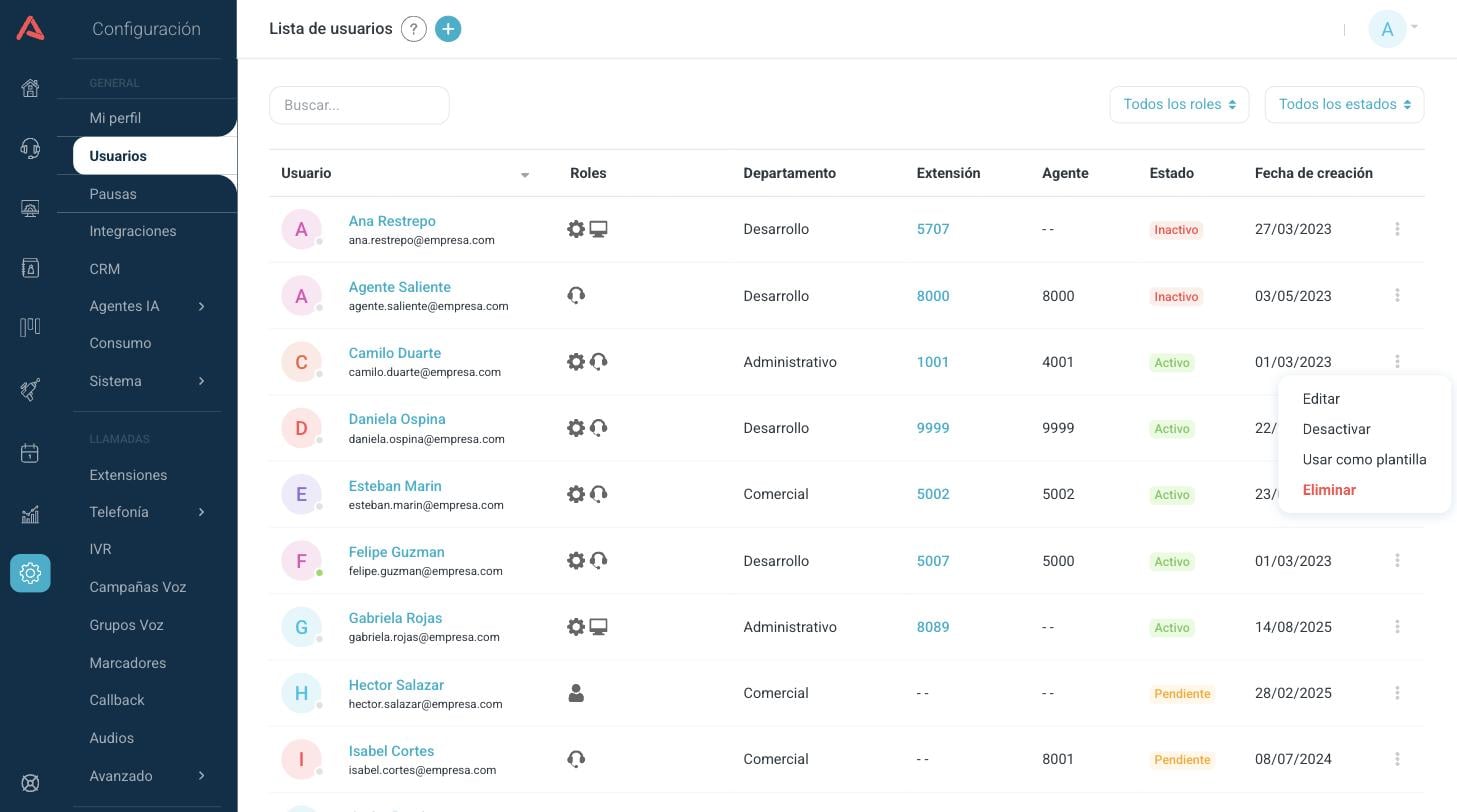
- Edit
- Opens the user, the same as clicking their name.
- Deactivate
- Leaves them in the Inactive state: they cannot get in or carry out any role, but their history and their configuration are kept. When they come back, you activate them again from the same menu.
- Use as Template
- Opens the multiple creation copying the configuration of this user.
- Delete
- Erases the user.
When somebody leaves the operation for a while, deactivate them instead of deleting them: it leaves what they did intact, so their interactions and their reports keep adding up, and you reactivate them with the configuration they already had. Keep in mind that an inactive user still takes up their license seat, so if you need the seat for somebody else, then you do have to delete them.
You cannot deactivate or delete yourself: those options do not appear on your own row.