Dialers
Outbound calls: who gets called, at what pace and who takes them
What this module is for
A dialer is an outbound calling operation: a list of contacts, a rule for working through it and a way of placing the calls. Everything that defines that operation lives in the dialer, from who gets called and in what order to what the agent records on hanging up and what gets analysed afterwards.
You will find the module under Setup > Calls > Dialers.
A dialer does not work on its own. It leans on three things that have to exist before you create it:
- A CRM with the contacts
- That is where the numbers come from. The dialer keeps no contacts of its own: it filters the ones in the CRM you pick.
- An outbound category
- This is what decides which trunk the calls go out through. Without a category the dialer cannot place a call, which is why the field is required in every type.
- Someone to take the call, depending on the type
- Preview, Automatic and Manual dialers are assigned to agents from the list. The Predictive one works against an inbound campaign and the Blaster against an IVR, which is why those two have no assigned agents.
You will see the word segment a lot in this article. A segment is one pass of the dialer over a group of contacts from the CRM: the ones that meet a set of conditions, in a given order. A dialer can have several segments, one after another, and each one starts wherever you want it to start.
The five types of dialer
The first thing you pick when creating a dialer is the type, and that decision changes everything else: which tabs show up, which fields you fill in and who places the call. It is worth being clear about it before you start, because the type cannot be changed later.
- Preview
- The agent sees the list of contacts assigned to them and decides when to call each one. It is the slowest type and the one that gives the agent the most control, and it works when someone needs to prepare before calling.
- Automatic
- The agent still sees their list, but the calls go out on their own and arrive already connected. It raises the pace a lot without taking away the agent's view of who they are calling.
- Predictive
- The system dials against a list the agent never sees, and it runs ahead: it starts calling before the agents hang up, working out when they will be free. The calls come into an inbound campaign, and only the ones a person answered are passed to an agent.
- Blaster
- It calls with no agents at all. When the customer answers, it hands the call to an IVR, and the IVR does the talking. It is what you want for notices, reminders and automated surveys.
- Manual
- It has no list and no segments. It is how you let an agent dial numbers themselves, with a typification at the end of the call.
These are the tabs you get with each type:
- Preview and Automatic
- General, Script, Typification, Segments, Speech Analytics and Real Time ASR.
- Predictive and Blaster
- General, Segments and Time Conditions.
- Manual
- General and Typification, and the General tab comes down to two fields.
Predictive and Blaster depend on your licence. If you cannot see them in the type selector or in the list filter, your installation does not have them enabled.
The dialer list
The first screen is the list of the dialers on the account, one per row.
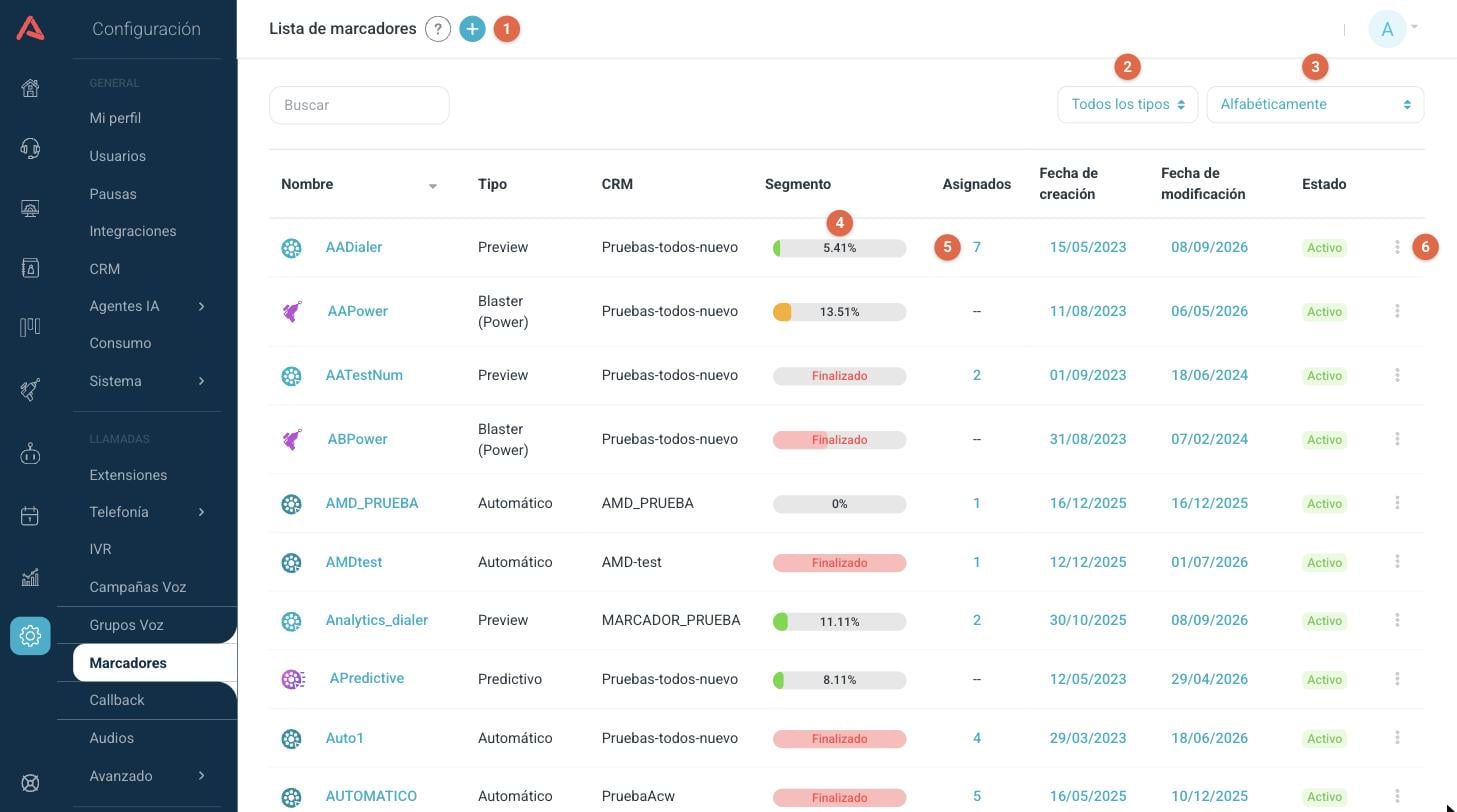
- 1 The + button opens the form for a new dialer.
- 2 Filters the list by dialer type.
- 3 Changes how the list is sorted.
- 4 The progress bar of the segment that is running. You can press it.
- 5 How many users are assigned. You can press this one too.
- 6 The row's action menu.
The icon on the left tells you what type each dialer is without opening it, and hovering over it gives you the name of the type.
- Type
- Preview, Automatic, Predictive, Blaster or Manual.
- CRM
- The CRM this dialer's contacts come from.
- Segment
- How the current segment is doing. It shows the percentage while it runs and the word Completed once it is done.
- Assigned
- How many agents and supervisors the dialer has. Predictive and Blaster show --, because those two are not assigned to anyone.
- Created and Modified dates
- When it was created and when it was last touched. Hover over either one and it tells you who did it.
- Status
- Active or Inactive. An inactive dialer stays on the list but stops dialling.
The default order is alphabetical, and the other two options are there for the same reason: finding what is running today in a hurry. Last segment start puts the most recently started dialer at the top, and Active segments first keeps the operations in progress up front.
The progress bar
The Segment column is not just decoration. Press it and you get a summary of the segment that is running.
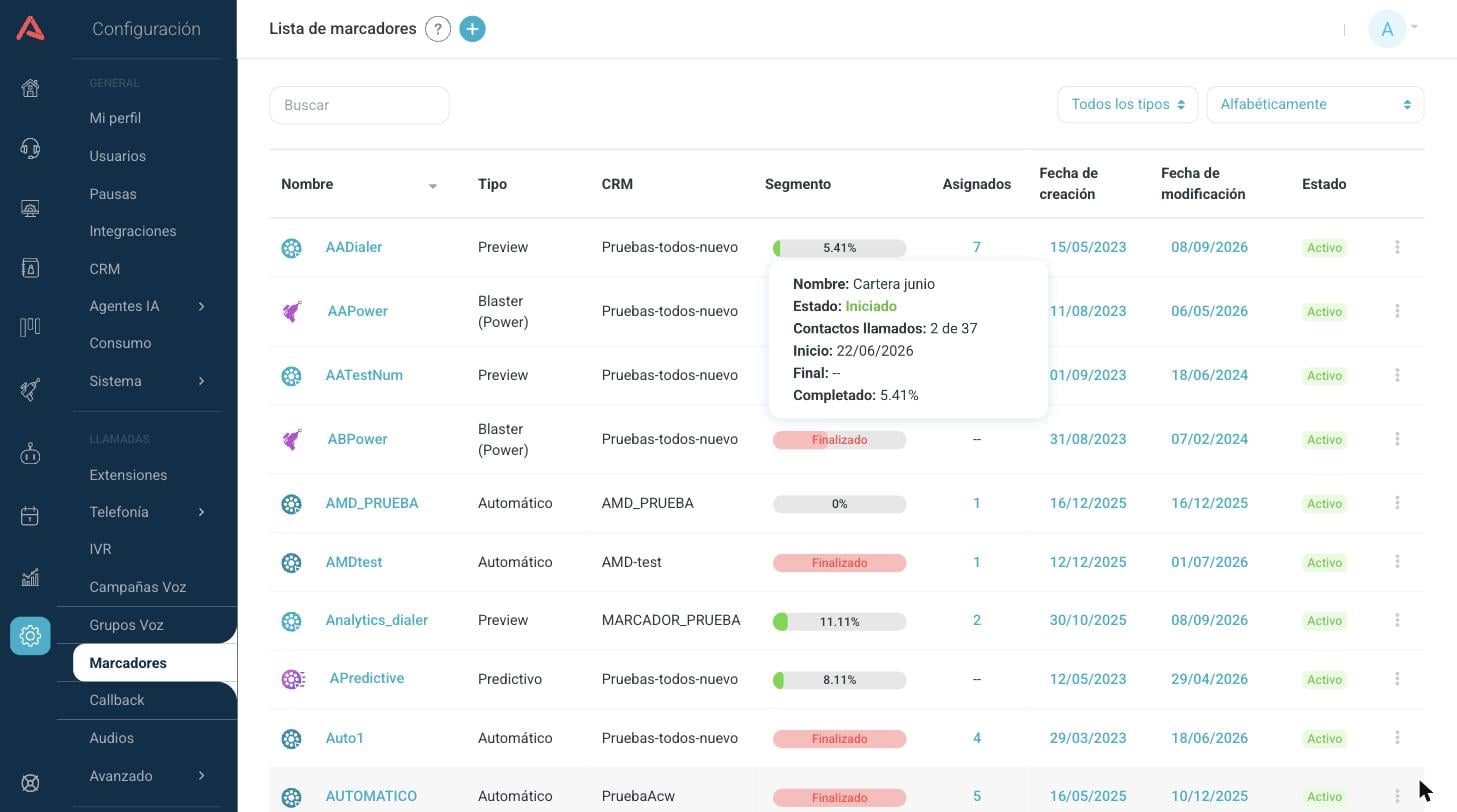
It shows you the segment's name, its status, how many contacts have been called out of how many, when it started, when it finished and the percentage completed. It is the fastest way to answer "how is today's campaign going?" without opening the dialer.
The assigned agents
The number in the Assigned column opens the window where you decide who works this dialer.
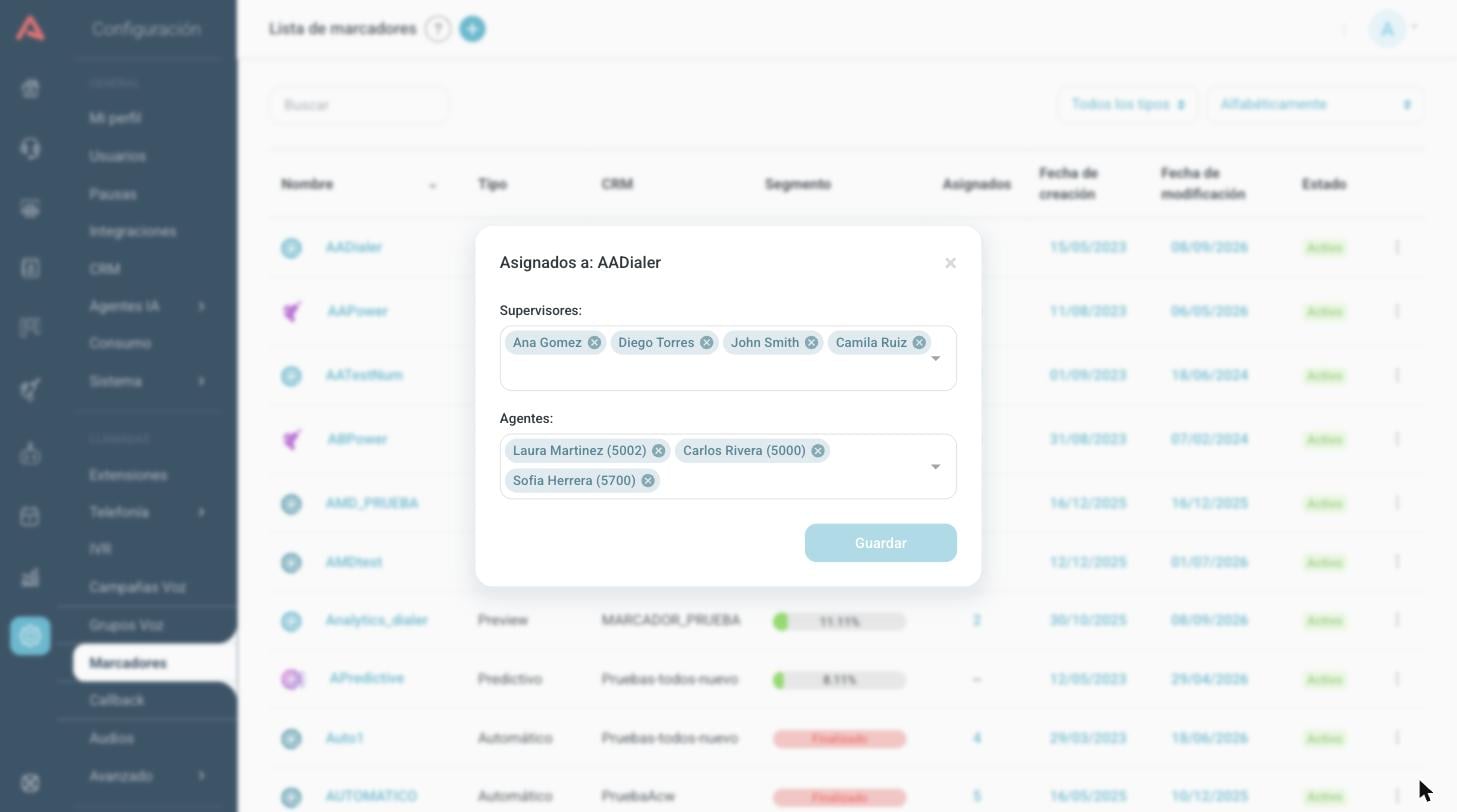
They are assigned separately: supervisors on top, agents with their extension number below. You remove them with the x next to each name and add them by typing in the field. Changes take effect with Save.
A user who has the panel open at that moment is not updated. Audara saves the rest and tells you the names of the ones that were left unchanged. If you need to move somebody who is working, wait until they close their session and save again.
The menu on each row
- Edit
- Opens the full form. It is the same as pressing the name.
- View logs
- The dialer's change history: who touched it, when and what changed.
- Deactivate
- Leaves it Inactive. This is what you want when an operation is over but you need to keep its results.
- Delete
- Removes it. If the dialer has users assigned, the warning tells you before you confirm, because they get removed too.
Creating a dialer
The + button opens New Dialer. It is a form of tabs that saves in one go with the Save button in the header, so you can move between tabs in any order and nothing is recorded until you press it.
Save starts out disabled and lights up when the form meets the minimum. If it does not light up, check in this order: the required fields in General, that the segment has its contacts calculated and, in Blaster and Predictive, that the schedule has no two time ranges on the same day overlapping.
Creating or editing a dialer today needs write permission on Voice Campaigns, on top of the one for Dialers. If you can see the list but creating does not work, that is why. With read-only permission you can open the form and look through it, but Save stays disabled.
When editing, the form is the same with two fields locked: Name and Dialer Type. A dialer does not change its name or its type once created, so both are worth getting right.
General: how it is going to dial
The General tab is the only one that shows up in every type, and it is where the dialling behaviour is defined. The screenshots in this section are of a Preview dialer, which is the one that shows the most shared fields.
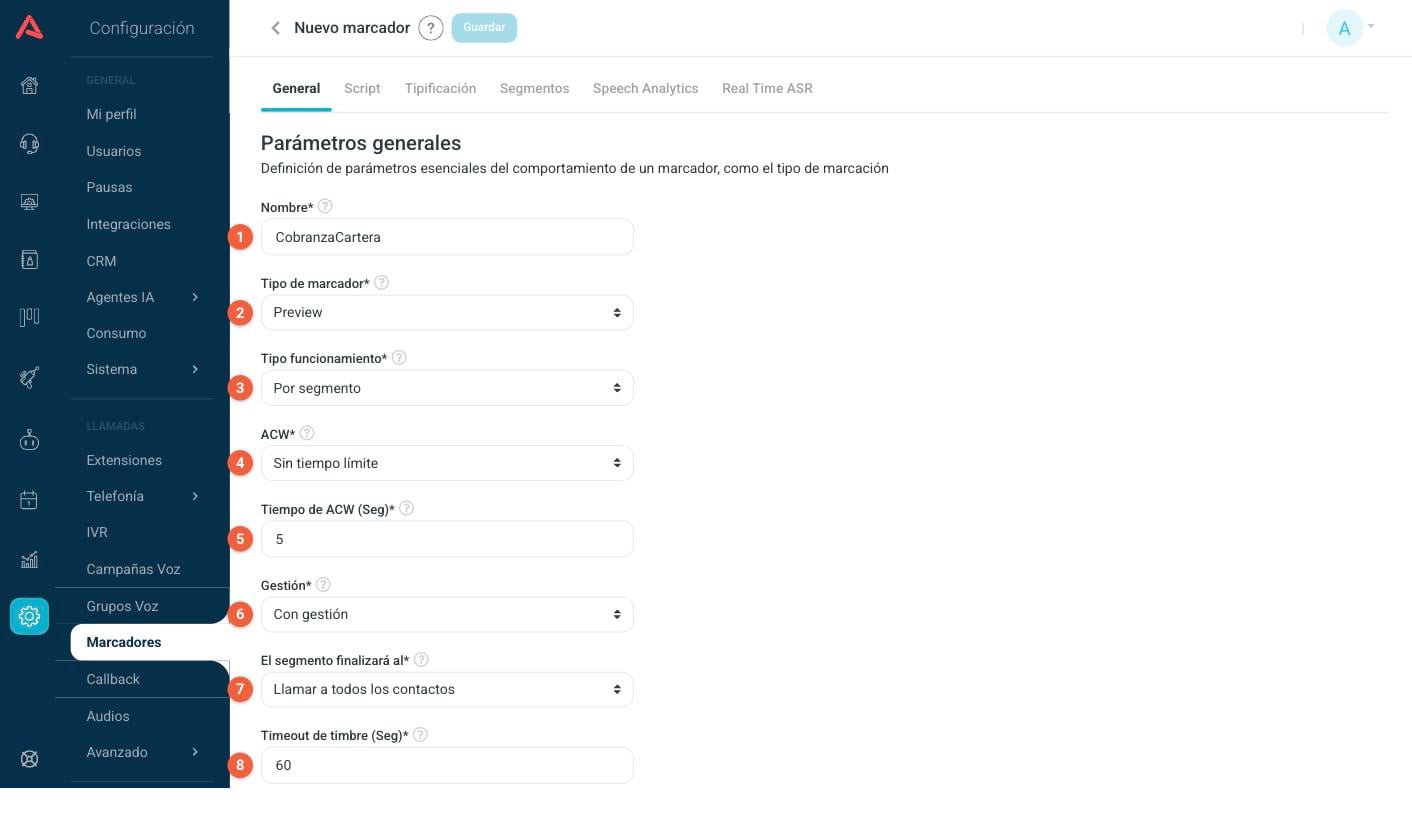
- 1 Name*. What identifies the dialer everywhere in Audara. Three characters minimum.
- 2 Dialer Type*. The one you picked earlier. Changing it here reshapes the whole form.
- 3 Operation Type*. Whether the dialer works through segments of a CRM or dynamically. It only shows up in Preview and Blaster.
- 4 ACW*. What happens to the agent when they hang up.
- 5 ACW Time (Sec)*. How many seconds that window lasts. Minimum 5.
- 6 Manage Type*. Whether the agent records the outcome of the call when it ends.
- 7 Segment ends when*. When the pass is considered finished.
- 8 Timeout (Sec)*. How long it rings before hanging up if nobody answers. Between 20 and 180 seconds.
The Name field quietly strips out anything that is not a letter or a number as you type. Type "Debt collection" and you end up with "Debtcollection", and accents and hyphens disappear the same way. You are not doing anything wrong: the dialer's name is used internally for telephony, and that is why it only accepts those characters. Write the name without spaces from the start and it will not surprise you.
The Operation Type field only shows up in Preview and Blaster, and it means something different in each. In a dynamic Preview there is no list and there are no segments: the dialer sits waiting and it is the agent who looks up the contact to call in the CRM, so the CRM is picked right there in General. That is what is recommended when the dialer handles Callback returns from an inbound campaign. In a Blaster the dynamic mode is a different thing, and it has its own section below.
ACW and Manage Type, which move together
ACW is the time the agent gets after hanging up to finish whatever they could not do during the call. It has three options and they are not interchangeable:
- With Time Limit
- When the time runs out, the agent becomes available on their own and the next call comes in.
- No Time Limit
- The counter keeps running into negative numbers until the agent presses End. The agent decides when they come back.
- No ACW
- There is no gap between calls.
Manage Type decides whether the agent records how the call went: Completed, No Answer, Wrong, Busy, Voicemail, Do Not Call Again, Disrupted or Scheduled. With management on, the dialer knows who to retry and who to leave alone.
The two fields are tied together. If you pick No ACW, Manage Type switches off, because the agent has no moment in which to record anything. And picking any ACW other than that one sets Manage Type to With management by itself. On top of that, Required Typification and Admin Contact can only be turned on with No Time Limit ACW, which is the only one where the agent decides when to move on.
Segment ends when defines when the pass closes, and the two options give very different results:
- Call all contacts
- Calling each one once is enough, whatever the call came to.
- Manage all contacts
- Every contact has to end up closed: completed, or with an outcome that says there is no retry, like wrong number or do not call again. A number that never answers keeps the segment open.
The second half of General
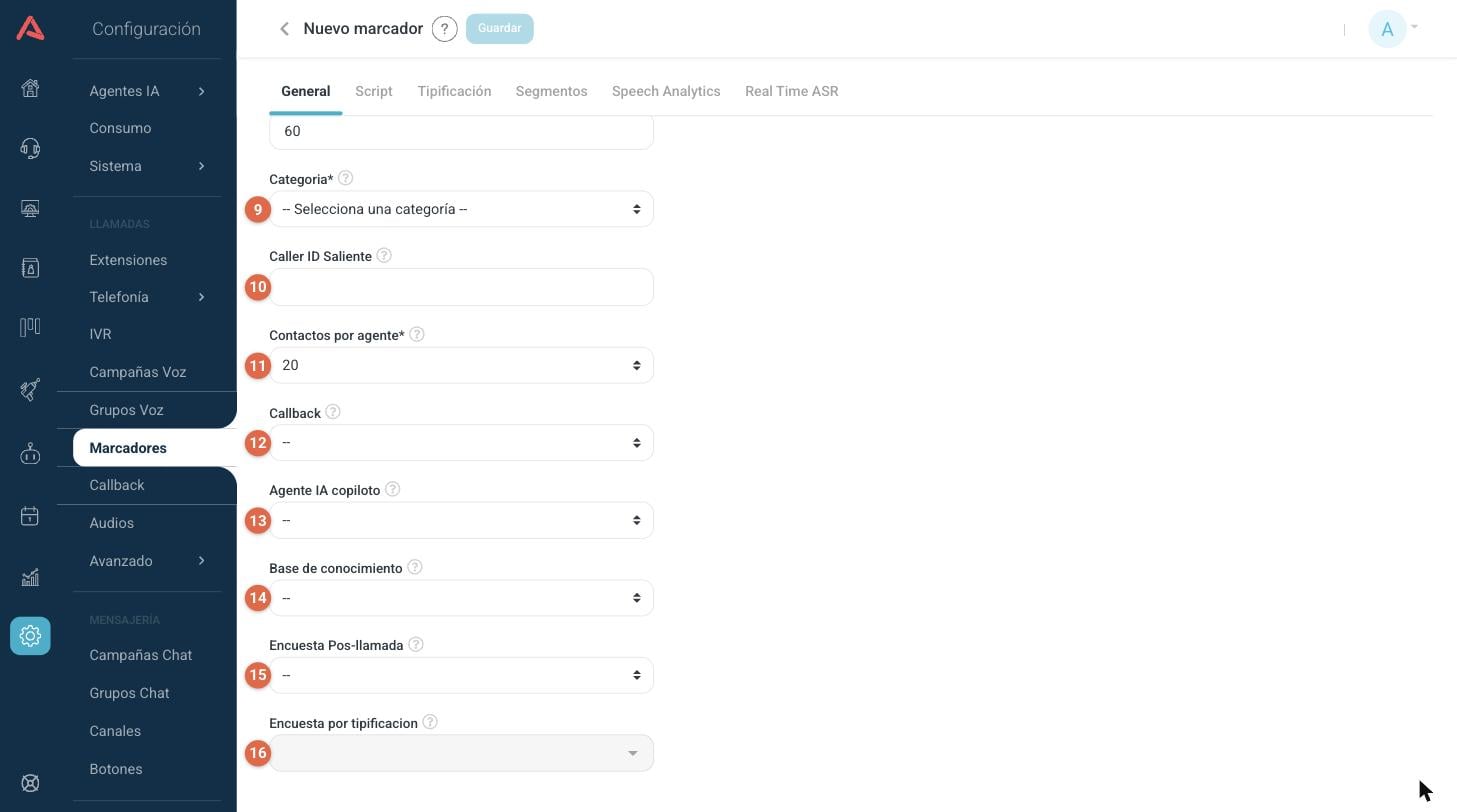
- 9 Category*. Where the calls go out through. It comes from the outbound route categories.
- 10 Caller ID Outgoing. The number shown to whoever receives the call, when the trunk asks for it.
- 11 Contacts per Agent*. How many of the segment's contacts each agent gets for their pending list.
- 12 Callback. The Callback this dialer schedules return calls with.
- 13 AI Agent Copilot. The AI agent the human agent can talk to while handling the call.
- 14 Knowledge Base. Where that copilot gets its answers from.
- 15 Post-Call Survey. The survey-type IVR that plays when the call ends.
- 16 Survey by typification. Which typifications send the call to that survey.
Survey by typification starts out disabled and only becomes available once you have picked a survey above, which makes sense: first the survey, then who gets sent to it.
Several of these fields lock up once the dialer has a started segment, among them Category, Caller ID, Contacts per Agent, Callback, ACW and Manage Type. It is not a fault: these are things that cannot be changed with calls going out. To touch them, end the segment.
What the Automatic dialer adds
The Automatic dialer uses the same General tab as the Preview one and adds four fields, which are precisely the ones that make the calls go out by themselves.
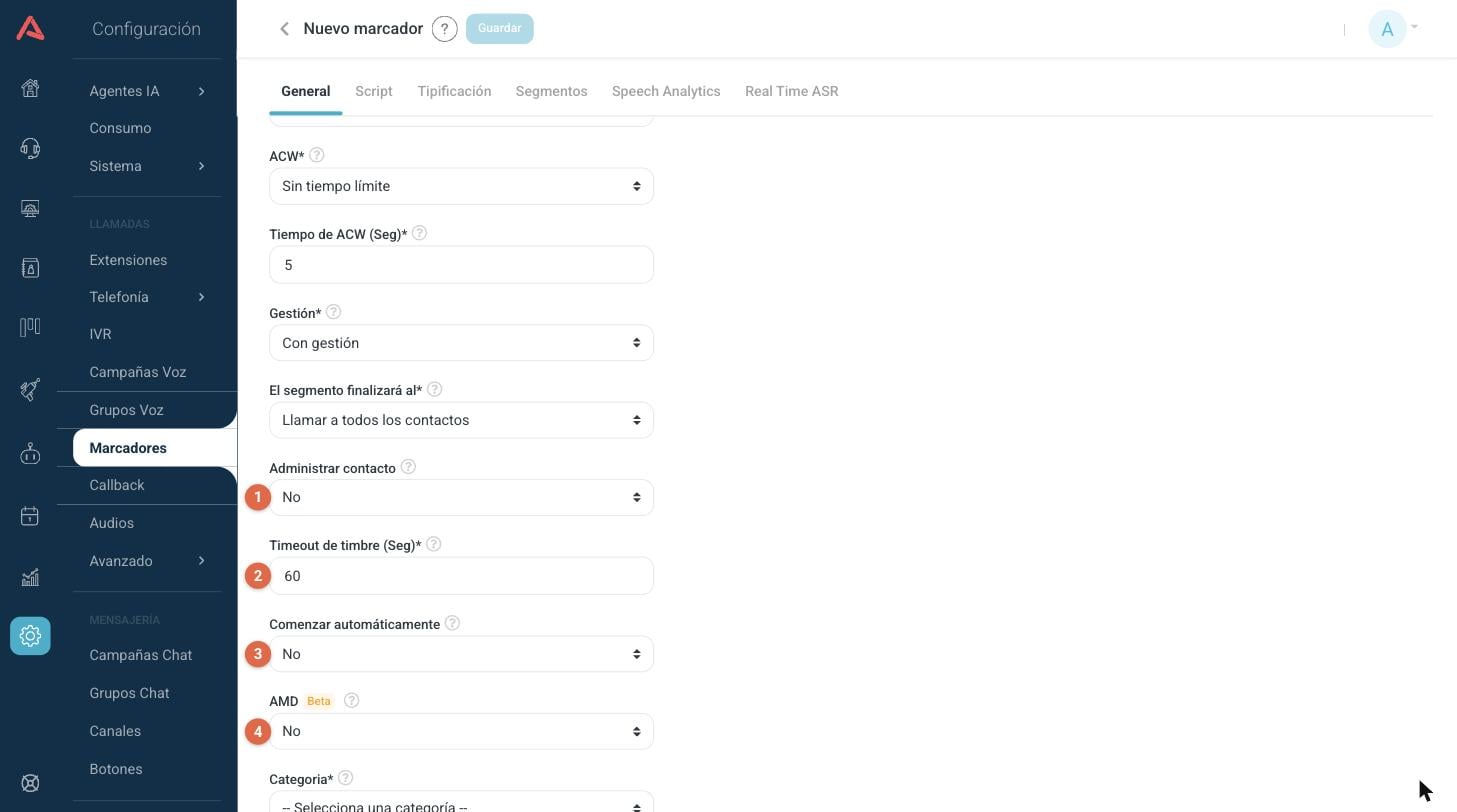
- 1 Admin Contact. Lets a contact have several phone numbers and lets the agent decide, on hanging up, whether to call the next contact, the next number or try the same one again.
- 2 Timeout (Sec)*. How long it rings before the call counts as unanswered.
- 3 Auto-start. Whether the dialer starts as soon as the agent logs in, or the agent has to press Start in their panel.
- 4 AMD. Answering machine detection: the dialer works out whether a person or a machine picked up before passing the call to the agent.
Admin Contact only becomes available with No Time Limit ACW, because it asks the agent for a decision on hanging up, and that decision needs a moment with no clock running.
Auto-start set to No is the comfortable choice for an operation that begins the day in a meeting: the agents log in, get organised and start when they are ready. Set to Yes, the first call lands on somebody who is still putting their headset on.
Predictive: the system works out the pace
The Predictive dialer hands lists to nobody. It dials against an inbound campaign, and only the calls a person answered enter that campaign and reach an agent. The rest, voicemail and numbers that do not respond, is dropped along the way.
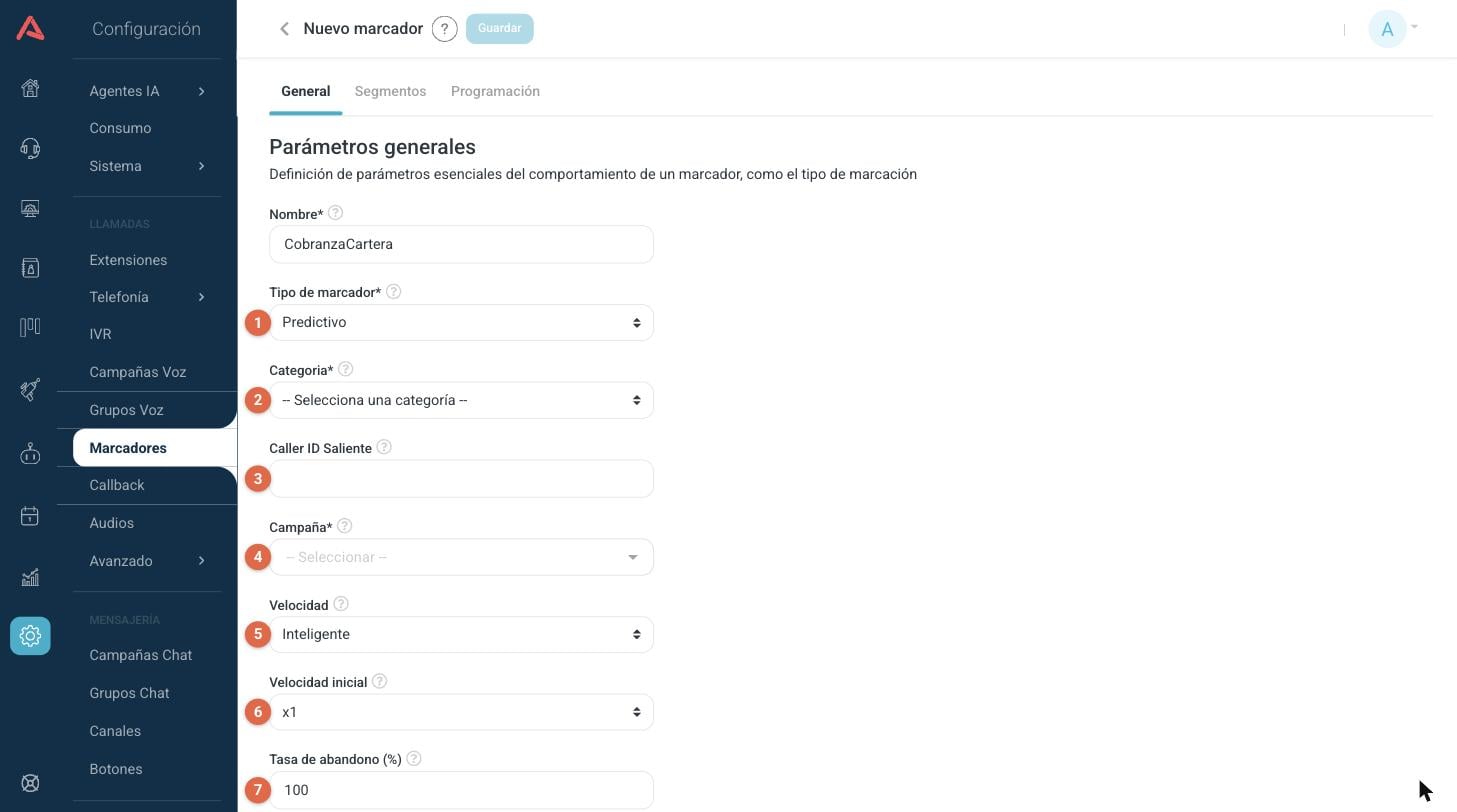
- 1 Dialer Type* set to Predictive. Notice how the tabs come down to three.
- 2 Category*. The usual one: where the calls go out through.
- 3 Caller ID Outgoing.
- 4 Campaign*. The inbound campaign that receives the answered calls. It is required.
- 5 Predictive Speed. Whether you set the pace or the system works it out.
- 6 Initial Speed. How many calls per agent it starts with.
- 7 Abandon Rate (%). The ceiling on answered calls that can be lost.
The Campaign field only lists inbound campaigns that have the Predictive dialer option switched on and are not already taken by another dialer. If you cannot see the one you are looking for, check it in Voice Campaigns before going any further here.
Speed, which goes by two names
Predictive Speed has two modes, and the field underneath changes its name depending on which one you pick:
- Manual
- You set the pace and there it stays. The field underneath is called Fill Rate and goes up to x8.
- Smart
- The system adjusts the pace on its own, watching the abandon rate, the fill rate and the retries. The field underneath becomes Initial Speed, goes up to x3 and is only a starting point.
Abandon Rate only shows up with Smart speed, because it is the limit the automatic calculation respects. The lower you set it, the more cautiously the system dials. The minimum it accepts is 10.
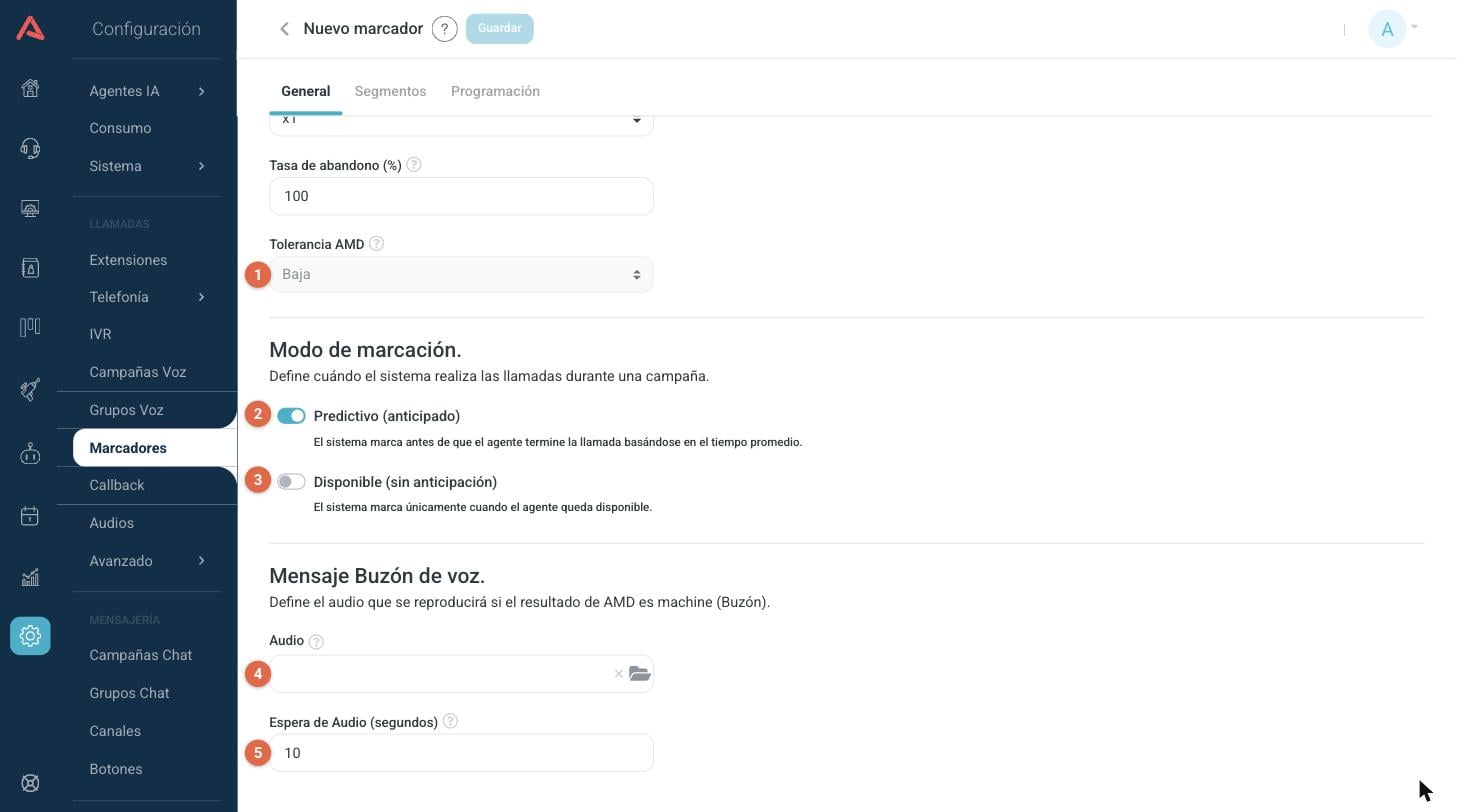
- 1 AMD Tolerance. How strict the answering machine detection is.
- 2 Predictive (Anticipated). The system dials before the agent hangs up, working from the average call duration.
- 3 Available (No Anticipation). The system only dials once an agent is already free.
- 4 Audio. The audio that plays if a voicemail answered.
- 5 Audio Wait (seconds). How long it waits before playing it. Between 1 and 20.
The two dial modes are the difference between speed and zero dropped calls. With Predictive (Anticipated) the agents' time is used better, but every now and then somebody answers and there is nobody to take them. With Available (No Anticipation) that never happens, at the cost of a slower pace.
AMD Tolerance is currently fixed at Low and cannot be changed. It appears on screen greyed out so you know how sensitive the detection is set to be.
Blaster: calling with no agents
The Blaster is the only one that needs nobody logged in. It dials on its own and, when the customer answers, hands them to an IVR. The IVR is what plays the message, offers options or runs the survey.
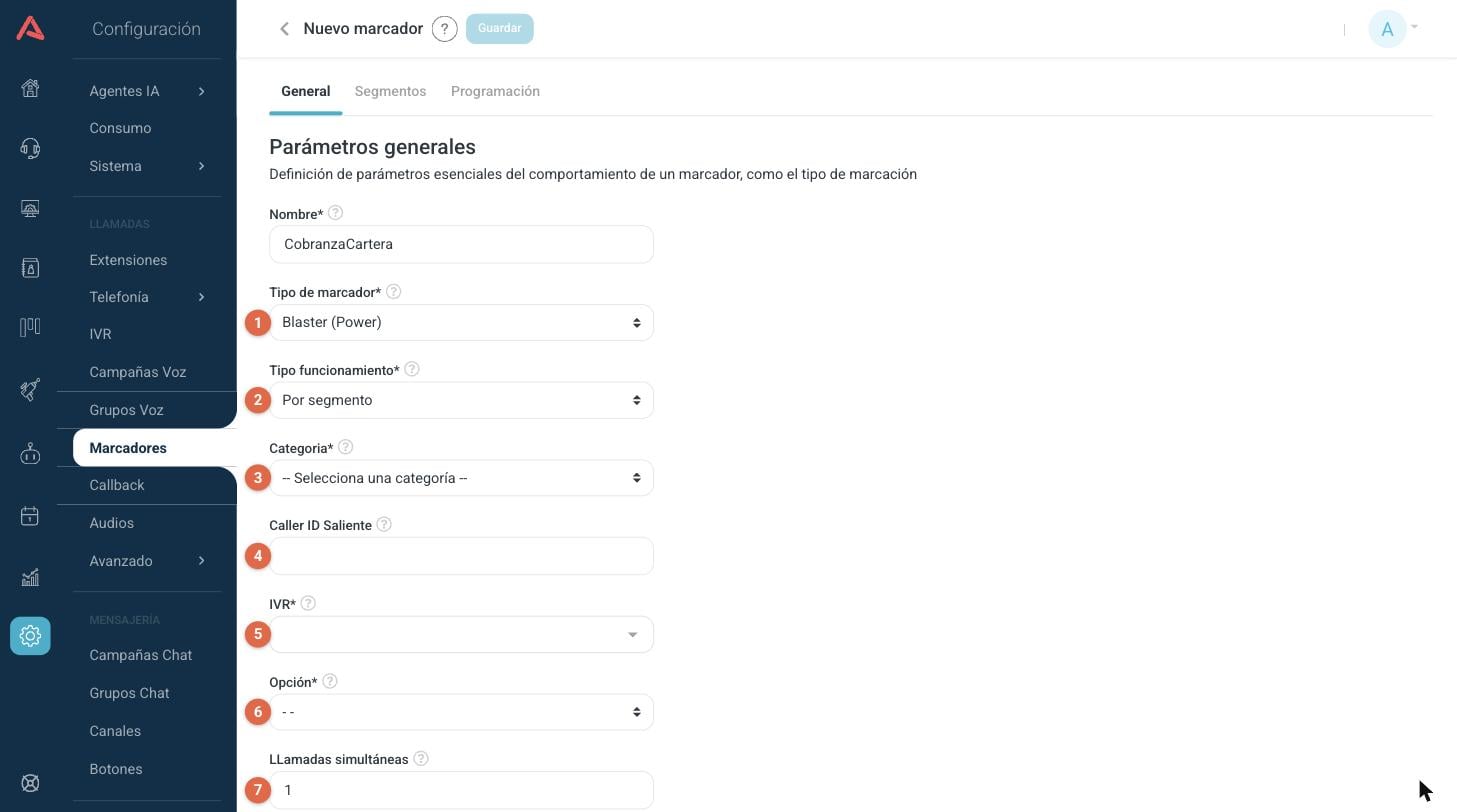
- 1 Dialer Type* set to Blaster.
- 2 Operation Type*. By segment or dynamic.
- 3 Category*.
- 4 Caller ID Outgoing.
- 5 IVR*. The IVR that takes over when the customer answers.
- 6 Option*. Which option of that IVR the call comes in through.
- 7 Simultaneous calls. How many calls it keeps up at once.
Simultaneous calls has a ceiling set by your licence. If you type a higher number, the field brings it down on its own to the maximum you have contracted.
Dynamic mode
The Operation Type field shows up in Preview and in Blaster, and it means something different in each. What it does in Preview is further up, in the General section. In a Blaster it is a change of substance:
- By Segment
- The dialer works like all the others: a CRM, a set of conditions, a list of contacts it works through until it is done.
- Dynamic
- The dialer has no list. It stays switched on waiting for somebody to send it contacts while it runs, from an automation for instance. It dials as they arrive and never completes on its own.
In dynamic mode the Segments tab disappears, because there is no list to build and no CRM to filter. If you go looking for it and it is not there, check this field.
Time Conditions: when the dialer may call
Predictive and Blaster dial on their own, so they need to know when they are allowed to. That is the Time Conditions tab, and it does not show up in the other types because there the schedule is set by the agent logging in to work.
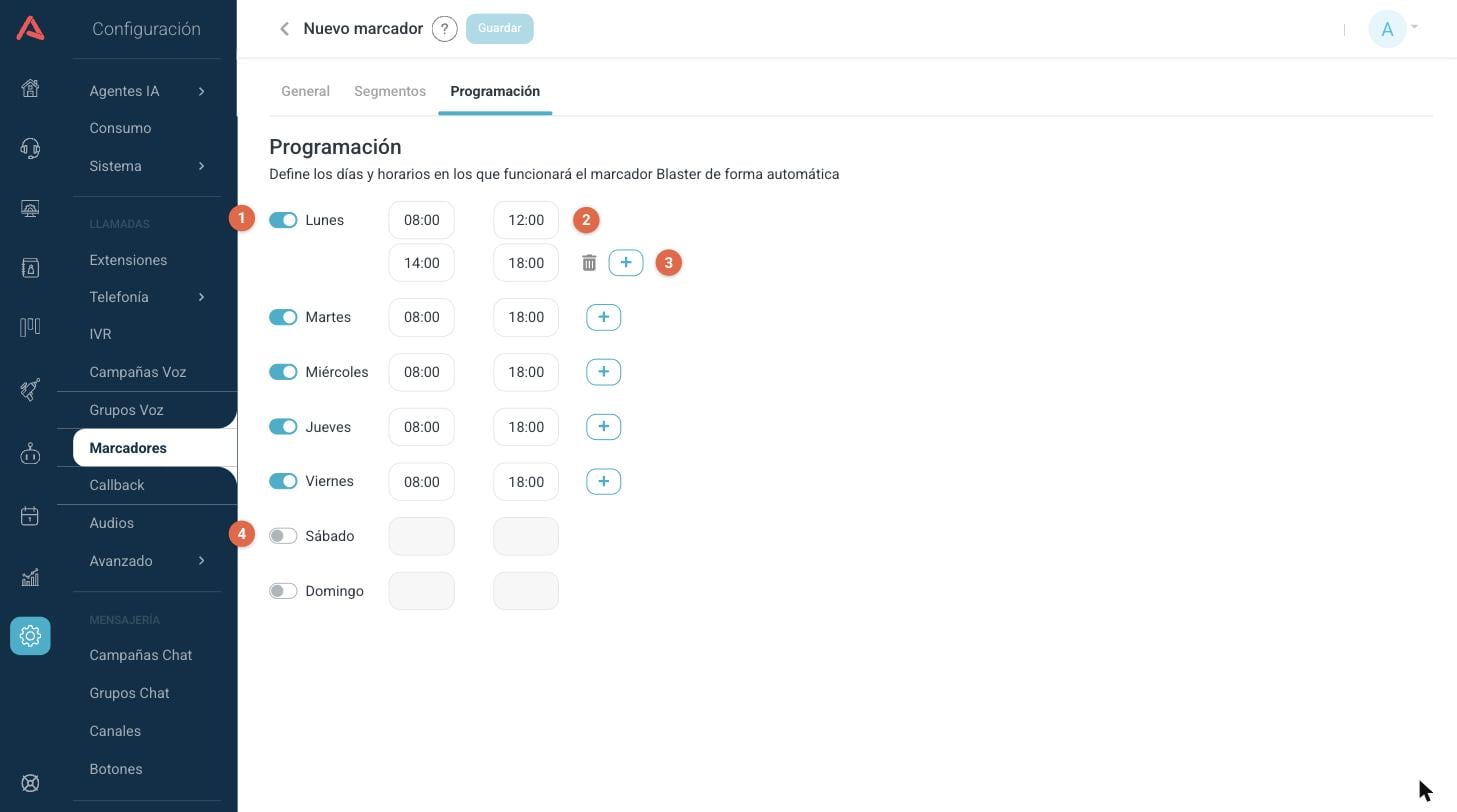
- 1 The switch for each day. Off means no calls that day.
- 2 The time range, from one hour to another, in 15 minute steps.
- 3 The + button adds another range to the same day, and the bin deletes the one you no longer want.
- 4 A day that is switched off leaves its hours greyed out.
Each day takes up to four ranges, which is what you need to split the working day around lunch or to call only during the hours when people pick up. What you cannot do is have two ranges on the same day overlap: if that happens, Audara tells you and will not let you save until you fix it.
Two ranges from 08:00 to 12:00 and from 14:00 to 18:00 beat a single one from 08:00 to 18:00 if nobody answers at lunchtime. The dialer does not spend calls on dead hours and the contact rate looks better for it.
Script: what the agent reads
The Script tab is what the agent reads in their panel when the call comes in. It is in Preview and Automatic, which are the types where there is a person doing the talking.
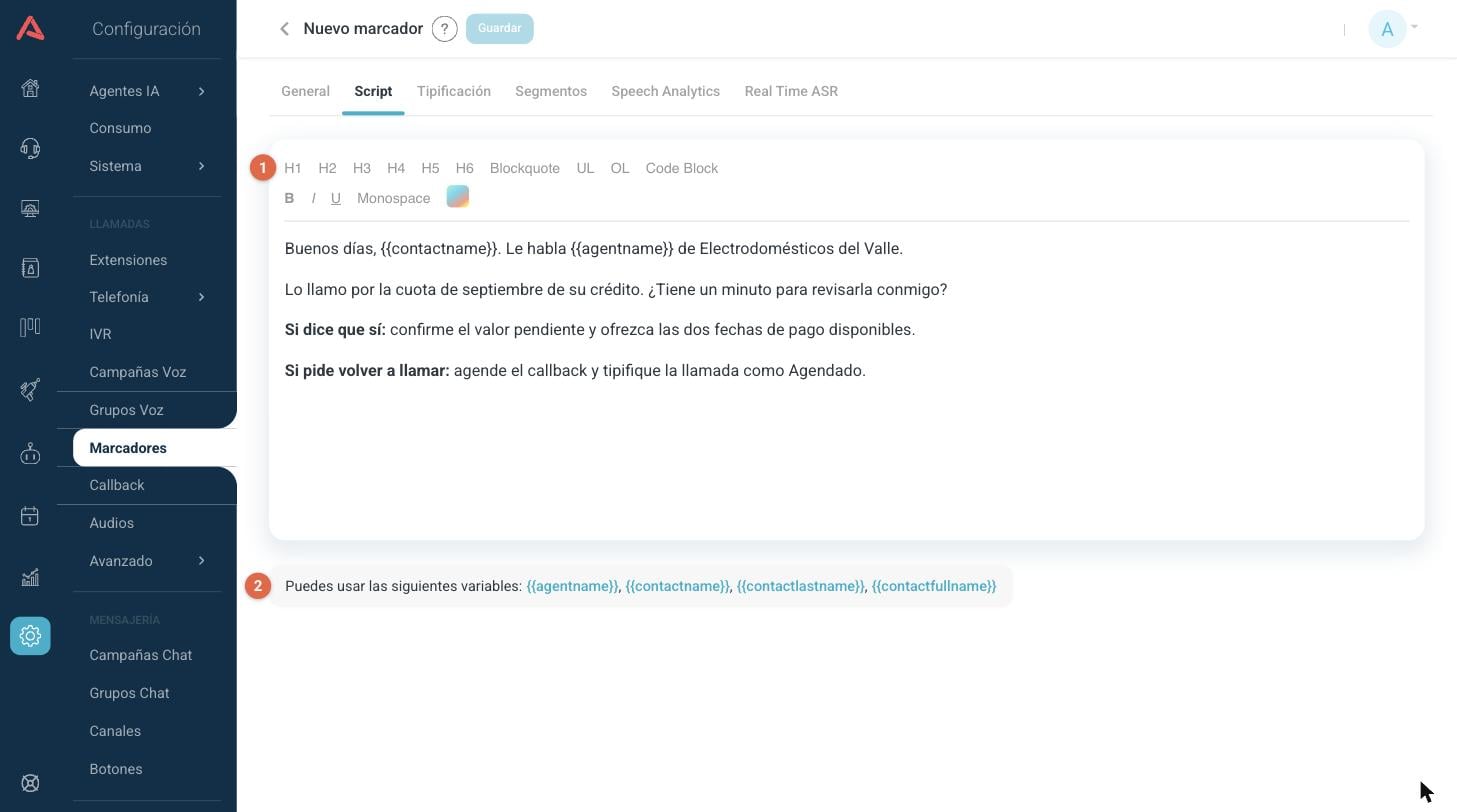
- 1 The formatting bar: headings, bold, italics, lists, quotes and code blocks.
- 2 The variables you can use inside the text.
Variables are written exactly as they appear there and are replaced on their own when the agent sees the script:
- {{agentname}}
- The name of the agent taking the call.
- {{contactname}}
- The name of the contact being called.
- {{contactlastname}}
- Their last name.
- {{contactfullname}}
- Their full name.
A script is worth more if, on top of the greeting, it tells the agent what to do at each fork in the conversation. A couple of lines in bold for "if they say yes" and "if they ask you to call back" save the agent from improvising, and make the whole operation answer the same way.
Typification: what the agent records
Typifying is putting an outcome on the call. The Typification tab is in Preview, Automatic and Manual, and it has two parts: the tags that exist, and how they are put to the agent.
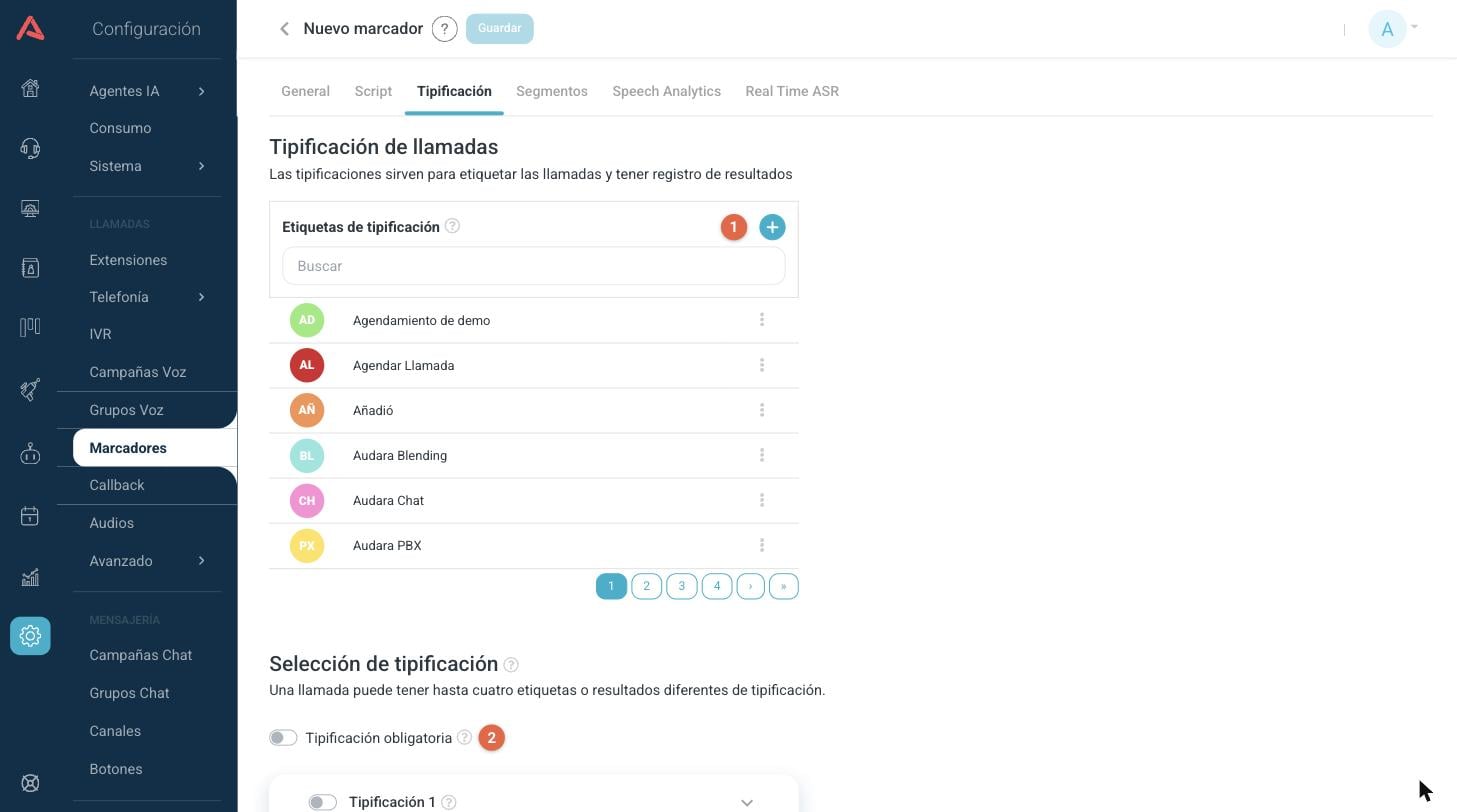
- 1 The + button creates a new tag. The menu on each row edits or deletes it.
- 2 Required Typification: the agent cannot move on to the next call without typifying.
The list on top is the account's catalogue of tags, with its own search box and paging. You can create as many as you need.
Required Typification can only be switched on with No Time Limit ACW. It makes sense: if the ACW runs out on its own, you cannot demand that the agent gets something recorded before the next call comes in. If the switch is greyed out, go to General and change the ACW.
Creating a tag
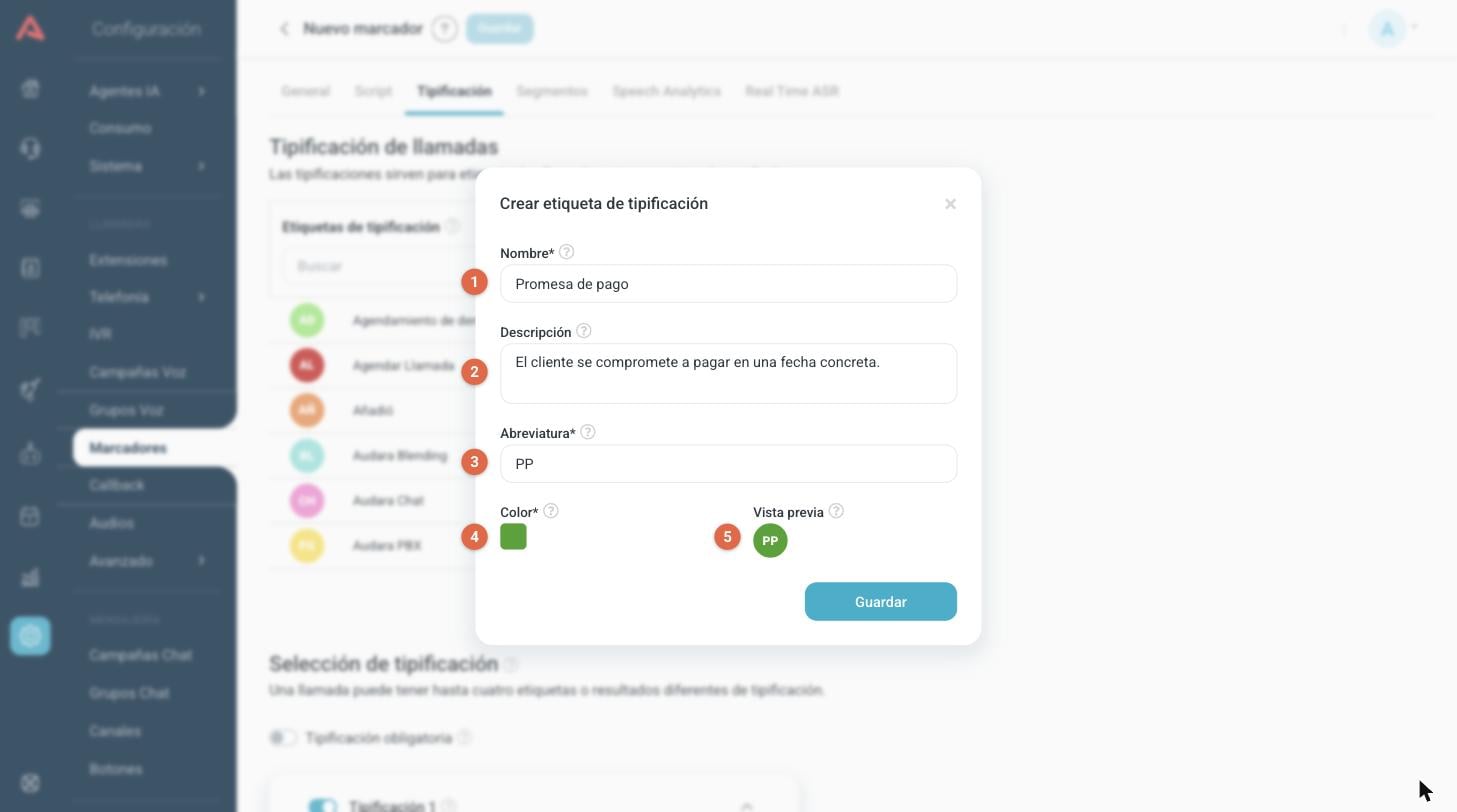
- 1 Name*. What the agent sees in their panel. Three characters minimum.
- 2 Description. What this tag is for. Informational only.
- 3 Abbreviation*. The letters that go inside the coloured circle.
- 4 Color*. The one that identifies the tag throughout the application.
- 5 Preview. How it is going to look.
Tags show up in reports, in the contact history and in the supervisor panel, so the colour and the abbreviation are not a detail: they are how the tag is recognised at a glance.
The four typifications
One call can end up with as many as four things recorded on it. They are not four loose tags: they are four different questions that you put together.
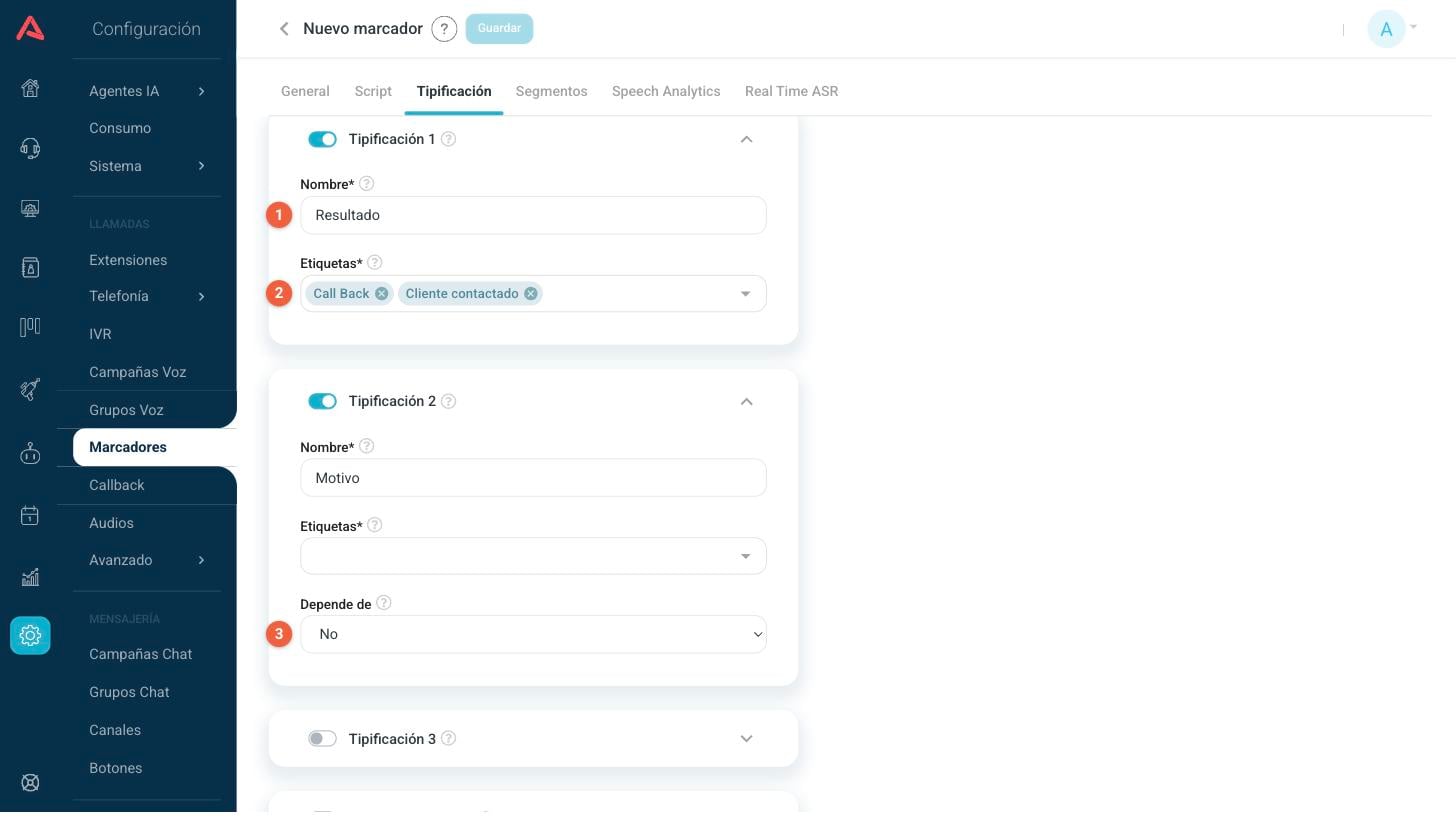
- 1 Name*. What the question is called in the agent's panel.
- 2 Tags*. The possible answers. The agent picks exactly one.
- 3 Depends on. Whether this question only appears based on what was answered in the previous one.
The first three work the same way: a name, a list of tags, and the agent marks one. The fourth, Open Typification, is different: it is a free text field for the agent to write down whatever does not fit into a tag.
Each typification has its own switch, so you can use just one or all four. And Depends on chains them: Typification 2 can appear only when a certain answer was given in Typification 1, which saves asking the agent why there was no contact when there was.
Two well thought out typifications get you further than four. The first answers "what happened?" and the second "why?", with the second depending on the first. Four required questions on every call end up with agents always marking the first option.
Conversion
At the end of the tab you pick which of all those answers counts as a good outcome.
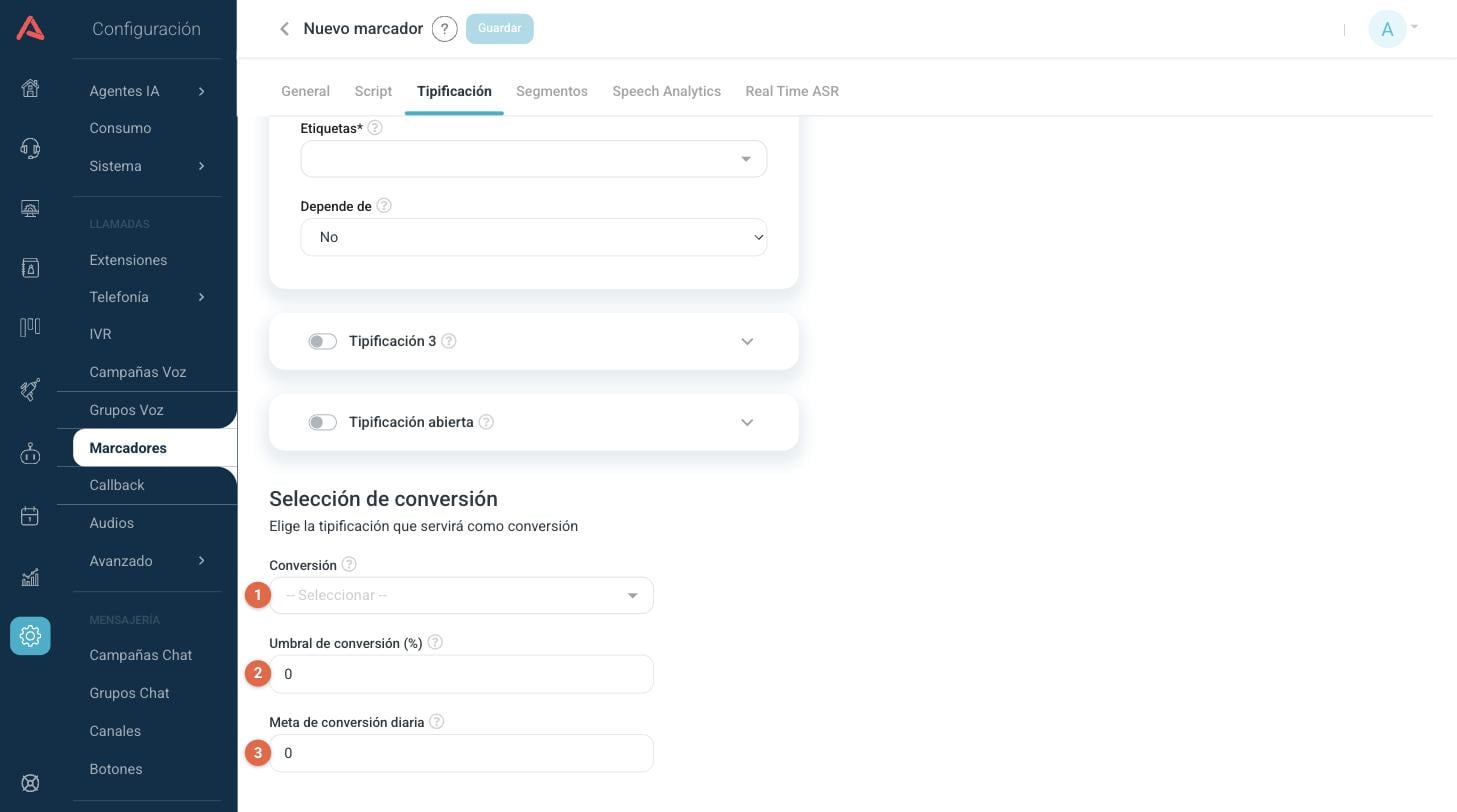
- 1 Conversion. The tag that counts as a sale, or as an agreement, or as whatever the goal happens to be.
- 2 Conversion threshold (%). The percentage above which the agent sees their number in green. Below it, they see it in red.
- 3 Daily conversion goal. How many conversions are expected per day. On reaching it, the agent earns a badge.
Segments: who is going to be called
The Segments tab is where the dialer gets its contacts. First you pick the CRM, then you build the passes.
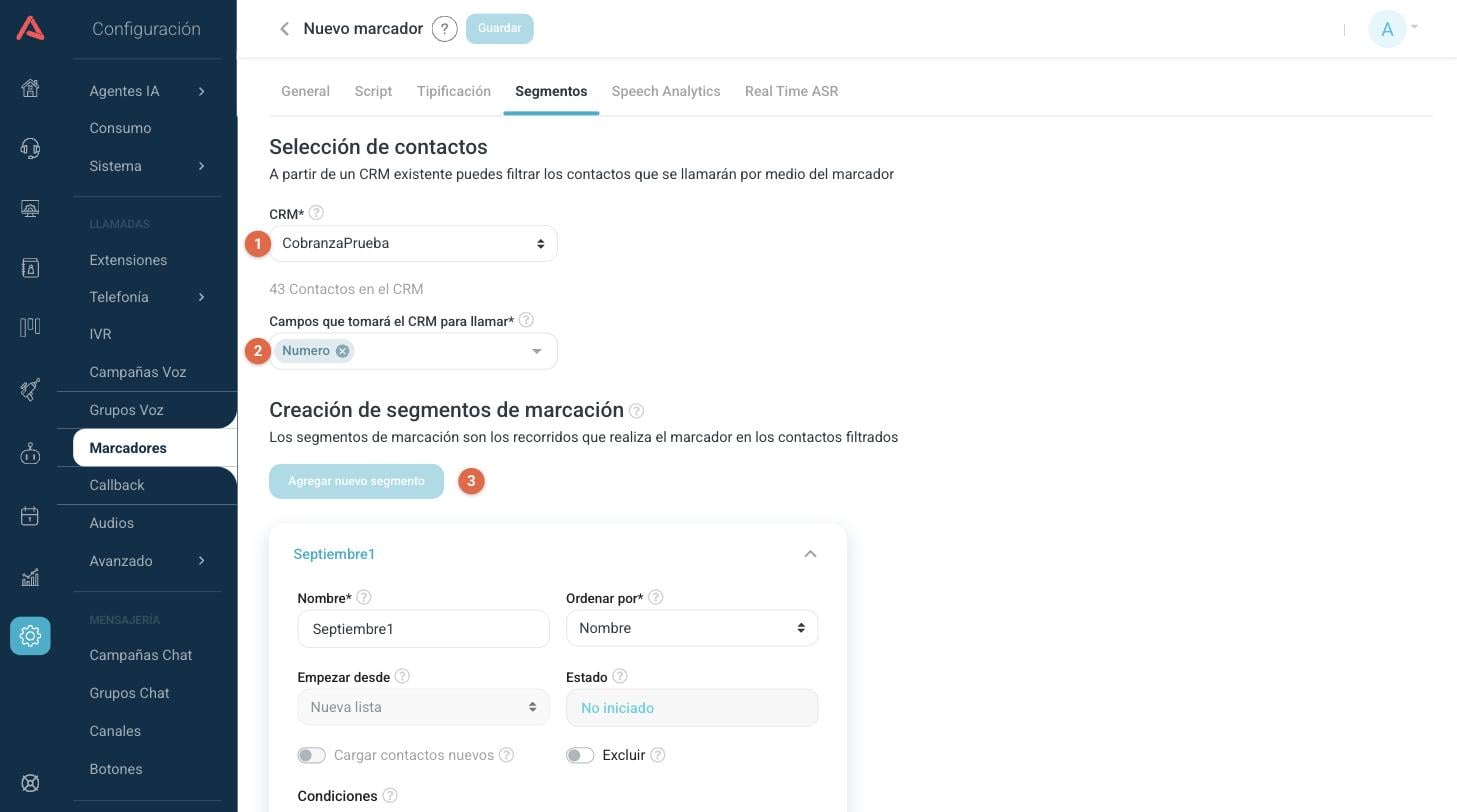
- 1 CRM*. Where the contacts come from. Underneath it tells you how many it has.
- 2 Fields taken by the CRM for calling*. Which phone fields are used, and in what order they are tried.
- 3 Add New Segment creates the next pass.
The CRM cannot be changed once the dialer has started its first segment. Pick it carefully from the start, because changing it later means creating another dialer.
In Fields taken by the CRM for calling you can put several phone numbers of the same contact. The dialer works through them one by one until it gets a call through, so the order matters: mobile first and landline second is not the same as the other way round.
The conditions of a segment
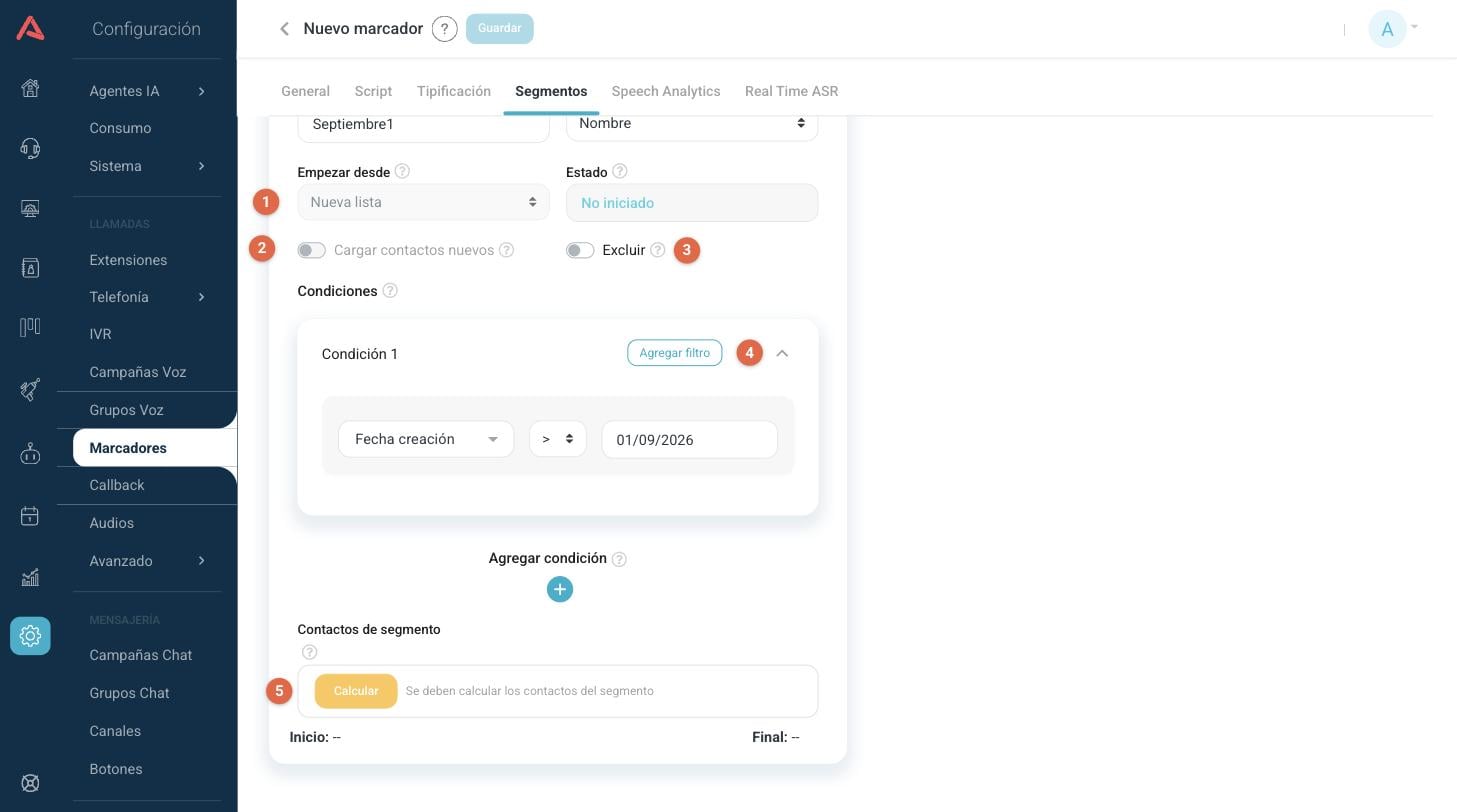
- 1 Start On. Whether the segment starts from the whole CRM or from the results of a previous segment.
- 2 Load New Contacts. Includes the contacts that entered the CRM after that previous segment.
- 3 Exclude. Turns the filter around: in come the ones that do not meet the conditions.
- 4 Add Filter adds another rule within the same condition.
- 5 Calculate counts how many contacts are left with what you have built.
Each segment also has a Name, an Order by that decides the calling order, and a Status that you do not touch because the system keeps it:
- Not Started
- No call has gone out yet. It is the only status in which the segment can still be modified.
- Started
- It is calling. It can no longer be edited, but it can be ended.
- Paused
- Stopped on purpose, ready to resume. It only exists in the Predictive dialer.
- Completed
- Finished, either because it called everyone or because somebody closed it.
You have to press Calculate before saving. While the segment has no calculated contacts, the Save button in the header stays disabled, and that is one of the most common reasons a new dialer looks like it refuses to be created.
Conditions filter on the CRM's fields: creation date, city, balance, whatever that CRM has. A segment with two conditions asks for both to be met, and within one condition each filter adds another rule. With Exclude switched on you call exactly the ones that were left out, which is the short way of saying "everybody except the ones who already paid".
Chaining segments
The point of segments is that they chain. When the first one finishes, you create the next with Start On pointing at it, and give it new conditions based on what happened: the ones who did not answer, the ones left scheduled, the ones who said to call tomorrow.
You can create as many as you need. Load New Contacts is there so the second pass also includes the people who entered the CRM in between, and that is why it is disabled when the segment starts from a new list: there is no earlier pass to bring anything from.
While the segment runs
With a segment started, the buttons for managing it appear. End closes it, and it asks for a confirmation because there is no going back. Pause and Unpause only exist in the Predictive dialer.
Once the segment is completed, Download Contacts shows up with three lists: all the contacts, the ones that never got called and the deleted ones. It is how you get what was left over so it can be worked separately.
Speech Analytics: going through the recordings
The Speech Analytics tab is in Preview and Automatic, and it is what turns recordings into something you can review without listening to all of them. It transcribes the calls, scores them against quality rules and produces a summary.
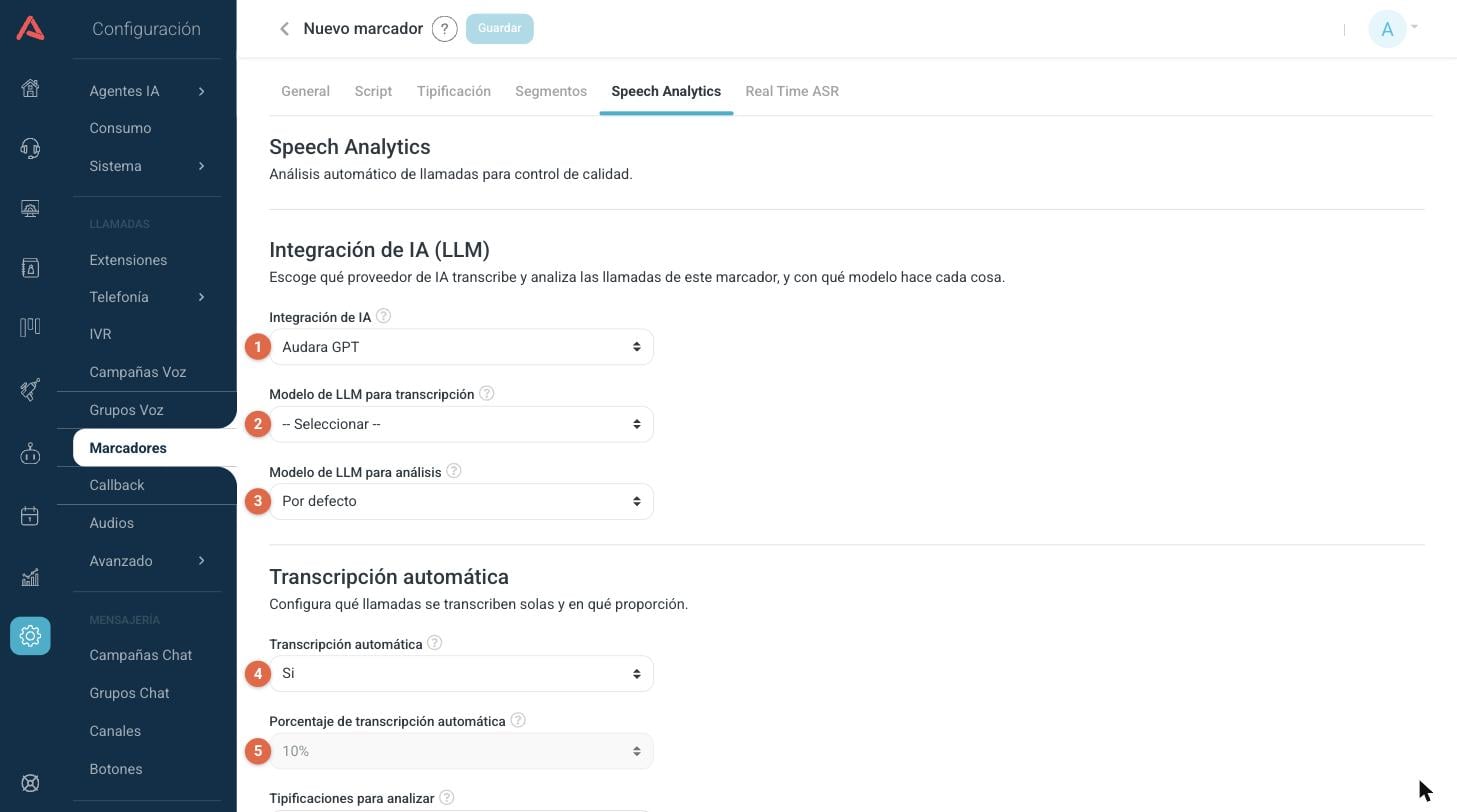
- 1 AI integration. The provider that works this dialer's calls.
- 2 LLM model for transcription. The one that turns the audio into text.
- 3 LLM model for analysis. The one that reads that transcript and answers.
- 4 Automatic transcription. Whether calls are transcribed on their own.
- 5 Automatic transcription percentage. What proportion of the calls gets transcribed.
Both model fields have a Default option, which means "whatever the integration has configured". It is convenient, but bear in mind that if somebody changes the model over there, it changes for every dialer left on Default.
Nothing in this tab works without an AI integration picked at the top. If you see the notice that says so, start there. And if you pick Gemini, keep in mind that Gemini analyses but does not transcribe outbound calls: the analysis runs over whatever transcripts the live transcription has left behind.
The Typifications to analyze field, below the percentage, lets you transcribe only the calls that ended with certain typifications. It is how you spend the analysis where it matters instead of scattering it at random.
Normalization and QA rules
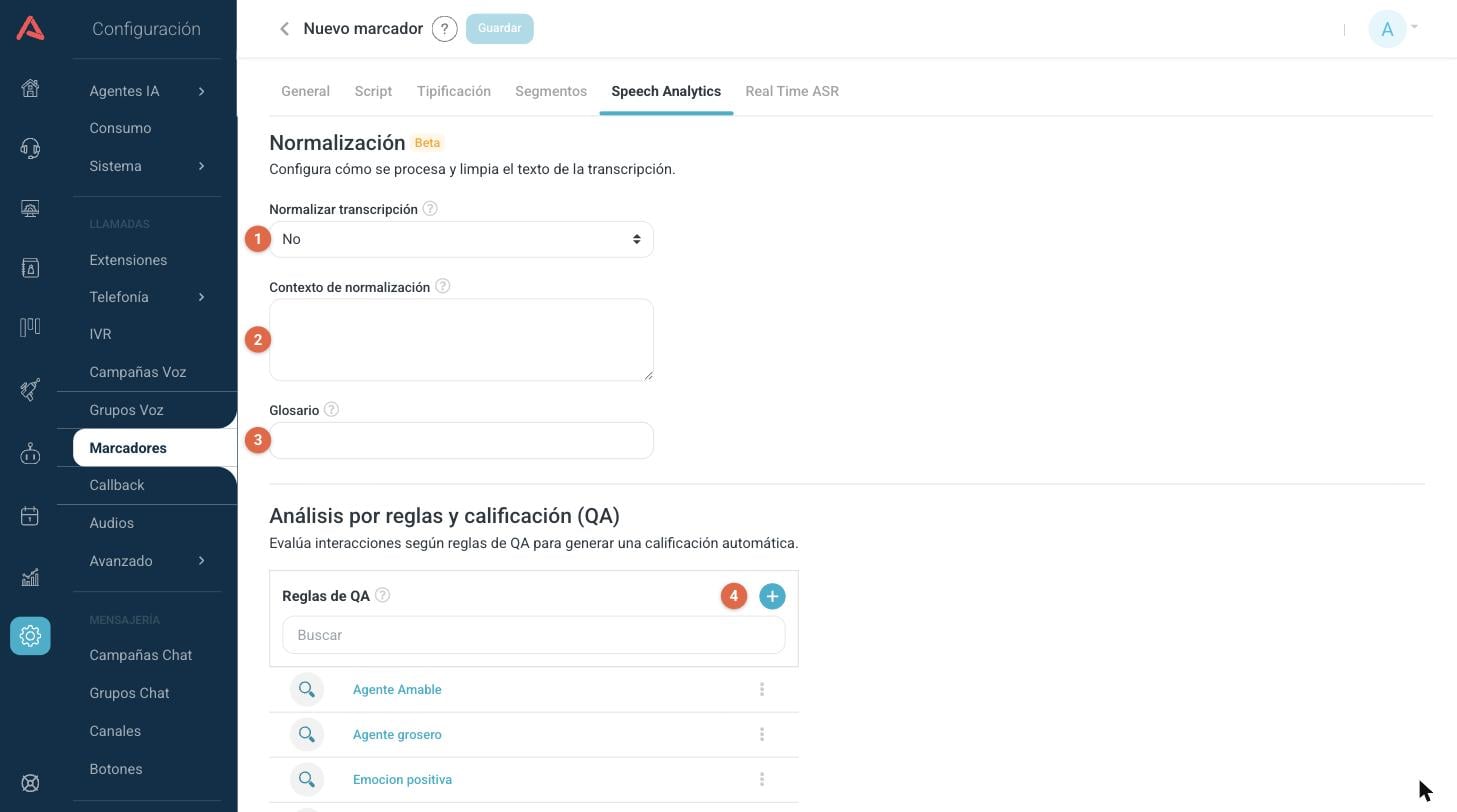
- 1 Normalize Transcript. Whether the text is cleaned up before being analysed.
- 2 Normalization Context. What these calls are about, so the cleanup understands them.
- 3 Glossary. The words specific to your operation that get transcribed wrong.
- 4 The + button creates a new QA rule.
The glossary is one of the things you notice most: product names, brands and surnames that the transcription writes down by ear. Putting them in there saves you reviewing transcripts that say something else entirely.
A QA rule is a quality criterion. It can be scored by matches, looking for words in the transcript, or by AI analysis. Each rule defines whether it applies to the agent, to the customer or to both, and whether it counts towards the call's score. The rules you create are then picked below, under Selected QA Rules, which are the ones that run on this dialer.
Summary and emotions
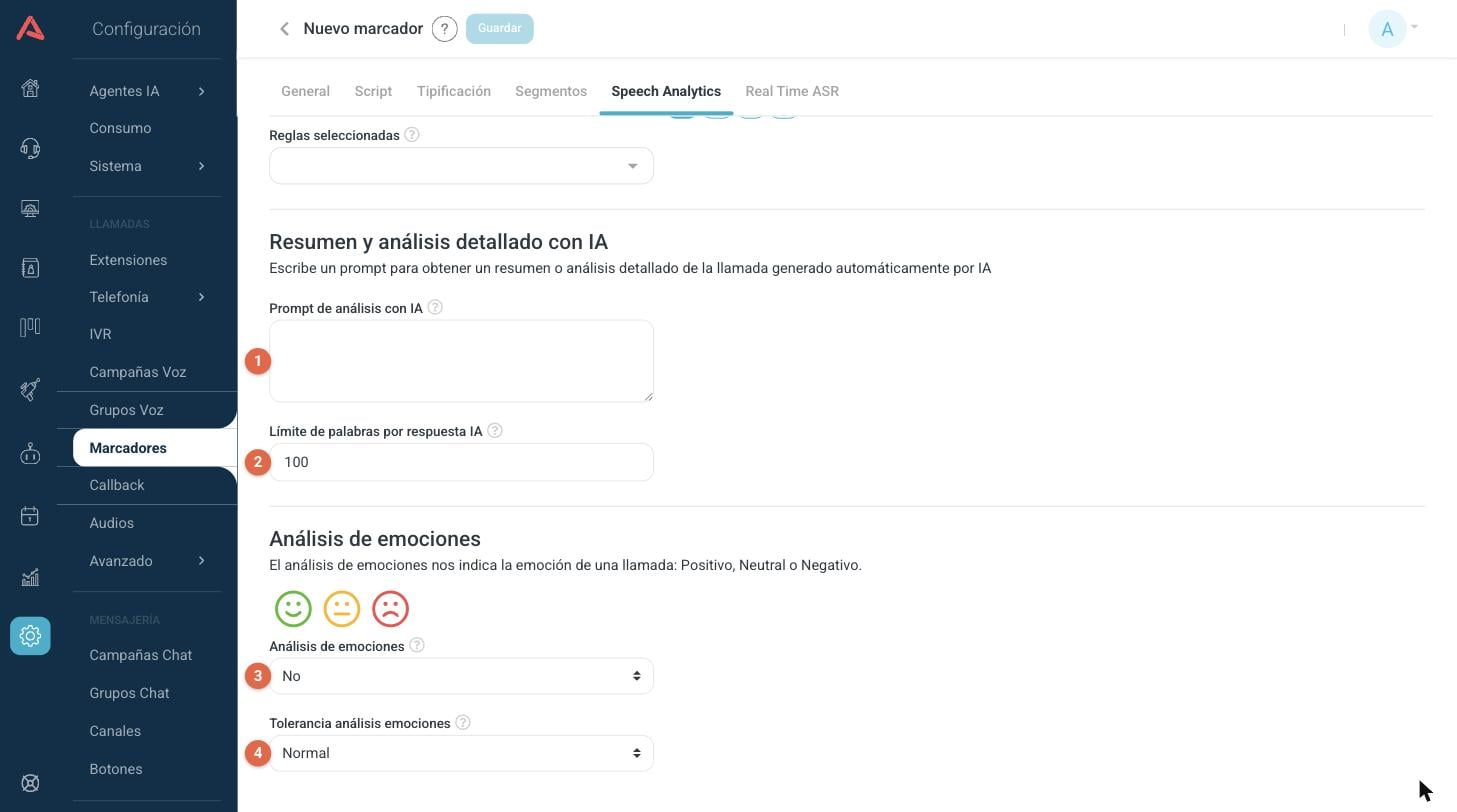
- 1 AI analysis prompt. What you ask it to tell you about each call.
- 2 Limit of words per AI response. How long that summary is allowed to be.
- 3 Emotion Analysis. Whether each call ends up marked positive, neutral or negative.
- 4 Emotion Analysis Tolerance. How easily a call gets marked as negative.
A prompt that asks for specific things gets you far more than one that asks for "a summary". Asking for the reason for the call, the commitment that was reached and whether anything was left open gives you answers you can read down a column and compare across calls.
Real Time ASR: transcribing as it happens
The Real Time ASR tab is the live version of the above. Instead of working on the recording once the call is over, it transcribes while the conversation is happening, which is what lets the agent's copilot follow what is being said.
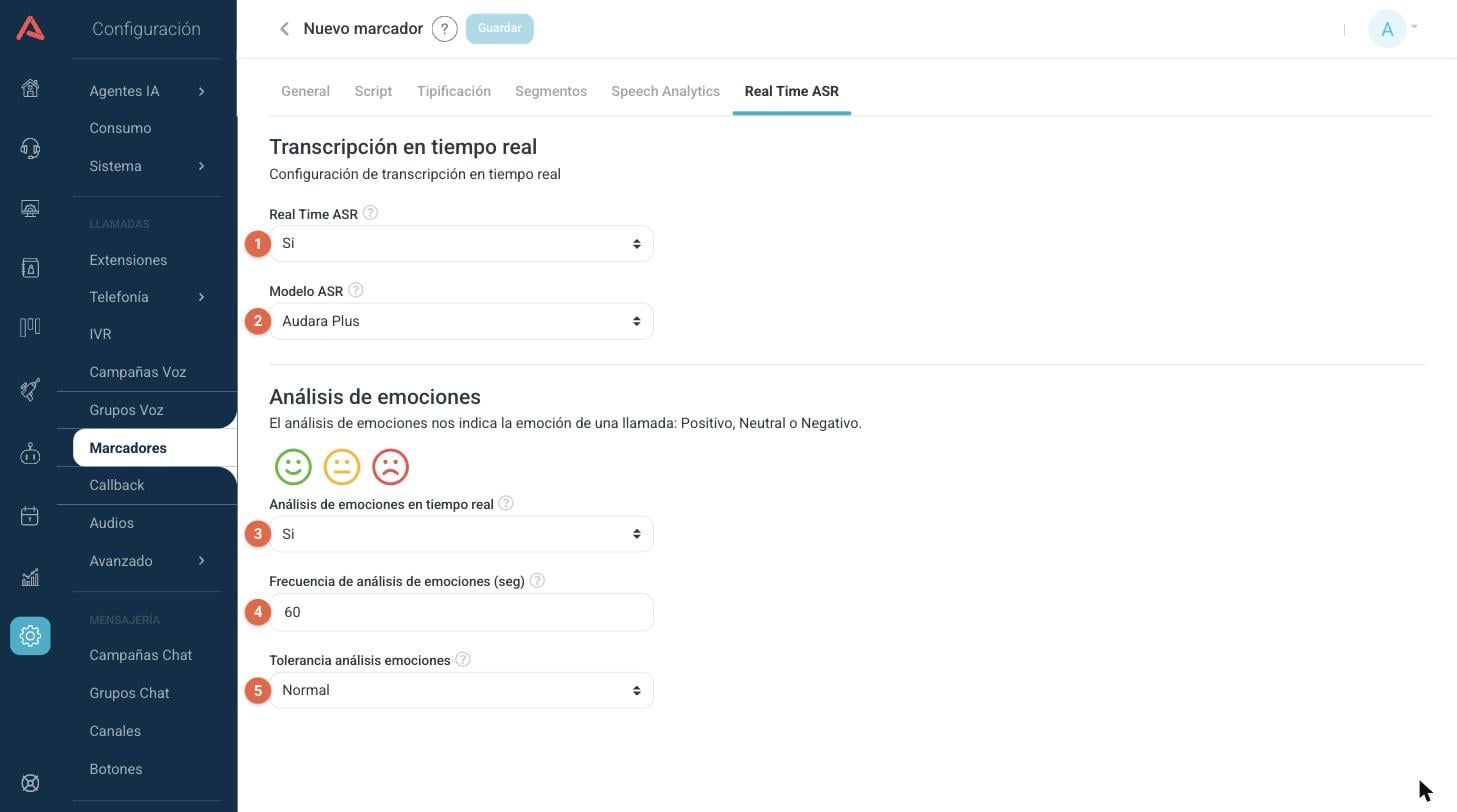
- 1 Real Time ASR. Switches live transcription on.
- 2 ASR Model. Which model does the transcribing.
- 3 Real-time Emotion Analysis. Marks the mood of the call as it goes.
- 4 Emotion analysis frequency (sec). How often it takes another look.
- 5 Emotion Analysis Tolerance. The same as in Speech Analytics, but for the live analysis.
With Real Time ASR switched on, the automatic transcription settings on the Speech Analytics tab are ignored. The calls are already transcribed live, so there is nothing left to transcribe afterwards. Audara tells you so on the tab.
The Manual dialer
The Manual dialer is the simplest of them all, which is why it is easy to overlook. It has no contact list, no segments and no CRM: it is the permission for an agent to dial numbers themselves from their panel, with a typification at the end of each call.
Its form comes down to Name and Dialer Type in General, plus the full Typification tab. It is for the work that does not fit into a campaign, when somebody has to return a one-off call and you still want it recorded like all the rest.